How to Print Excel Sheets on One Page Easily

Are you tired of printing your Excel worksheets and finding that the pages cut off or span multiple pages, making it harder to review or present the data?
Understanding Your Printing Needs

Before diving into how to adjust your Excel sheet for printing on one page, it’s crucial to understand why you might need to print data within a single page:
- To create a clean and concise visual summary of data for presentations or meetings.
- To save paper and ink by minimizing the number of sheets printed.
- To ensure that all data is captured in one glance, reducing the need to flip through several pages.

Adjusting Margins for Optimal Printing

Margins define the white space between the data and the edge of the page. Here’s how to adjust them:
- Go to the Page Layout tab.
- Click on Margins and choose Custom Margins.
- Set Top, Bottom, Left, and Right margins to a minimal value, keeping enough space for a header and footer if necessary.
📏 Note: Be cautious not to set margins too small as it might make the text hard to read or cause the print to be cut off if printer margins are ignored.
Using the Print Area and Scaling

Defining a print area focuses printing on specific cells. Here’s how you can do it:
- Select the range of cells you want to print.
- Go to Page Layout and click Print Area, then Set Print Area.
To scale your data:
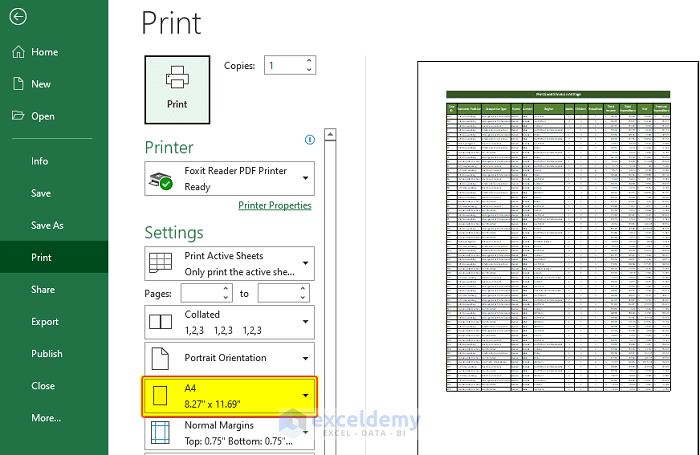
- Under Page Layout, in the Scale to Fit group, choose Width or Height and set them both to 1 page.
📐 Note: If scaling your data results in unreadable or too small text, consider reducing the amount of data or changing to a landscape layout.
Orienting Your Page

Change the page orientation to:
- Portrait for longer data sets with fewer columns.
- Landscape for data with many columns to fit more horizontally.
- Navigate to Page Layout.
- Click on Orientation and select your preference.

Minimizing Header and Footer Size

To conserve space:
- Go to Page Layout > Print Titles.
- Under Header/Footer, choose options with minimal space.
Adjust header/footer settings to include essential information only:
- Date and time, if needed.
- Page numbers for multi-page documents.
- A concise file name or worksheet title.
🔍 Note: Headers and footers can be useful for reference but should not take up valuable printing space. Keep them to a minimum.
Utilizing Page Break Preview

Page Break Preview helps you see where page breaks will occur:
- Go to View and select Page Break Preview.
- Manually drag blue dotted lines to adjust where your page will break.
- Return to Normal view when done adjusting.
Here’s how to do it:
| Step | Description |
|---|---|
| 1 | Access Page Break Preview |
| 2 | Adjust blue lines to force a new page break |
| 3 | Exit Page Break Preview to return to Normal view |

Tips for Organizing Data Efficiently

To maximize space utilization:
- Remove unnecessary columns or rows.
- Use Data > Group to collapse detailed rows and show summaries only.
- Reduce font size to fit more text, but ensure it remains legible.
- Merge cells where content can be combined.
Wrapping Up

By following these steps, you can easily print your Excel sheets on one page, making your data more accessible, readable, and efficient. Adjusting print settings, scaling, orientation, and organizing data effectively ensures that your information is presented in the best possible way.
Why does my Excel sheet print across multiple pages even after scaling?

+
If your Excel sheet is still printing across multiple pages, it could be due to excessive data, unoptimized page settings, or if the printer settings do not account for your customizations.
Can I print multiple sheets on one page in Excel?

+
Excel does not have a built-in feature to print multiple sheets on one page. However, you can manually copy and paste the necessary data into a single sheet or use PDF printers that allow arranging sheets.
How do I ensure that my headers appear on each printed page?

+
Go to Page Layout > Print Titles, then under the Sheet tab, select the rows or columns to repeat at the top of each printed page.


