Effortlessly Pull Data from Another Excel Sheet

Mastering the art of working efficiently with Microsoft Excel can significantly boost your productivity, especially when you're dealing with large datasets spread across multiple sheets. Whether you're an accountant, data analyst, or just someone who loves organizing personal finances, knowing how to pull data from one Excel sheet to another is a game-changer. This guide will walk you through the various methods to achieve this, providing step-by-step instructions and key tips to optimize your workflow.
Why Pull Data Between Sheets?

Before diving into the technicalities, let’s understand the advantages of pulling data from one Excel sheet to another:
- Data Consolidation: Combine data from various sources into a single sheet for better analysis and visualization.
- Automation: Reduce manual data entry errors and save time by automating data retrieval processes.
- Refreshed Data: Keep your dashboard or report sheets updated with the latest information from source sheets.
Methods to Pull Data Between Sheets

Here are several methods to accomplish this task, each suited to different scenarios:
1. Using Formulas

Excel offers several functions to reference data from different sheets within the same workbook or even from different workbooks. Here’s how you can use some common functions:
- Direct Reference: Use the syntax
'SheetName'!CellReferenceto pull data. For example, if you want to reference cell A1 from Sheet2 in Sheet1, you'd write=Sheet2!A1. - VLOOKUP or HLOOKUP:
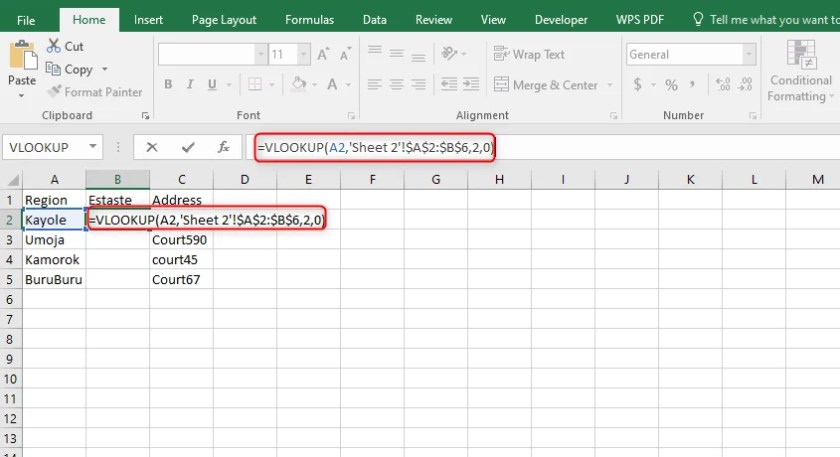
- VLOOKUP: For vertically looking up values. The formula is
=VLOOKUP(lookup_value, table_array, col_index_num, [range_lookup]). - HLOOKUP: For horizontal lookups, using
=HLOOKUP(lookup_value, table_array, row_index_num, [range_lookup]).
- VLOOKUP: For vertically looking up values. The formula is
- INDEX and MATCH: These can be more powerful when combined. INDEX returns the value of a cell in a table based on the column and row number, while MATCH searches for a lookup value and returns its position. Together, they act like a more flexible VLOOKUP or HLOOKUP.
📝 Note: When pulling data from another workbook, ensure that the source workbook is open, or use absolute path references.
2. Power Query

Power Query is Excel's data transformation and preparation engine. Here’s how to use it for data pulling:
- Select Data > Get Data > From File > From Excel Workbook, then choose your source workbook.
- Once the Navigator window appears, select the sheet or table from which you want to pull data.
- Click Load or Transform Data to work with the data in Power Query Editor before loading it into your Excel sheet.
⚠️ Note: Power Query is available in Excel 2016 and later versions. For earlier versions, you'll need to use the Excel add-in.
3. Using VBA Macros

For repetitive or complex tasks, VBA (Visual Basic for Applications) can automate the data pulling process. Here's a simple example:
Sub PullDataFromSheet()
    Dim sourceSheet As Worksheet
    Dim targetSheet As Worksheet

    Set sourceSheet = ThisWorkbook.Sheets("Sheet2")
    Set targetSheet = ThisWorkbook.Sheets("Sheet1")

    With sourceSheet
        targetSheet.Range("A1") = .Range("A1").Value
        ' More data pulling as required
    End With
End Sub
This macro copies the value from cell A1 in Sheet2 to Sheet1.
Data Connection Techniques

Beyond formulas, Excel offers connection methods for dynamic data updates:
- External Data Connections: Set up connections to external databases or web services to automatically refresh your Excel data.
- Power BI: Although not directly part of Excel, you can use Power BI to connect to multiple data sources, including Excel sheets, and then link back to Excel with Power Query.
📝 Note: External data connections require careful setup to ensure security and reliability of the data source.
Best Practices for Pulling Data

- Use Named Ranges: Instead of cell references, use named ranges for easier management and less error-prone data pulling.
- Error Handling: Implement error checks to ensure your data pulling doesn’t break due to missing or changed data.
- Data Validation: Before pulling data, validate that the source data meets certain criteria or formatting requirements.
- Documentation: Document your methods, especially if using VBA or Power Query, to make your work replicable and maintainable.
Summing up our journey through the techniques to pull data from one Excel sheet to another, it’s clear that Excel provides a rich set of tools for managing and analyzing data. From simple cell references to powerful queries and automation, you can adapt your method to fit the complexity of your data needs. Remember, while these techniques can streamline your work, they also require a bit of learning and practice to master. Keep exploring Excel’s capabilities, and soon, pulling data will be as natural as entering it.
Can I pull data from a closed Excel workbook?

+
Yes, using VBA or Power Query with proper setup, you can pull data from a closed workbook. For VBA, you’ll use ADO or OLEDB to connect to the closed file; for Power Query, you can set up a connection that refreshes data from the file without opening it.
What happens if the source data changes or is deleted?

+
If the source data changes, your references might return errors like #REF! or #N/A. If data is deleted or if the structure changes, you’ll need to update your formulas, connections, or VBA code to reflect these changes to maintain accurate data pulling.
How can I improve the performance when dealing with large datasets?

+
Performance can be enhanced by using:
- Power Query to streamline data retrieval.
- Index and Match functions instead of VLOOKUP or HLOOKUP for better lookup efficiency.
- VBA with event handlers for dynamic data updates.
- Excel options like manual calculation mode to reduce recalculation time.


