5 Simple Steps to Convert Excel to Google Sheets

Converting data from Microsoft Excel to Google Sheets is not just about switching software platforms; it's about enhancing collaboration, accessing real-time updates, and benefiting from cloud-based convenience. Whether you're transitioning from a desktop-centric work environment or simply exploring more collaborative tools, this guide outlines five straightforward steps to convert Excel files to Google Sheets. We'll look at the process, highlight some crucial notes, and conclude with key takeaways for a seamless transition.
Preparation

- Ensure you have an active Google account.
- Have your Excel file ready. Preferably, this should be the latest version with no critical errors or issues.
Step 1: Upload to Google Drive

Start by navigating to Google Drive in your browser:
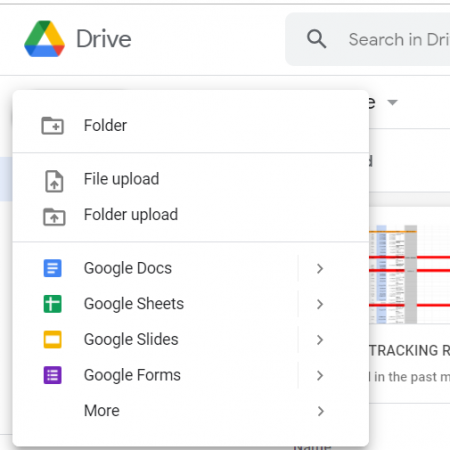
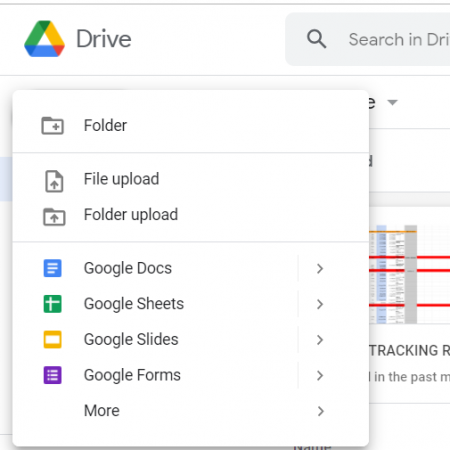
- Click on the “New” button in the left sidebar.
- Select “File upload” and choose your Excel file from your local storage.
After uploading, Google Drive will process the file to ensure compatibility with Google Sheets.
Step 2: Convert Excel to Google Sheets

Once uploaded:
- Right-click on the Excel file icon.
- Click on “Open with” and then select “Google Sheets.”
- If prompted, click “OK” to convert the file into Google Sheets format.
🔍 Note: This step creates a new Google Sheets document, keeping your original Excel file intact.
Step 3: Check for Compatibility Issues

After conversion:
- Check all formulas for compatibility. Excel functions might behave differently in Google Sheets.
- Verify formatting, especially conditional formatting rules.
- Look out for any embedded objects like charts or pivot tables which might need manual adjustments.
Step 4: Make Final Adjustments

Adjust your Google Sheets document:
- Fix any compatibility issues you’ve identified in Step 3.
- Set sharing and collaboration options as per your needs.
This step ensures your data is ready for use within Google’s ecosystem.
Step 5: Backup and Manage

Finalize your transition:
- Consider downloading the Google Sheets file in .xlsx format for backup purposes.
- Organize your Google Drive by creating a folder for these converted files or manage permissions and sharing settings.
With these steps, your data is now accessible and editable in Google Sheets, ready for enhanced collaboration.
In summary, converting Excel to Google Sheets is a straightforward process involving five key steps. From uploading your Excel file to making final adjustments and ensuring backup, the transition is manageable for anyone. This conversion not only enables cloud-based collaboration but also integrates your data with Google's suite of tools for better productivity.
Can I edit the Excel file after it’s converted to Google Sheets?

+
Yes, once the file is converted to Google Sheets, you can edit, modify, and save changes directly within Google Sheets.
Will all Excel features be supported in Google Sheets?

+
While Google Sheets supports most Excel features, there might be some advanced functions or formatting that aren’t compatible or behave differently. Always review your document after conversion.
How do I share the converted Google Sheets file with others?

+
Click the “Share” button in the top-right corner of Google Sheets. You can then enter email addresses, set permissions (View, Edit, or Comment), and generate shareable links.


