Lock Your Excel Sheet: Make it Non-Editable Easily

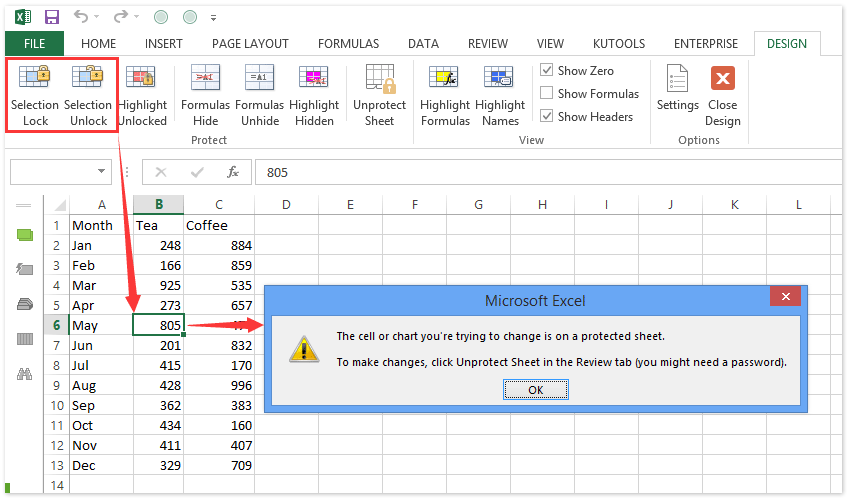
Imagine you have spent hours crafting a complex Excel worksheet, perfecting formulas, and arranging data in just the way you need. The last thing you want is for someone to accidentally, or worse, intentionally modify it. Whether you're sharing your work for collaboration or just preserving it for future use, knowing how to protect an Excel sheet can be a lifesaver. In this guide, we will explore different methods to make your Excel sheet non-editable, ensuring your work remains intact.
Why Lock an Excel Sheet?

Before diving into the how, let's understand why you might need to lock an Excel sheet:
- Prevent Data Corruption: Locking prevents unintended edits or deletions that could corrupt your data or break formulas.
- Control Access: You might want some users to have view-only access while others can modify the sheet.
- Ensure Data Integrity: When sharing workbooks, locking ensures that the original data structure remains unaltered.
Method 1: Basic Protection through Sheet Protection

This is the simplest and most commonly used method to protect your Excel sheet:
- Open your Excel workbook.
- Click on the sheet tab you want to protect.
- Go to the Review tab on the Ribbon.
- Click on 'Protect Sheet'.
- In the dialog box:
- Set a password to prevent the sheet from being unprotected by others.
- Choose what actions are allowed. By default, only selecting locked cells is permitted.
- Click 'OK'. Your sheet is now protected.
💡 Note: Remember your password. If you forget it, you won't be able to edit the protected sheet again without special recovery tools or Excel support.
Method 2: Protecting the Workbook Structure

If you want to ensure that no one can add, delete, hide, or unhide worksheets, protect the workbook structure:
- Open your Excel workbook.
- Go to the Review tab.
- Click on 'Protect Workbook'.
- Select 'Structure' and optionally set a password.
- Click 'OK'.
Method 3: Cell-Level Protection

For more granular control, you can lock specific cells while allowing others to be edited:
- Select the cells you want to protect.
- Right-click and choose 'Format Cells', or use the shortcut Ctrl+1.
- Go to the 'Protection' tab and ensure 'Locked' is checked (it is by default).
- Now, protect the sheet as explained in Method 1.
This way, only the unlocked cells will be editable when the sheet is protected. Here's a simple visual:
| Unlocked | Locked |

⚠️ Note: Cells are locked by default. You only need to unlock cells you intend to edit after protection.
Method 4: Using Password Protection

To take security to the next level, you can encrypt the entire workbook with a password:
- Go to File > Info.
- Click 'Protect Workbook' and then 'Encrypt with Password'.
- Enter a password in the dialog box.
- Click 'OK' and then re-enter the password for confirmation.
- Save your workbook.
Anyone opening this workbook will need to enter the password to even view it.
Method 5: Protecting with VBA

For those comfortable with macros, Visual Basic for Applications (VBA) offers robust protection options:
Sub ProtectSheet()
    With Worksheets("Sheet1")
        .Protect Password:="YourPassword", DrawingObjects:=True, Contents:=True, Scenarios:=True
    End With
End Sub
Copy this code into the VBA editor, change "Sheet1" to your sheet's name, and "YourPassword" to the desired password, then run the macro.
Best Practices for Sheet Protection

When locking your Excel sheets, keep these best practices in mind:
- Communicate: Let users know which parts of the sheet are locked and why.
- Back Up: Always keep an unprotected version for your records.
- Password Management: Use strong passwords and consider sharing them securely if needed.
- Version Control: If working in a team, ensure you're all on the same page about edits and locks.
As we wrap up, securing your Excel spreadsheets is a fundamental aspect of maintaining data integrity and controlling who can edit your work. From simple sheet protection to more advanced techniques like cell-level control and encryption, Excel provides multiple layers of security to meet your needs. Remember to use these methods thoughtfully, keeping both your workflow and team collaboration in mind.
What happens if I forget the password to my protected sheet?

+
If you forget the password, you’ll need either to seek help from Microsoft support or use third-party tools to recover or remove the password. Always keep your passwords in a safe place or use a password manager.
Can I protect multiple sheets at once?

+
You can protect multiple sheets by going through each sheet and protecting them individually or using a VBA macro to loop through all sheets in a workbook.
Is it possible to allow some users to edit a protected sheet while others only view it?

+
Yes, you can use workbook sharing options or VBA to set different permissions for different users, although it might require more advanced setup.
Will protection stop macros from running on the sheet?

+
Sheet protection does not stop macros by default, but you can configure macro protection if necessary. Macros can interact with protected sheets using the Unprotect method with a password.
How can I know if a sheet is protected without trying to edit it?

+
You can check for a message in the status bar at the bottom of the Excel window or look for the ‘Unprotect Sheet’ option under the ‘Review’ tab, which is only visible when the sheet is protected.


