Boost Your Excel Productivity: Spacing Tips Revealed

Every professional, student, or data enthusiast knows the frustration of dealing with messy spreadsheets. Whether it's a long list of data with inconsistent spacing, cells merging in unexpected ways, or simply too much wasted space, proper spacing in Excel can be a game changer. Let's dive into how you can boost your Excel productivity with strategic spacing tips that will streamline your work, make your data more presentable, and improve readability.
Understanding Excel’s Spacing

Before we get into the specifics, it’s essential to grasp what we mean by spacing in Excel:
- Column Width: The width of columns which can directly impact how your data fits within each cell.
- Row Height: The vertical space allocated for rows, which affects how much information can be displayed at once.
- Cell Padding: The internal spacing within a cell, giving breathing room around your content.
- Indentation: Adjusting the starting point of text within cells to visually structure your data.
Adjusting Column Width

To adjust column width in Excel:
- Place your cursor on the line between the column letters on the top header.
- The cursor will change to a double-headed arrow.
- Click and drag to adjust the width to your desired size.
Alternatively, you can:
- Select the column or columns, right-click, choose “Column Width”, and enter a specific value.
- Double-click the boundary line to auto-fit the column width to the largest content in the cells.
Remember, maintaining a consistent column width not only makes your spreadsheet more visually appealing but also simplifies data navigation.
💡 Note: Auto-fitting can be particularly useful for tables with varying text lengths, but be cautious as it might lead to excessively wide columns.
Setting Row Height

Adjusting row height follows a similar process:
- Position your cursor on the line between row numbers on the left sidebar.
- When the cursor turns into a double-headed arrow, click and drag to resize.
You can also:
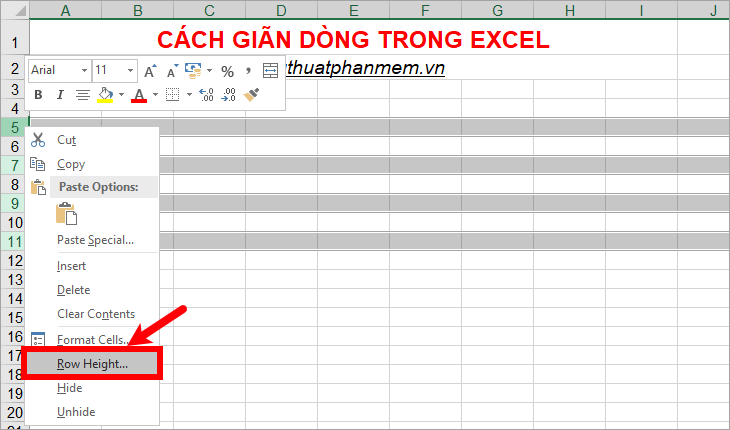
- Select the row, right-click, choose “Row Height”, and type in the desired height.
- Double-click to auto-fit the height based on the content of the cells.
Increasing row height is particularly useful when dealing with cells containing images, comments, or when you need more vertical space for multi-line text.
Cell Padding for Better Readability

While Excel doesn’t have a built-in padding option, you can simulate cell padding:
- Manually add spaces before and after the content in each cell.
- Use the indent feature (increase/decrease indent icons on the Home tab) for left and right padding.
- Apply cell borders for a visual effect of spacing.
Proper cell padding enhances readability, especially in crowded spreadsheets.
✏️ Note: For a professional look, consider using cell styles that mimic padding. Excel’s custom number formats can also be used to add spaces or indentation to your numbers or text.
Indenting for Structured Data

Indentation can help you visually organize data:
- Select the cells you want to indent.
- Click the ‘Increase Indent’ or ‘Decrease Indent’ buttons under the ‘Alignment’ section in the Home tab.
Indentation is particularly useful for outlining hierarchies in your data or when you’re organizing bullet lists or numbered lists within Excel.
Advanced Spacing Techniques

Let’s delve into some more sophisticated techniques for spacing in Excel:
Conditional Formatting for Space Management

Conditional formatting can:
- Highlight rows with specific criteria to create visual gaps or groupings.
- Automatically adjust cell formatting based on content or values.
This not only helps in managing space but also in enhancing data analysis by making patterns more visible.
Merging Cells for Visual Effect

Merging cells can:
- Create headers that span multiple columns or rows for a clean look.
- Visually group related data.
However, be cautious with merging as it can complicate data analysis and sorting later on.
Text Wrapping and Alignment

Excel’s text wrapping and alignment features:
- Allow text to wrap within cells, preventing it from spilling over into adjacent cells.
- Align text within cells to improve the overall layout and readability.
This can be particularly useful when working with large amounts of text data.
Wrapping up, mastering Excel's spacing tools can greatly enhance your productivity. From adjusting column width and row height to implementing padding, indentation, and advanced formatting, you now have the tools to make your spreadsheets both functional and aesthetically pleasing. Remember, the goal is not just to present data but to do so in a way that makes it easier to interpret, analyze, and use. Proper spacing techniques in Excel will not only make your work look more professional but will also contribute to better collaboration and data management.
How can I quickly adjust multiple columns to a uniform width?

+
To adjust multiple columns to the same width, select all the columns you want to change, right-click on one of the column headers, choose “Column Width” and enter the desired width. This will apply the width to all selected columns uniformly.
Why should I use indentation in Excel?

+
Indentation in Excel helps to visually structure data, particularly when dealing with hierarchical lists, outlines, or when you need to show dependencies or categorization within your data.
Can I remove spacing in Excel if I find it unnecessary?

+
Yes, you can remove spacing by adjusting column width and row height back to smaller sizes, using the “AutoFit” function, or manually removing added spaces or formatting applied for padding.


