Find and Remove Excel Column Duplicates Easily

Finding and Removing Excel Column Duplicates Made Simple

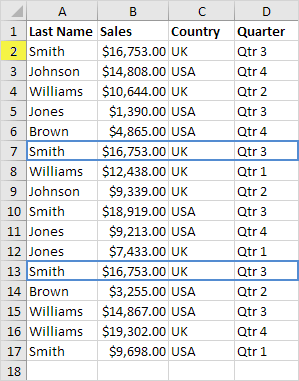
If you work with large datasets in Microsoft Excel, dealing with duplicates is an almost inevitable challenge. Duplicate data can clutter your spreadsheets, skew analyses, and lead to errors in data interpretation. In this comprehensive guide, we'll explore straightforward methods to find and remove Excel column duplicates easily, ensuring your data remains clean and accurate for better decision-making.
Understanding Excel Duplicates

Before diving into the methods, let’s clarify what we mean by duplicates in Excel:
- Exact Duplicates: These are cells with the same content, including formatting and all attributes.
- Partial Duplicates: These might be identical except for case sensitivity or minor variations in formatting.
💡 Note: When discussing duplicates, we're focusing on the data in cells rather than their formatting.
Method 1: Using Excel’s Built-in Remove Duplicates Tool

Excel provides a straightforward tool for removing duplicates:
- Select the range of data or entire column where you want to remove duplicates.
- Go to the Data tab on the Excel Ribbon.
- Click on Remove Duplicates.
- If your selection includes headers, ensure you check “My data has headers.”
- Select which columns to check for duplicates. If you only want to focus on one column, uncheck all but that one.
- Click OK. Excel will remove duplicate rows or highlight them for deletion based on your settings.
🚨 Note: This method removes entire rows if any cell in the row is a duplicate. If you want to remove only specific columns, consider the following methods.
Method 2: Advanced Filter to Find Duplicates

For more control over which duplicates to remove:
- Select the column or data range you’re working with.
- Go to the Data tab.
- Choose Advanced under the “Sort & Filter” group.
- Select the “Filter the list, in-place” option.
- In the “Criteria range” box, enter the column or range you want to filter.
- Check “Unique records only.”
- Click OK. Excel will filter out all duplicates, leaving only unique values visible.
Method 3: Using Conditional Formatting for Visual Inspection

If you prefer to inspect duplicates before deciding what to do with them:
- Select the column or range of data to check for duplicates.
- Go to Home tab > Conditional Formatting > New Rule.
- Choose “Use a formula to determine which cells to format.”
- Enter the formula to check for duplicates, like this:
=COUNTIF(A2:A1000,A2)>1(Assuming data starts from cell A2). - Set the format to highlight duplicates, and click OK.
Method 4: Using Excel Formulas to Find Duplicates

If you need to keep track of duplicates in a separate column:
- Insert a new column next to the data column you want to check for duplicates.
- Enter this formula to flag duplicates:
=IF(COUNTIF(A:A,A2)>1,“Duplicate”,“Unique”)(Assuming your data is in column A). - Drag this formula down through all cells in the new column.
Choosing the Right Method

Your choice depends on:
- The complexity of your data.
- Whether you need to see duplicates before removing them.
- If you prefer automatic removal or need manual verification.
Each method serves a different purpose in managing duplicates:
| Method | Best For | Notes |
|---|---|---|
| Remove Duplicates Tool | Quick removal of exact duplicates | Removes entire rows, not just column data. |
| Advanced Filter | Preserving unique data in-place | Allows for filtering based on specific conditions. |
| Conditional Formatting | Visual inspection and manual decision | Non-destructive, highlights for inspection. |
| Excel Formulas | Tracking duplicates alongside data | Dynamic, updates as data changes. |

🔍 Note: For datasets with complex criteria or multiple columns involved, consider using a combination of methods for optimal results.
Final Thoughts

Navigating through the process of finding and removing duplicates in Excel can streamline your data management significantly. By implementing the techniques outlined here, you can keep your spreadsheets clean, improve data integrity, and make more informed decisions. Whether you choose the automatic removal with Excel’s built-in tool, prefer visual aids through conditional formatting, or need to track changes dynamically with formulas, these methods cater to various data scenarios, ensuring that your work with Excel is both productive and accurate.
What should I do if Excel is not removing all duplicates?

+
Check for variations in data, like different formatting, trailing spaces, or case sensitivity. Ensure you’re not missing data in columns that might affect the duplicate detection process.
Can I recover data that was accidentally removed as duplicates?

+
If you’ve used the Remove Duplicates tool, the action can’t be undone without using “Undo” (Ctrl + Z) immediately after. However, keeping a backup of your data before operations like this is always advisable.
Is it possible to remove duplicates in multiple columns at once?

+
Yes, the Remove Duplicates tool allows you to check for duplicates in multiple columns. Just select all relevant columns when you set up the removal criteria.


