Unlock Excel Security: Password-Protect Your Sheet Now

Excel is a powerful tool used by millions worldwide for various purposes, from simple household budgeting to complex data analysis for businesses. One of its most useful features for safeguarding sensitive information is the ability to password-protect sheets. Protecting your Excel sheets ensures that your data remains confidential and secure, accessible only to those who know the password. In this comprehensive guide, we'll delve into how you can protect your Excel sheets with passwords effectively.
Why Password-Protect Your Excel Sheets?

Before we get into the “how,” let’s understand the “why”:
- Prevent Unauthorized Access: Password protection ensures only authorized users can access, modify, or view the content.
- Protect Sensitive Information: Whether it’s personal financial information, proprietary business data, or confidential reports, ensuring only the right eyes see it is crucial.
- Reduce Errors: By locking certain areas, you prevent accidental changes, maintaining data integrity.
- Maintain Workbook Integrity: For large and shared workbooks, password protection can help keep the structure intact, preventing unauthorized edits.
How to Password-Protect an Excel Sheet

Here’s a step-by-step guide on how you can password-protect your Excel sheet:
- Open Your Workbook: Start by opening the Excel workbook where you want to protect a sheet.
- Select the Sheet: If you have multiple sheets, click on the sheet tab you wish to protect.
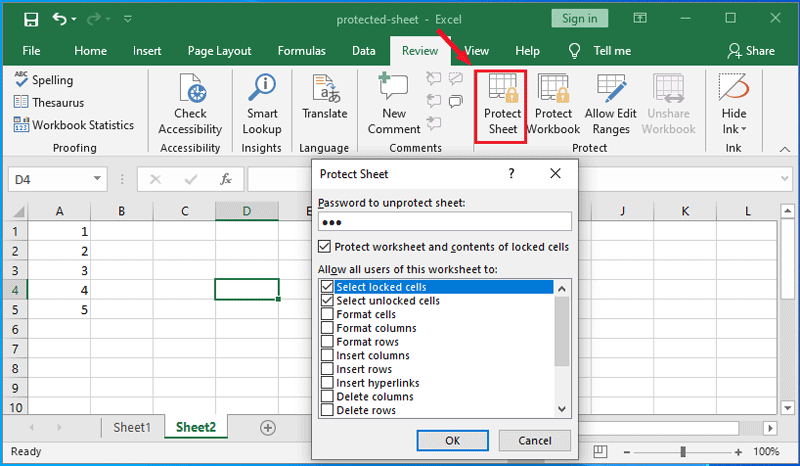
- Go to the Review Tab: In the ribbon at the top, click on the “Review” tab.
-
Protect Sheet: Click on “Protect Sheet.” A dialog box will appear with several options.
- Password to Unprotect Sheet: Here, you’ll set a password which will be required to unprotect the sheet later.
- Allow Users to: Select what actions users can still perform on the protected sheet.
- Confirm Password: You’ll be prompted to re-enter your password to confirm it. Remember, if you forget this password, you might lose access to your sheet permanently, so make it memorable yet secure.
- Save Your Workbook: After setting up protection, save your workbook to ensure the changes are applied.
Choosing a Secure Password

Here are some tips for choosing a password that provides strong security:
- Length: Aim for at least 12 characters.
- Variety: Include uppercase and lowercase letters, numbers, and special characters.
- Avoid Common Words: Passwords like “password123” or “123456” are easily guessable.
- Change Regularly: Even with a strong password, update it periodically for added security.
Options for Sheet Protection

Excel offers several options for how you protect your sheets:
| Protection Option | Description |
|---|---|
| Protect Sheet | Prevents unauthorized changes to cells, moving cells, or altering formatting. |
| Protect Workbook | Secures the structure of the workbook, like adding, removing, or hiding sheets. |
| Share Workbook with Protection | Allows multiple users to edit the workbook at the same time while maintaining some protection controls. |

How to Share an Excel File Securely

If you need to share your Excel file, consider the following:
- Password-Protected File: You can also password-protect the entire workbook file from the File menu > Info > Protect Workbook > Encrypt with Password.
- Cloud Services: Use cloud services like OneDrive or Dropbox to share files. They often have built-in security features.
- Email with Password: If emailing, provide the password separately for added security.
⚠️ Note: Always ensure your passwords are not easily guessable and keep them confidential. Losing a password can mean permanent loss of access to your data.
Troubleshooting Common Issues

Here are solutions to common issues you might encounter with Excel sheet protection:
- Forgotten Password: If you’ve forgotten your password, there’s no direct way to recover it. Keep backups or use third-party recovery tools (though they’re not always reliable).
- Protected Workbook, Can’t Save: If you’re working on a protected workbook, check the permissions allowed under “Review” > “Allow Users to.”
- VBA Macro Issues: Macros might conflict with protection settings. Ensure your macros are designed to work with protected sheets or use VBA to manage protection.
In summary, password-protecting an Excel sheet is a straightforward yet critical step in securing your data. Whether you're dealing with personal finance, business reports, or any sensitive data, protecting your sheets helps maintain confidentiality, reduces the risk of accidental changes, and preserves the integrity of your work. Remember to choose strong, memorable passwords, consider sharing methods, and keep in mind that while protection provides a layer of security, it should be part of a broader data security strategy.
Can I protect specific cells instead of the entire sheet?

+
Yes, you can protect individual cells or ranges within a sheet. First, unlock the cells you want to keep editable, then protect the sheet, and select which actions users are allowed to perform.
What happens if I forget my Excel sheet password?

+
If you forget your password, there’s no built-in recovery method in Excel. You might have to use third-party password recovery tools, though they’re not always effective.
Is it possible to protect multiple sheets at once?

+
Excel doesn’t provide an option to protect multiple sheets simultaneously directly through the UI. However, you can use VBA scripting to automate this process for multiple sheets.


