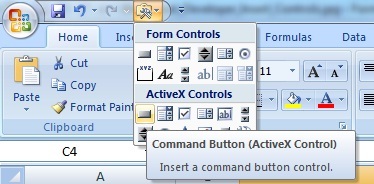
5 Simple Steps to Add Command Button in Excel

Adding a command button in Microsoft Excel can significantly enhance the functionality and interactivity of your spreadsheets. Whether you’re aiming to automate processes, simplify data entry, or provide users with direct access to macros, incorporating command buttons is a game changer. Here are five straightforward steps to add command buttons to your Excel workbook:
1. Open Developer Tab

Before you can add a command button, you need to ensure the Developer tab is visible:
- Open Excel.
- Go to File > Options.
- In the Excel Options window, click on Customize Ribbon.
- Under the Customize the Ribbon list, check the box next to Developer, then click OK.
💡 Note: If you don’t see the Developer tab, you might not have permission to edit the workbook or might be using a different version of Excel where the Developer tab is hidden by default.
2. Insert a Command Button

Now that the Developer tab is accessible:
- Navigate to the Developer tab.
- Click on Insert.
- Under Form Controls, click the Button icon.
- Drag your cursor on the worksheet where you want to place the button.
📌 Note: Ensure you have enough space around the button for users to interact with it comfortably.
3. Assign a Macro

After placing the command button:
- The Assign Macro dialog box will appear.
- Choose an existing macro from the list or create a new one by selecting New.
- If creating a new macro, write your VBA code using the VBA editor.
- Click OK or Close to finish.
Here is a simple example of a VBA macro that displays a message box:
Sub Button1_Click()
    MsgBox “Hello, Excel User!”, vbInformation, “Welcome!”
End Sub
4. Customize Your Button

After assigning a macro, you can customize the button:
- Right-click on the button to access its properties.
- Change the caption, font, color, and other properties as needed.
- To resize or reposition, drag the edges of the button while in edit mode.
🌟 Note: Remember to keep the button visually intuitive to ensure users can easily interact with it.
5. Test and Distribute

Ensure everything works as intended:
- Test the button by clicking on it. Verify the macro runs as expected.
- If the workbook will be shared, save it as a Macro-Enabled Workbook (xlsm file format).
In these steps, we’ve covered how to add a command button to an Excel worksheet, assign it a macro, customize its appearance, and ensure it functions correctly. These simple actions can automate repetitive tasks, boost productivity, and make your spreadsheets more interactive.
To wrap up, incorporating command buttons into your Excel spreadsheets can dramatically improve functionality, providing a more user-friendly interface for those who use your workbook. It allows for automation, streamlines processes, and can even guide users through complex operations with the help of intuitive buttons.
Can I add multiple command buttons in one worksheet?

+
Yes, you can add as many command buttons as needed on a single worksheet. Just repeat the process outlined above for each button you wish to add.
How do I edit or delete a command button after it’s been created?

+
Right-click on the button, choose ‘Properties’ to edit, or ‘Cut’ or ‘Delete’ to remove the button. Remember to be in design mode if you’re editing a button’s properties.
What if my macros don’t work when clicking the command button?

+
Check if macros are enabled in the workbook settings under File > Options > Trust Center > Trust Center Settings > Macro Settings. Also, ensure you saved the workbook in a macro-enabled format (.xlsm).
Can I change the button icon?

+
Excel command buttons from the Form Controls don’t support custom images directly, but you can use ActiveX controls for icons or opt for other workarounds like overlaying shapes.


