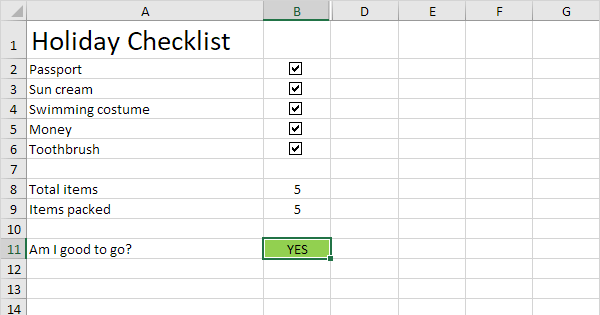
Master Excel: Add Checkboxes Effortlessly

In an era where productivity and efficiency are paramount, Microsoft Excel continues to be a cornerstone for data organization and manipulation. Among its myriad features, the ability to add checkboxes can significantly enhance the interactivity and functionality of your spreadsheets. Whether you're managing a to-do list, creating an interactive report, or conducting surveys, checkboxes provide an intuitive way to input binary data. Here's how you can master adding checkboxes in Excel effortlessly.
Step-by-Step Guide to Adding Checkboxes

Adding checkboxes in Excel isn't as straightforward as some other functions, but with this guide, you'll find it both manageable and rewarding.
Preparation

- Enable Developer Tab: The Developer tab isn't visible by default. To enable it:
- Go to File > Options.
- Select Customize Ribbon.
- Check the box next to Developer in the Main Tabs.
- Click OK.
📝 Note: This step is only necessary if you haven't previously enabled the Developer tab.
Inserting Checkboxes

- Place Checkboxes:
- Go to the Developer tab.
- In the Controls group, click Insert.
- Under Form Controls, click on the Checkbox icon.
- Drag your cursor on the sheet where you want the checkbox to appear.
Customizing Your Checkboxes

- Adjust Properties: To adjust the properties of your checkbox:
- Right-click on the checkbox and choose Edit Text to change the label.
- Right-click again and select Format Control to set properties like size, font, or linking the checkbox to a cell.
🔖 Note: When linking a checkbox to a cell, ensure the cell is not already part of a complex formula to prevent overwriting.
Using Checkboxes in Your Spreadsheet

- Track Checked Items: Once checkboxes are linked, any checked box will automatically input TRUE or FALSE into the linked cell. This can be used for:
- Conditional formatting based on checkbox status.
- Counting or summarizing data based on checked items.
| Function | Formula | Application |
|---|---|---|
| Count Checked Boxes | =COUNTIF(A1:A100,TRUE) | Counts the number of checked boxes in a range. |
| Conditional Formatting | SELECT Home > Conditional Formatting | Format cells based on checkbox status. |

Advanced Checkbox Techniques

- Interactive Dashboard: Use checkboxes to toggle between different sets of data or visualizations.
- Data Validation: Ensure only checkboxes are used in specific cells by:
- Select the cells where you want to limit input.
- Go to Data > Data Validation.
- Allow List from the drop-down, and under Source, type TRUE,FALSE.
While the process to add checkboxes might seem daunting initially, the result is well worth the effort, offering a dynamic way to handle data. With practice, you'll find this feature indispensable for making your Excel workbooks more user-friendly and functional.
Why can’t I see the Developer tab in Excel?

+
The Developer tab is hidden by default. You must enable it through Excel Options > Customize Ribbon to make it visible.
Can I link multiple checkboxes to a single cell?

+
Directly, no. Each checkbox can only be linked to one cell, but you can use formulas to summarize the states of multiple checkboxes into one cell.
How can I use checkboxes for conditional formatting?

+
Link your checkbox to a cell, then apply conditional formatting rules based on whether the cell is TRUE or FALSE to format other cells in your spreadsheet.


