Rename Excel Sheets Easily: Step-by-Step Guide

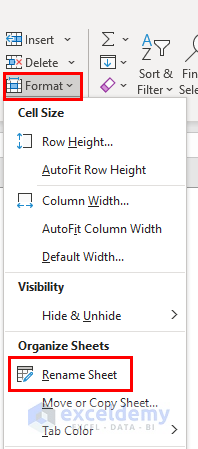
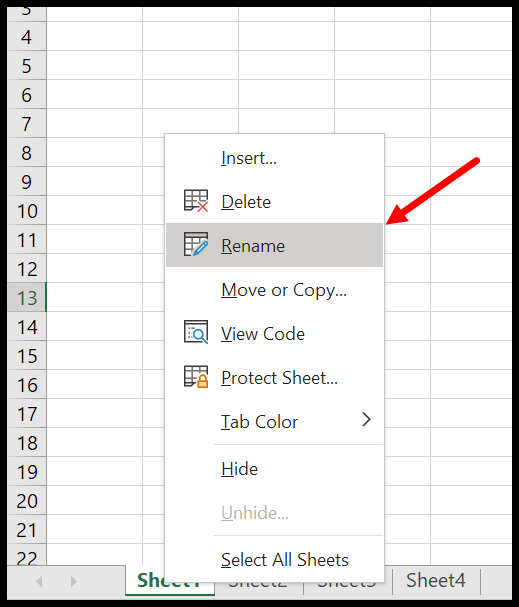
If you work with Microsoft Excel, you know how essential it is to manage multiple sheets efficiently. Renaming Excel sheets can help you organize your data better, making it easier to navigate through complex workbooks. Whether you're an Excel novice or an experienced user looking to streamline your workflow, this step-by-step guide will show you various methods to rename Excel sheets with ease.
Why Rename Excel Sheets?

Renaming Excel sheets isn’t just about keeping things neat. Here are some reasons why it’s beneficial:
- Improved Organization: Clear names help you quickly identify the contents of each sheet.
- Enhanced Collaboration: When sharing workbooks, intuitive sheet names aid others in understanding the workbook structure.
- Error Reduction: Well-named sheets reduce the risk of working on the wrong data.
Method 1: Renaming a Sheet Manually

The simplest way to rename a sheet is through manual input. Here’s how:
- Double-click the sheet tab you want to rename. This action will highlight the current name.
- Type the new name for the sheet. Keep in mind the limitations: maximum length is 31 characters and avoid using certain special characters like :, \ or /.
- Press Enter or click away from the tab to apply the new name.
That’s all there is to it!
Method 2: Using VBA for Bulk Renaming

For those dealing with workbooks containing many sheets, manual renaming can be time-consuming. Visual Basic for Applications (VBA) provides a way to automate this process. Here’s how you can do it:
- Open the Visual Basic Editor by pressing Alt + F11 or by navigating through Developer > Visual Basic.
- Insert a new module by right-clicking any of the objects in the Project Explorer, selecting Insert, and then Module.
- Copy and paste the following VBA code into the module:
Sub RenameSheets()
    Dim ws As Worksheet
    Dim count As Integer
    count = 1
    For Each ws In ThisWorkbook.Worksheets
        If Not ws.Name = “Sheet1” Then
            ws.Name = “Sheet” & count
            count = count + 1
        End If
    Next ws
End Sub
- Close the VBA editor, and run the macro by going to Developer > Macros, selecting RenameSheets, and clicking Run.
This code will rename all sheets except the first one, sequentially, starting from “Sheet2”.
Method 3: Renaming Sheets with Formulas

Although Excel doesn’t directly allow renaming sheets with formulas, you can use formulas to create a dynamic list of names and then manually or through VBA, update the sheet names to match these formulas:
- Create a list of names in a worksheet (e.g., in cells A1, A2, etc.).
- Use a formula in adjacent cells to format these names, for example, if your names are in A1 through A10:
- In cell B1, enter
=CONCAT(“Report-”,A1,“-”,TEXT(TODAY(),“YYYY-MM-DD”)) - Drag down the formula to fill the series.
This approach requires you to manually or programmatically rename the sheets to match these formula-driven names.
📝 Note: Using formulas to generate names doesn’t automatically update the sheet names; it merely provides a guide for manual or programmatic renaming.
Method 4: Excel Add-Ins

Several Excel add-ins exist that offer enhanced functionality, including bulk sheet renaming:
- ASAP Utilities: A popular add-in that includes a feature to rename sheets by prefix or suffix.
- Excel-Tool: Another tool that supports renaming sheets with wildcards or patterns.
While these add-ins can save time, always ensure they are compatible with your Excel version and are from reputable sources.
Customizing Sheet Names

Here are some tips to make your sheet names more intuitive:
- Use Consistent Naming Conventions: If you’re tracking sales, name sheets like “Sales_Jan”, “Sales_Feb”, etc.
- Add Dates: Include dates when appropriate to keep track of historical data, e.g., “Balance_Sheet_2023-10-01”.
- Include Summary Sheets: Rename summary sheets clearly to stand out from detail sheets, e.g., “Summary”, “Yearly_Overview”.
- Color-Coding: Use tab colors to differentiate between different categories of sheets.
Remember, these practices not only help with organization but also with future data analysis.
Organizing Excel Sheets

Once your sheets are renamed, here are some organizational tips:
- Group related sheets together by dragging and dropping their tabs.
- Use the Right-click menu to sort sheets alphabetically.
- Hide sheets you don’t need right now with a simple right-click and selecting “Hide”.
Renaming Excel sheets is more than just a cosmetic change; it's about enhancing efficiency and clarity in your data management. From manual renaming to using VBA, Excel offers various ways to manage and name your sheets effectively. Remember to use these methods judiciously, keeping in mind the purpose and structure of your workbook. By following these tips, you can ensure that your Excel workbooks remain organized, making them easier to work with and share with others.
Can I use special characters when renaming sheets?

+
Yes, but avoid using the following characters in sheet names: :, \, /, ?, *, [, and ] as they are reserved in Excel.
Is there a limit to how many sheets I can rename using VBA?

+
There’s no specific limit to the number of sheets you can rename with VBA, but large numbers can slow down your VBA code execution. Always test with a small set before applying macros on a large scale.
How do I undo a sheet name change?

+
Unfortunately, there is no built-in ‘undo’ for sheet names, but you can manually rename the sheet back to its original name or use a VBA macro to revert changes if you’ve saved the original names.


