Adjust Excel Sheet to Fit One Page Easily

Introduction to Printing Large Excel Worksheets

Large Excel worksheets often need adjustments for printing. This guide shows how to:
- Adjust page layout for printing
- Scale content to fit one page
- Use features to make printouts readable
✨ Note: This guide focuses on Microsoft Excel, but similar principles apply to other spreadsheet software.
Preparation Before Printing

To start, prepare your Excel document for printing:
- Save your work before printing.
- Check data integrity:
- Ensure all formulas are updated.
- Confirm no hidden rows or columns are unintentionally excluded.
Now, you can start optimizing the layout.
Adjusting Page Setup

1. Orientation and Paper Size

Navigate to File > Page Setup or press Alt + P > S:
- Select Orientation for either portrait or landscape.
- Choose Paper Size to match your printer’s capabilities.
2. Page Margins

Adjust margins in the Page Layout tab:
- Reduce margins to maximize printable area.
- Set consistent margins for uniformity across sheets.
3. Header and Footer

Customize headers and footers to enhance printouts:
- Include useful information like page numbers or titles.
- Check for proper alignment and readability.
📜 Note: Headers and footers affect print preview and may require adjustments for scale.
Using Scale to Fit

If your sheet exceeds one page, scaling might be necessary:
1. Auto-Fit

To auto-fit your content:
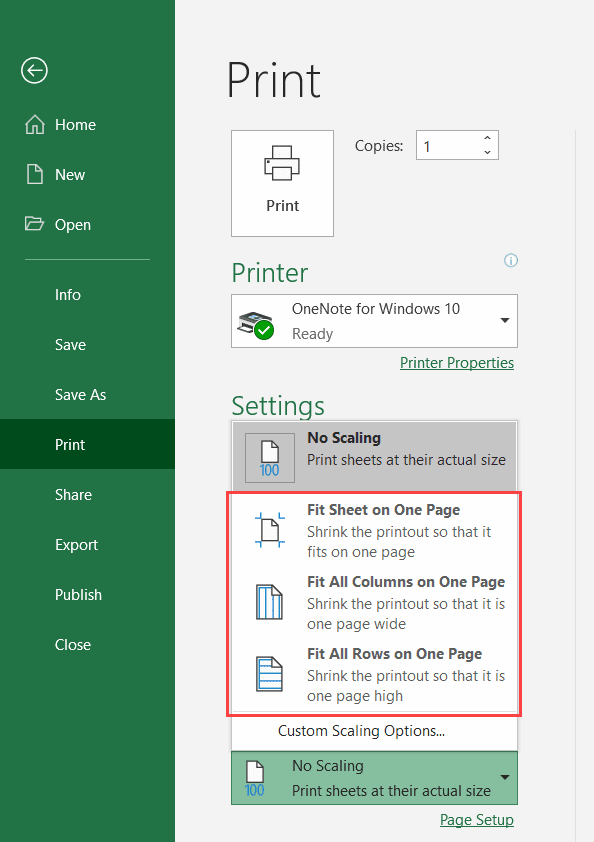
- Go to Page Layout > Scale to Fit.
- Set Width or Height to 1 page.
- Excel will automatically adjust content to fit.
2. Custom Scaling

For more control:
- In Page Setup > Scaling, choose Adjust to:.
- Adjust the percentage until your content fits on one page.
- Monitor legibility; too much scaling might make text unreadable.
3. Print Preview

Before printing:
- Use File > Print to see how your document will look.
- Check for any unintended breaks or cut-off data.
👀 Note: Don't forget to adjust scaling again if you make changes post-preview.
Optimizing Content for Printing

After adjusting layout and scaling, optimize content:
1. Reducing Font Size and Column Width

- Adjust font sizes or column widths in smaller increments to fit more data.
2. Hiding Rows/Columns

- Select rows or columns and hide them with right-click > Hide.
3. Using Print Area

- Select essential cells, go to Page Layout > Print Area > Set Print Area.
4. Page Breaks

- Insert or adjust manual page breaks with Page Layout > Breaks.
📌 Note: Remember, if changes are made post-print setup, you may need to adjust scaling again.
Summing Up

Optimizing an Excel sheet for printing involves several steps to ensure data fits neatly onto one page. By adjusting page setup, scaling content, and making strategic content decisions, you can create professional-looking printouts ready for any presentation or report. Remember:
- Save your work before any major changes.
- Use the scale-to-fit options to simplify printing.
- Be mindful of legibility when scaling.
Why does my Excel sheet not fit on one page?
+Your Excel sheet might not fit due to large data volumes, incorrect scaling, or unadjusted page settings.
What’s the ideal font size for printouts?
+A font size of 10-12 points ensures readability while conserving space, though adjust according to your needs.
How can I align Excel content better for printing?
+Adjust cell alignment and use Excel’s center features to make your printouts neat and professional-looking.
What if my printout still looks cluttered?
+Try simplifying your content, hiding unnecessary data, or use print titles for clarity across pages.
How to prevent automatic page breaks?
+Use manual page breaks or adjust settings to minimize automatic ones, ensuring continuity of your data.


