5 Easy Ways to Add Dropdowns in Excel Sheets

Drop-down lists in Excel not only make data entry more efficient but also ensure data accuracy by limiting the possible input choices. They can be especially beneficial in scenarios where users are required to choose from predefined options rather than typing in values. In this blog post, we'll explore five straightforward methods to incorporate dropdown lists into your Excel spreadsheets, making your data management tasks easier.
Using Data Validation

Data Validation is one of the most common features used for adding dropdowns in Excel.
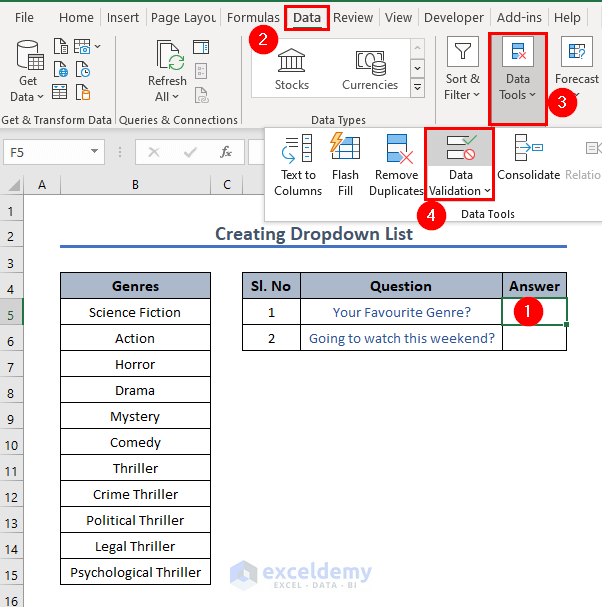
- Select the Cell: Click on the cell where you want the dropdown list.
- Access Data Validation: Go to the Data tab, and select ‘Data Validation’ from the ‘Data Tools’ group.
- Set up the List: In the Data Validation dialogue box, under ‘Allow:’, choose ‘List’.
- Source: Enter your list values in the Source box, separated by commas (e.g., Option1,Option2,Option3), or refer to a range in the sheet.

📝 Note: If your list items are on the same sheet, clicking into the Source box, then selecting those cells, will automatically populate the Source field with the cell references.
Named Ranges for Dynamic Lists

This method allows you to create dynamic lists that can be updated without having to change the dropdown setup.
- Create a Named Range: Select your list items, go to Formulas > Define Name, and give it a name.
- Use in Data Validation: In the Data Validation settings, under Source, type ‘=’ followed by the name of the named range.
Table Method for Efficient Updating

If your list of options will be updated frequently, using a table is highly efficient.
- Convert List to Table: Highlight your list and use Insert > Table to create an Excel Table.
- Data Validation Setup: Use the table name in the Data Validation Source field (e.g., =Table1[List1]).
| Method | Use Case | Update Process |
|---|---|---|
| Static List | Unchanging options | Manual re-entry |
| Named Range | Occasionally changing | Change named range |
| Table | Frequently updated | Direct table update |

VBA for Advanced DropDowns

For more complex dropdown lists where conditions might apply, VBA can be used.
- Open VBA: Press Alt + F11 to open the VBA editor.
- Insert Module: Click Insert > Module.
- Write the Code: Enter your VBA code to set up dropdown lists with conditions.
💻 Note: VBA requires knowledge of coding; if you’re not familiar, consider learning the basics first or hiring an expert.
Using Advanced Filter

This method is perfect for creating a dependent dropdown list where the options in one dropdown depend on the selection in another.
- Set Up Primary List: Create your primary list.
- Create Criteria Range: Enter your criteria for filtering the primary list.
- Apply Advanced Filter: Use Data > Advanced to filter your list based on the criteria.
By the end of this blog, you should be well-versed in several techniques to add dropdown lists to your Excel spreadsheets, enhancing both data integrity and user interaction.
We’ve walked through various methods to enhance your Excel sheets with dropdown functionality, from the basic Data Validation to more complex VBA scripting. By understanding these techniques, you can ensure your data is entered correctly, improve user efficiency, and maintain consistency across your spreadsheets.
Can I create a dropdown list that depends on another dropdown?

+
Yes, you can use the Advanced Filter or VBA to set up dependent dropdown lists. The primary dropdown would affect the available options in the secondary dropdown.
What should I do if my dropdown options are not displaying correctly?

+
Ensure that the source range for your dropdown list is correctly set up. Check for errors in the cell references or named range definitions. If using VBA, make sure the script is running without errors.
How can I make my dropdown list dynamic?

+
By using named ranges or Excel Tables, your dropdown list can automatically update when new items are added to your source data.


