5 Easy Ways to Lock an Excel Sheet for Protection

Protecting your Excel workbook from unauthorized changes is essential for maintaining the integrity of your data. In this post, we'll guide you through five easy steps to lock an Excel sheet, helping you to safeguard your sensitive information and work effectively.
How to Lock an Excel Sheet for Enhanced Security

Excel’s built-in security features provide several layers of protection, from protecting individual worksheets to securing the entire workbook. Here’s how you can lock your Excel sheets:
1. Protect Worksheet with a Password

To prevent others from modifying the content of your sheet, you can set a password:
- Open your Excel workbook.
- Right-click on the sheet tab you want to lock, then select Protect Sheet…
- In the Protect Sheet dialog box:
- Check what actions you want to allow users to do.
- Enter and confirm a password.
- Click OK to set the protection.
💡 Note: Remember to choose a strong password and keep it safe to avoid losing access to your data.
2. Protect the Workbook Structure

To lock the structure of your workbook, preventing the addition, deletion, or renaming of sheets:
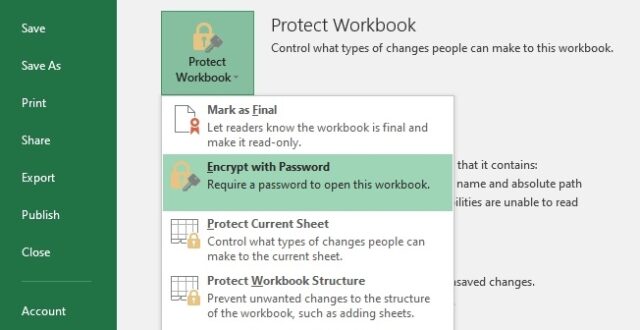
- Go to File > Info > Protect Workbook.
- Select Protect Structure and Windows.
- Set a password in the dialog box and click OK.
3. Add a Password to Open the Workbook

Adding a password to open the workbook ensures that only authorized users can view the content:
- Navigate to File > Info > Protect Workbook.
- Choose Encrypt with Password.
- Enter a password in the Encrypt Document dialog box and click OK.
- Confirm the password when prompted.
4. Restrict Editing to Specific Cells

Locking only certain cells or ranges can allow users to interact with parts of the sheet while keeping others secure:
- Select the cells you want to allow editing.
- Right-click and choose Format Cells, then go to the Protection tab.
- Uncheck Locked.
- Once you’ve protected the sheet (as outlined in step 1), only the selected cells will be editable.
5. Use Excel’s Advanced Protection Options

For even more control:
- Go to the Review tab.
- Select Protect Sheet for detailed options like allowing users to edit objects, sort, use AutoFilter, and more.
🔐 Note: Remember that while Excel protection is useful, it's not foolproof. For highly sensitive data, consider additional security measures.
Why Lock Your Excel Sheet?

Here are some key reasons to lock your Excel sheets:
- Data Integrity: Prevent accidental or unauthorized changes.
- Confidentiality: Protect sensitive information from prying eyes.
- Collaboration: Allow editing of specific parts by team members while keeping the rest locked.
- Version Control: Maintain a consistent workbook structure for use across different departments.
✍ Note: Regular backups of your protected files are advisable to prevent data loss.
In summary, locking your Excel sheets is a fundamental step towards securing your data from unwanted changes and access. By following these steps, you can ensure your spreadsheets are safe, and your work remains unaltered. Remember, while Excel provides robust security features, the level of protection should be tailored to the sensitivity of the data you're handling.
Can I unlock an Excel sheet if I forget the password?

+
Generally, if you forget the password to an Excel sheet, you cannot unlock it without the password. However, there are third-party tools available that might help recover or remove passwords, but using these tools may involve security risks.
Is it possible to password-protect a specific range of cells in Excel?

+
Yes, you can protect specific cells by locking them before protecting the sheet, as described in step 4. This allows users to edit only the cells you’ve set as unlocked while keeping the rest of the sheet secure.
Does sheet protection work across all versions of Excel?

+
Sheet protection features are fairly consistent across different versions of Excel. However, some advanced protection features might be available only in newer versions.


