5 Easy Steps to Convert Excel to Google Sheets

In today's digital workplace, cloud-based solutions are becoming increasingly crucial. Google Sheets has emerged as a go-to option for many due to its real-time collaboration features, accessibility, and integration with other Google Workspace tools. However, most users initially find themselves working with Microsoft Excel files, leading to a common need to transition from Excel to Google Sheets. This guide will walk you through five straightforward steps to make this transition seamless and efficient.
Step 1: Preparing Your Excel File

Before you upload your Excel file to Google Sheets, it’s essential to ensure your document is ready for the transition:
- Backup Your Data: Always create a backup of your Excel file before proceeding. This ensures that you can revert if something goes awry during the conversion process.
- Check for Compatibility: Make sure that your Excel file does not use any features unique to Excel that might not translate well into Google Sheets, such as certain macros or complex formulas.
- Consolidate Data: If your Excel file has external links or data connections, try to consolidate this data into the file. Google Sheets has some limitations with external data connections.
- Optimize Your Formulas: Simplify or replace any Excel-specific formulas or functions. For instance, replace Excel’s
=INDIRECT()with=SPLIT()or=OFFSET()where possible.
💡 Note: This preparation step might require some time depending on the complexity of your workbook, but it’s crucial for a successful conversion.
Step 2: Uploading to Google Drive

To convert an Excel file to Google Sheets, you first need to upload it to Google Drive:
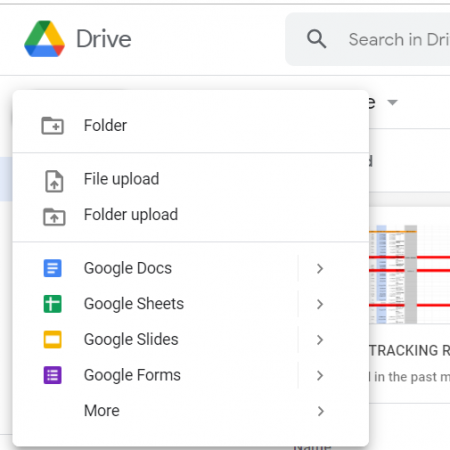
- Navigate to Google Drive and click on “New” in the top left corner.
- Select “File upload” from the drop-down menu.
- Browse and select your prepared Excel file from your local storage.
- Once the upload is complete, right-click the file in Google Drive and choose “Open with” then “Google Sheets”.
Step 3: Reviewing the Converted File


After the file has been opened in Google Sheets:
- Check Formatting: Verify that all your data has been correctly transferred, including formatting, cell alignments, and conditional formatting.
- Inspect Formulas: Ensure all formulas are intact and functioning as intended. Google Sheets uses slightly different syntax for some functions compared to Excel.
- Data Integrity: Confirm that all data types are preserved. Sometimes, numeric values might turn into text or vice versa during conversion.
- Linked Images or Objects: Check if any linked images or objects from Excel have been properly imported. If not, you might need to manually re-link them.
📌 Note: If you find major discrepancies, you might need to go back to the Excel file, adjust, and repeat the upload process.
Step 4: Adjusting and Optimizing

Now that your file is in Google Sheets, you might need to make some adjustments:
- Convert Macros: If your Excel file included VBA macros, you’ll need to rewrite them in Google Apps Script, as Google Sheets does not support VBA.
- Update Charts: Redraw or update charts as Google Sheets might not recognize Excel’s custom chart settings.
- Collaboration Features: Set up sharing permissions, add comments, and use the revision history to collaborate effectively.
- Integrate with Google Workspace: Consider how to integrate your spreadsheet with other Google services like Forms, Docs, or Calendar for automation and data flow.
Step 5: Saving and Final Checks

Before finalizing:
- Ensure all data has been successfully migrated and checked for accuracy.
- If you need to work in both environments, you can download the Google Sheet as an Excel file, keeping in mind the potential for data loss in this conversion.
- Use the “File” menu to “Save a copy” in Google Sheets format for a native Google Sheet version, ensuring full functionality within Google’s ecosystem.
💡 Note: Regularly syncing your Excel and Google Sheets versions can help prevent data discrepancies.
By following these steps, you have effectively transitioned from Microsoft Excel to Google Sheets, harnessing the power of cloud collaboration while maintaining your data's integrity. The process, though it might seem meticulous at first, ensures that your spreadsheets remain functional and user-friendly in the new environment. This shift not only allows for better collaboration but also leverages Google's powerful tools for further automation and data analysis. Remember, it's not just about converting a file; it's about optimizing your workflow to fit modern, flexible, and team-oriented work practices.
Can I keep using my Excel files after converting to Google Sheets?

+
Yes, you can continue using your Excel files. You have the option to download the Google Sheet as an Excel file or keep a backup of your original Excel file.
What happens to Excel-specific functions during the conversion?

+
Many Excel functions are directly compatible with Google Sheets, but some complex or proprietary functions may need to be adjusted or replaced with equivalent Google Sheets functions or scripts.
Is there a way to automate the conversion process?

+
You can automate the process by using Google Drive’s API or Google Apps Script to upload, convert, and manage files programmatically.
Will links and references to other cells or sheets transfer?

+
Most internal references and links within the document will convert correctly. However, references to external workbooks or data sources might need manual adjustment or updating.
How do I handle permissions when converting for collaboration?

+
Once converted, you can share the Google Sheet and set appropriate permissions for collaborators. You can control access rights, allowing for real-time collaboration or just view access.


