Master Excel Rule Setting in 5 Simple Steps

In today's digital age, mastering Excel is no longer just an advantage; it's almost a necessity, especially for those in the business, finance, and administrative sectors. Excel's versatility can help you manage data, perform complex calculations, and streamline processes, but only if you know how to harness its full potential. One critical aspect of Excel proficiency is understanding and implementing rule setting or conditional formatting. This blog post aims to guide you through the process of setting rules in Excel in five straightforward steps, ensuring you can manipulate data with ease and efficiency.
Understanding Conditional Formatting

Before diving into the rules, let’s clarify what conditional formatting is. Conditional formatting in Excel allows you to automatically apply specific formatting to cells based on the criteria you define. This could be changes in font color, cell color, icons, or even data bars. Essentially, it visually enhances your spreadsheets by highlighting important information, making anomalies stand out, or categorizing data effectively.
Step 1: Identify the Data Range

The first step to rule setting is to identify which part of your spreadsheet will be subject to these rules. Here’s how:
- Select the cells: Click and drag over the cells you want to apply the conditional formatting to.
- Consider large data sets: If you’re working with extensive data, conditional formatting can help visualize patterns or outliers, but remember it might slow down your spreadsheet if applied excessively.

Step 2: Access Conditional Formatting Options

Once your range is selected:
- Go to the Home tab on the Excel Ribbon.
- Click on Conditional Formatting in the Styles group.
This action opens a variety of formatting options tailored to different needs.
Step 3: Choose Your Rule

Here’s where you decide how your data should behave:
- Highlight Cell Rules for basic conditions like values greater than or equal to a certain number.
- Top/Bottom Rules to mark top performers or lowest values.
- Data Bars or Color Scales for visual comparisons.
- Icon Sets for adding visual cues.
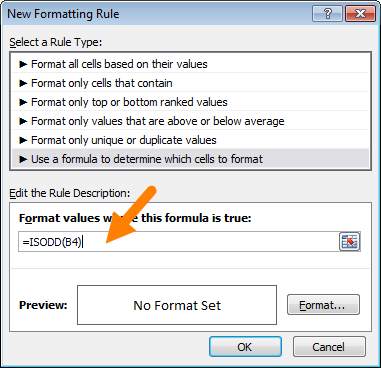
- Or New Rule to customize your own conditions.
Selecting the right rule depends on what insights you’re looking to highlight in your data.
Step 4: Set Up the Rules

After choosing your rule type:
- Define the condition using the dropdown or the formula bar provided in the dialog box.
- Set the formatting by choosing colors, fonts, or other visual elements to apply when the condition is met.
- Click OK to apply the rule.
⚠️ Note: Be cautious with overlapping rules; Excel applies them in the order listed in the Conditional Formatting Rules Manager, where later rules can override earlier ones.
Step 5: Review and Manage Your Rules

Managing your rules is crucial for maintaining order:
- Navigate to the Conditional Formatting Rules Manager under the Conditional Formatting dropdown.
- Here you can add, edit, delete, or change the order of your rules.
This step ensures that your spreadsheet remains efficient and your rules work as intended without conflict.
In mastering Excel rule setting, you've gained not just a technical skill but a strategic tool for data analysis. By following these five simple steps, you can now:
- Identify and select the appropriate data range for conditional formatting.
- Access and navigate through the conditional formatting options seamlessly.
- Choose and customize rules that highlight the most relevant data points for your needs.
- Set up and refine rules to meet specific criteria, ensuring visual accuracy.
- Manage and review these rules, keeping your data presentation optimized and error-free.
This knowledge empowers you to make data-driven decisions quickly, enhance productivity, and present information in a visually impactful manner. Whether it's for business reporting, tracking project progress, or personal financial management, Excel's rule setting opens a world of possibilities for data manipulation and analysis.
Can conditional formatting be applied to entire columns or rows?

+
Yes, you can apply conditional formatting to entire columns or rows by selecting them before setting up the rule.
What happens if two rules conflict in Excel?

+
The rule listed later in the Conditional Formatting Rules Manager will override the earlier rule where they overlap. To avoid this, manage and prioritize rules accordingly.
Can conditional formatting slow down Excel?

+
Yes, applying extensive conditional formatting over large data sets can slow down performance. It’s best to use it judiciously.
Is there a way to copy conditional formatting rules to other cells?

+
You can copy conditional formatting rules by using the Format Painter or by copying and pasting the formatted cell. Excel will ask whether to keep or remove existing rules.
Can I use formulas in conditional formatting rules?

+
Absolutely! When creating a new rule, you can use Excel formulas to define the conditions, allowing for complex and dynamic formatting based on data relationships.


