5 Easy Steps to Save Excel Sheet in Google Drive

Google Drive has become an indispensable tool for many of us looking to store, access, and share files easily across devices. With its seamless integration with Google Suite, including Google Sheets, which offers powerful alternatives to Microsoft Excel, users often find themselves needing to transfer files between these platforms. This post will guide you through five easy steps to save your Excel sheet directly into Google Drive, ensuring your data is accessible and editable in the cloud.
Why Transfer Excel to Google Sheets?

Before diving into the steps, understanding why you might want to switch from Excel to Google Sheets can be useful:
- Cloud Accessibility: Work on your spreadsheets from anywhere, on any device with internet access.
- Collaboration: Google Sheets makes real-time collaboration straightforward, allowing multiple users to edit or comment simultaneously.
- Version Control: With version history, track changes and revert if necessary.
- Cost-effective: Google Sheets is free, reducing the cost compared to Microsoft’s subscription model.
- Integration: Connects seamlessly with other Google services like Google Forms for data collection.
Step 1: Access Your Google Drive

To begin, open your web browser and navigate to drive.google.com. If you’re not already logged in, you’ll need to sign in with your Google account.
Step 2: Upload Your Excel File

Once in your Google Drive:
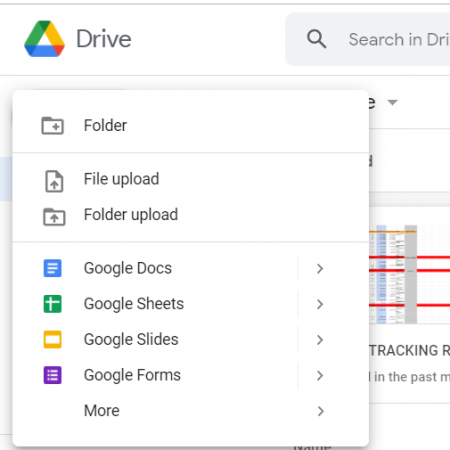
- Click the + New button on the left side.
- Select File Upload.
- Navigate to and select your Excel file (.xlsx or .xls) from your computer, then click Open to start the upload process.
Step 3: Convert Excel to Google Sheets

After your Excel file has been uploaded, you’ll find it in your Google Drive. Here’s how to convert it:
- Right-click on the uploaded Excel file or click the three dots next to the file name.
- Select Open with and then choose Google Sheets.
- Google Drive will now convert your Excel file to a Google Sheets format.
Step 4: Save and Organize

After the conversion:
- Your file will automatically be saved in Google Drive as a Google Sheets document.
- Consider organizing your files by creating folders or using tags for easy access later on.
- If you wish to keep the Excel file available, do not delete the original file; Google Drive will create a new file in the Google Sheets format.
Step 5: Share and Collaborate

Now that your document is in Google Sheets, you can take full advantage of its collaboration features:
- To share your document, click the Share button in the top right corner.
- Enter the email addresses of people you want to share with or generate a link to share.
- Set permissions as Editor for collaboration, Viewer for read-only, or Commenter for comments only.
⚠️ Note: Be cautious when sharing sensitive documents, ensuring you only grant access to trusted parties.
By following these steps, you've successfully transferred your Excel sheet into Google Drive, opening up numerous possibilities for cloud-based work, collaboration, and data management. Remember, Google Sheets is not just a storage solution; it's a versatile tool that can enhance productivity and enable real-time teamwork. Embrace the cloud, and watch your workflow evolve!
What happens to my original Excel file during the conversion process?

+
During the conversion process to Google Sheets, your original Excel file remains unchanged. Google Drive creates a new Google Sheets document, preserving the original file in its native format.
Can I revert the Google Sheets file back to an Excel file?

+
Yes, you can export the Google Sheets document back to an Excel file by going to File > Download > Microsoft Excel (.xlsx).
Is the conversion process automatic, or do I have to do it manually each time?

+
Google Drive automatically prompts you to convert the file when you open an Excel file with Google Sheets for the first time. However, if you want to keep both formats, you’ll need to manually initiate the conversion process.
What if my Excel file contains complex formulas or macros?

+
While Google Sheets supports many Excel formulas, some complex Excel functions and macros might not translate perfectly. It’s advisable to review and adjust your formulas after conversion to ensure accuracy.


