Save Excel Sheet: Quick Guide to Separate Files

In today's fast-paced work environment, efficiently managing data is crucial for productivity. One common task many professionals encounter involves separating or splitting an Excel worksheet into multiple files based on criteria such as columns or specified conditions. This blog will guide you through the process of how to save an Excel sheet into separate files with ease.
Understanding Excel Data Separation


Excel provides a plethora of functions to manipulate data. Before diving into the techniques, let's understand why separating data can be beneficial:
- Improved Organization: Breaking down large datasets into smaller, more manageable files.
- Efficient Data Analysis: Easier to focus on specific segments of data.
- Enhanced Collaboration: Allows team members to work on different aspects of the same dataset simultaneously.
Basic Methods for Splitting Excel Worksheets

Manual Copy and Paste

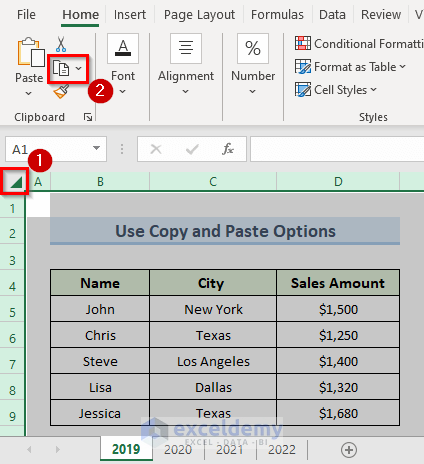
For smaller datasets, the simplest method to split an Excel sheet is to manually copy and paste data:
- Sort or filter the data based on your criteria.
- Copy the filtered or selected data.
- Create a new workbook or sheet and paste the data.
- Repeat for each group or segment.
This method is straightforward but can become time-consuming with large datasets.
Using Advanced Filter

An advanced filter provides a more efficient way to split data:
- Select your data range.
- Go to Data > Advanced Filter.
- Choose where to place the filtered data: copy to another location.
- Select the criteria range for filtering.
- Click OK to filter and extract the data.
VBA Macro to Split Sheets

For frequent use or handling of extensive datasets, automating the process with VBA can be very efficient:
- Open the Excel workbook containing the data.
- Press ALT + F11 to open the VBA editor.
- Insert a new module by selecting Insert > Module.
- Paste the following VBA code:
- Run the macro by clicking F5 or the Play button in VBA editor.
Sub SplitDataIntoSeparateFiles() Dim ws As Worksheet Dim wsNew As Worksheet Dim rng As Range Dim lastRow As Long, lastCol As Integer, i As Long Dim wbNew As Workbook Dim uniqueList As VariantSet ws = ThisWorkbook.Sheets("Sheet1") ' Change "Sheet1" to your source sheet's name lastRow = ws.Cells(ws.Rows.Count, "A").End(xlUp).Row ' Assuming column A has the key criteria ' Get unique values in column A uniqueList = ws.Range("A2:A" & lastRow).AdvancedFilter(xlFilterCopy, , , True) For i = 1 To Application.WorksheetFunction.CountA(uniqueList) Set rng = ws.UsedRange wsNew = ws.Range("A1").AutoFilter(Field:=1, Criteria1:=uniqueList(i, 1)) ws.Rows(2).Resize(lastRow - 1).Copy ' Create new workbook Set wbNew = Workbooks.Add With wbNew .Sheets(1).Name = "Sheet1" .Sheets(1).Paste .SaveAs ThisWorkbook.Path & "\" & CStr(uniqueList(i, 1)) & ".xlsx" .Close SaveChanges:=False End With Next i ws.AutoFilterMode = False
End Sub
This code will automatically split the data into separate files based on the values in Column A. Adjust the sheet name, column, and criteria range as needed.
🌟 Note: Always back up your data before running macros to avoid unintended changes or data loss.
Advanced Techniques and Considerations

Power Query for Data Splitting

Power Query, available in Excel 2016 and later, can also be utilized to split data into separate files:
- Load your data into Power Query by selecting Data > Get & Transform Data > From Table/Range.
- Transform data as needed.
- Group the data by your criteria using Group By.
- Export the grouped data into separate CSV files through Home > Close & Load To and selecting CSV as the file type.
Data Analysis Expressions (DAX) in Power Pivot

Power Pivot offers DAX, which can be used for complex data separation:
- Load your data into Power Pivot.
- Create calculated columns or measures to dynamically split data.
- Export the results as separate files or refresh to dynamically update your splits.
Using Power Query and DAX can significantly enhance your ability to manage and manipulate data in Excel for more sophisticated tasks.
Automation and Integration

Consider integrating Excel with other software or tools:
- Excel with Power BI: For dynamic data visualization and more complex analysis.
- Excel with Python or R: To automate repetitive tasks or perform advanced statistical operations.
- Microsoft Flow/Power Automate: For automating file creation and distribution.
🔧 Note: Combining different tools can provide a more robust solution for data management but requires knowledge of multiple platforms.
In summary, there are various methods to split an Excel worksheet into separate files, each offering different levels of automation and complexity. From manual copy-paste to VBA macros, Power Query, and integration with other tools, you can choose the best approach based on your data size, frequency of use, and technical skill level. By mastering these techniques, you can significantly improve your data management processes, leading to increased efficiency and productivity in your work environment.
What is the easiest method to split an Excel sheet?

+
The easiest method for small datasets is manual copy and paste, where you sort or filter the data and manually move it into new sheets or workbooks.
Can I automate the process of splitting Excel sheets?

+
Yes, you can automate this process using VBA macros, Power Query, or by integrating Excel with other automation tools like Power Automate or Python scripting.
What are the limitations of using Power Query for splitting data?

+
Power Query is excellent for data transformation, but it might not handle very large datasets efficiently or might require significant time for processing complex queries.
Why would I want to split an Excel sheet?

+
Splitting an Excel sheet helps in organizing data, making it easier to analyze specific segments, and facilitates collaborative work by allowing team members to work on different parts of the data.
Are there any risks involved in using VBA macros?
+
VBA macros can pose risks if not written or executed properly. They can alter or delete data, so always backup your data before running any macro. Also, ensure the macro comes from a trusted source to avoid security risks.