5 Ways to Eliminate Margins in Excel Instantly

Introduction to Margins in Excel

Margins in Excel refer to the white space around the edge of your printouts. While they can be useful for ensuring readability and facilitating binding, sometimes you might want to minimize or eliminate them entirely to fit more data onto a single page or to create reports that use the full sheet of paper. Here’s how you can instantly remove or adjust margins in Microsoft Excel for optimal use of space.
1. Using Page Layout Settings

The simplest way to eliminate margins in Excel is through the Page Layout settings:
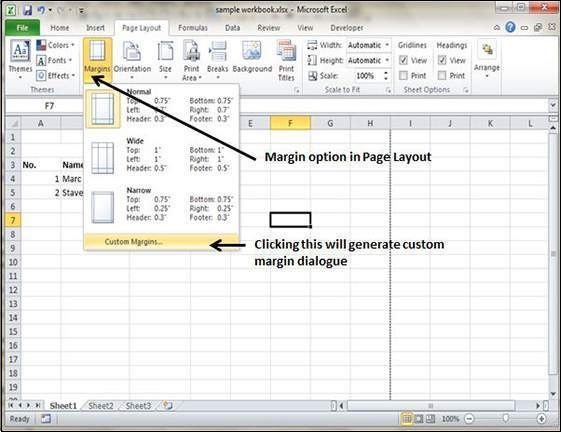
- Go to the Page Layout tab in the ribbon.
- Click on Margins.
- Select Narrow or Custom Margins if you want to set your own.
- In the Page Setup dialog box:
- Set Top, Bottom, Left, and Right margins to 0.
- Also, you can set the Header and Footer to 0 if applicable.
This method ensures that your Excel sheet will use the maximum available print area.
🔔 Note: Reducing margins too much might result in your text or data being cut off at the edges when printing.
2. Utilizing Print Area

If your goal is to eliminate margins for a specific range:
- Select the range of cells you want to print without margins.
- Go to Page Layout > Print Area > Set Print Area.
- Adjust your margins to zero or your desired small value.
- Now, when you print or preview, only this selected area will be printed with minimal margins.
3. Macro for Automated Margin Removal

For those who work frequently with Excel and need to apply no-margin printing, a VBA macro can automate the process:
Sub RemoveMargins()
    With ActiveSheet.PageSetup
        .LeftMargin = Application.InchesToPoints(0)
        .RightMargin = Application.InchesToPoints(0)
        .TopMargin = Application.InchesToPoints(0)
        .BottomMargin = Application.InchesToPoints(0)
        .HeaderMargin = Application.InchesToPoints(0)
        .FooterMargin = Application.InchesToPoints(0)
    End With
End Sub
To use this macro:
- Open the VBA editor by pressing Alt + F11.
- Insert a new module and paste the code above.
- Run the macro when needed.
🔔 Note: Macros can contain harmful code; ensure you trust the source of the macro before using it.
4. Adjusting Printer Settings

Sometimes, margin issues are due to printer limitations or default settings:
- Open the print dialog by pressing Ctrl + P.
- Look for printer properties or settings.
- Adjust the margin settings or unprintable area settings to zero if possible.
This method might not be available on all printers, but some advanced models do allow full-page printing without borders.
5. Custom Page Sizes

Another workaround involves creating a custom page size to fit your content exactly:
- Under Page Layout, click on Size.
- Choose More Paper Sizes.
- Set a custom width and height that match your content exactly or slightly larger.
- Adjust margins to zero to ensure there’s no unused space.
This method can be particularly useful when you need to create a specific-sized document or report.
In conclusion, eliminating margins in Excel can significantly enhance your document presentation, especially when you need to maximize space for tables or data sets. Whether you're aiming for a clean, borderless report or simply trying to fit more information onto a page, the methods discussed here offer you various ways to achieve this goal. Remember, while small or no margins might look appealing on screen, always consider the practicalities of printing and readability to ensure your documents are functional as well as visually appealing.
Can I set different margins for different sheets in one workbook?

+
Yes, each sheet in an Excel workbook can have different margin settings. You can apply the desired margin settings for each sheet individually using the Page Setup options.
What are the default margin settings in Excel?

+
The default margins in Excel are typically 0.75 inches for Top, Bottom, Left, and Right. However, these can vary depending on the version of Excel or user preferences.
Will setting zero margins affect my Excel file size or performance?

+
Setting zero margins does not directly impact file size or performance in Excel. It changes how the document looks when printed or viewed in Print Preview, not how it’s stored or processed by Excel.