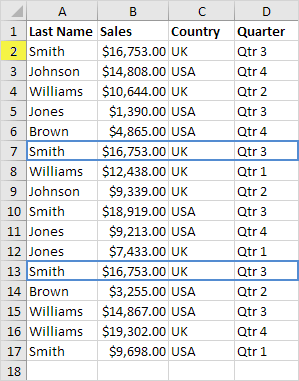
5 Quick Ways to Remove Duplicates in Excel

Introduction

Excel is an incredibly powerful tool used by millions for data analysis, management, and reporting. One common issue users often encounter is dealing with duplicate entries in their datasets. These duplicates can skew results, clutter your spreadsheet, and reduce the accuracy of your data analysis. Fortunately, Excel provides several built-in methods to clean up your data by removing these duplicates efficiently. In this post, we'll explore five quick methods to remove duplicates from your Excel spreadsheets, ensuring your data is clean and ready for analysis.
1. Using the Remove Duplicates Tool

The simplest and most direct method to remove duplicates is through Excel’s built-in ‘Remove Duplicates’ feature:
- Select your data range: Click and drag to select the cells containing data or select the entire column.
- Navigate to the tool: Go to the Data tab on the Ribbon and click 'Remove Duplicates'.
- Choose Columns: The dialog box will ask which columns to compare for duplicates. If your data headers are included, check the box for headers.
- Execute: Click OK. Excel will remove duplicates based on your criteria, leaving you with unique entries.
🔍 Note: If you remove duplicates from the entire spreadsheet, be aware that all columns are considered. Only the first occurrence of each unique combination will be retained.
2. Using Conditional Formatting

This method highlights duplicates so you can manually review and decide what to keep:
- Select your data range: Again, choose the area you want to check for duplicates.
- Go to Home: Click on Home > Conditional Formatting > Highlight Cells Rules > Duplicate Values.
- Set Conditions: Choose how you want duplicates to be highlighted (e.g., with a fill color).
- Review: Now, you can easily see which entries are duplicates. You might decide to delete them manually or use other methods for removal.
Using conditional formatting doesn't remove duplicates but helps visualize them, which is useful when you need to make manual decisions.
3. Leveraging Power Query for Removing Duplicates

Power Query is an advanced data transformation tool in Excel:
- Load Your Data: Go to Data > Get Data > From File > From Workbook, then choose your Excel file.
- Open Power Query Editor: After loading the data, click 'Transform Data' or open the Query Editor.
- Remove Duplicates: Select the columns for which you want to remove duplicates, then go to Home > Remove Duplicates.
- Load Back: Click Close & Load to bring your data back into Excel without duplicates.
4. Using Advanced Filtering Techniques

Advanced filtering provides another way to manage duplicates:
- Select Your Data: Highlight the range or entire table.
- Use Advanced Filter: Go to Data > Sort & Filter > Advanced.
- Unique Records Only: In the dialog, choose "Copy to another location" and check "Unique records only."
- Select Destination: Choose where to output the filtered results, typically another sheet or area in your workbook.
Advanced filtering creates a new list with only unique entries, keeping your original data intact.
5. Manual Method with Sorting

Sometimes, a simple sorting method can suffice for smaller datasets:
- Sort Data: Select your data and sort it by the column where duplicates might occur.
- Review and Delete: Look for repeated entries. Use Ctrl to select and delete these entries.
This approach might not be ideal for large datasets, but it gives you control over what data stays or goes.
Each method has its place depending on your dataset size, complexity, and the precision you need. Here’s a quick summary:
| Method | Use Case | Complexity |
|---|---|---|
| Remove Duplicates Tool | Quick cleanup of large datasets | Low |
| Conditional Formatting | Visual analysis or manual removal | Low to Medium |
| Power Query | Complex data transformations | Medium to High |
| Advanced Filtering | Data refinement and list creation | Medium |
| Manual Sorting | Small datasets or control over removal | Low |

✍️ Note: Always ensure you have a backup or can track changes when removing data to avoid accidental loss of information.
These techniques for removing duplicates in Excel are essential for anyone who works with data, ensuring the accuracy and reliability of their analyses. Whether you choose a straightforward tool like "Remove Duplicates" or leverage the power of Power Query, there's a solution for every data cleaning challenge you might face.
What is the safest method to remove duplicates?

+
The safest method often involves using conditional formatting to highlight duplicates. This way, you can review the data before making any changes, ensuring no crucial data is accidentally deleted.
Can I undo the removal of duplicates?

+
No, once duplicates are removed with tools like “Remove Duplicates,” they cannot be undone directly through Excel’s interface. Always keep a backup or work on a copy of your data to prevent data loss.
How do I remove duplicates based on multiple columns?

+
When using the “Remove Duplicates” feature, you can select multiple columns to identify duplicate records based on all the selected columns, ensuring a comprehensive check.
Will sorting affect how Excel finds duplicates?

+
No, sorting data does not change how duplicates are identified or removed, but it can make manual verification easier by grouping similar entries together.
What should I do if the “Remove Duplicates” tool seems to be malfunctioning?

+
Check your data for hidden characters or spaces, ensure the correct columns are selected, and make sure no duplicates are actually unique entries due to formatting issues. If the problem persists, consider using Power Query or manual methods.