5 Easy Steps to Remove Duplicates in Excel

Welcome to this detailed guide where we'll dive into the various methods of removing duplicates in Excel. Whether you're a business analyst, accountant, or simply working on your personal budget, knowing how to clean up your data by eliminating redundant entries is a vital skill. Excel, as a powerful data analysis tool, provides several approaches to streamline your data. Let's walk through these steps one by one.
Step 1: Understand Your Data

Before diving into the technical steps of removing duplicates, it’s crucial to understand your data. Here are some points to consider:
- Identify which columns contain duplicates.
- Decide whether you want to remove duplicates based on a single column or multiple columns.
- Determine what you want to do with the remaining data after removal.
🔍 Note: Understanding your data structure helps in choosing the right method for removing duplicates, ensuring the integrity of your dataset.
Step 2: Using the “Remove Duplicates” Feature

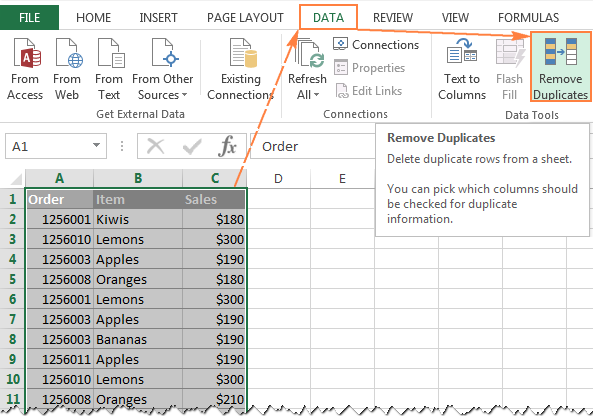
Excel provides a straightforward feature to remove duplicates. Here’s how you can use it:
- Select the range of data or the entire column(s) where you wish to remove duplicates.
- Go to the ‘Data’ tab in the ribbon.
- Click on ‘Remove Duplicates’. This will open a dialog box where you can specify which columns to check for duplicates.
- Choose the columns and hit ‘OK’. Excel will then remove duplicates and inform you how many duplicate rows were found and removed.
💡 Note: Always ensure you have a backup of your data before removing duplicates as the operation is irreversible.
Step 3: Conditional Formatting for Visualizing Duplicates

If you prefer to review duplicates before removal, conditional formatting can be an effective tool:
- Select the range where you want to highlight duplicates.
- Under the ‘Home’ tab, click ‘Conditional Formatting’ then ‘New Rule’.
- Choose ‘Use a formula to determine which cells to format’.
- Enter a formula like
=COUNTIF(A:A,A1)>1where A1 is the first cell of your selection, and A:A is the range you’re checking for duplicates. - Set the format to make duplicates stand out (like a different color).

🖌️ Note: Conditional formatting visually distinguishes duplicates without altering your data, allowing for a review before removal.
Step 4: Advanced Techniques - Using VBA or Advanced Filter

For more control or larger datasets, you might opt for:
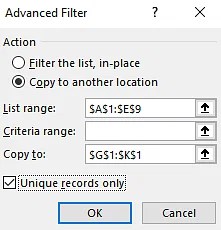
- Advanced Filter: You can use the Advanced Filter to remove duplicates by specifying criteria ranges.
- VBA: Here’s a simple VBA macro to remove duplicates:
Sub RemoveDuplicatesFromRange()
    Dim rng As Range
    Set rng = Selection
    rng.RemoveDuplicates Columns:=Array(1, 2), Header:=xlYes
End Sub
| Method | Advantage | Disadvantage |
|---|---|---|
| Remove Duplicates Feature | Easy to use, no VBA knowledge required | Limited customization |
| Advanced Filter | Offers more control over which columns to check | More steps involved |
| VBA | Automation and customization | Requires programming knowledge |

Step 5: Data Validation and Error Checking

After removing duplicates, it’s good practice to validate your data:
- Data Validation: Use Excel’s Data Validation feature to prevent future duplicates.
- Error Checking: Excel’s built-in error checking can help identify potential issues after removal.
📚 Note: Regular data validation helps maintain data integrity over time, reducing the need for frequent duplicate removal.
In this guide, we've explored various methods to remove duplicates in Excel, from the simple use of the "Remove Duplicates" feature to more advanced techniques using VBA and conditional formatting. Each method has its advantages, catering to different needs based on the complexity and size of your dataset. Remember to always back up your data before performing operations that modify your original data, and utilize conditional formatting or advanced filters for a more nuanced approach to duplicate management.
What happens to the data when I remove duplicates in Excel?

+
When you remove duplicates, Excel deletes all but one instance of duplicate data. The first occurrence of each unique value remains in place.
Can I undo the removal of duplicates in Excel?

+
Unfortunately, Excel does not have an “Undo” feature for the removal of duplicates. This is why having a backup is crucial.
How can I prevent duplicates in Excel in the future?

+
Using data validation rules can help prevent duplicates from being entered in the first place. Set up custom rules that disallow entry of values already present in a specific column.
What are the limitations of the “Remove Duplicates” feature?

+
The “Remove Duplicates” feature can only work on a single sheet at a time and requires manual intervention to decide which columns to check for duplicates.
Can I use Excel to find duplicates across multiple sheets?

+
Yes, though the built-in feature doesn’t support this directly. You can use VBA or consolidate your data into one sheet before applying the “Remove Duplicates” feature.