5 Quick Tips to Delete Blank Rows in Excel

Why Delete Blank Rows in Excel?

Before diving into the tips, it’s important to understand why removing empty rows in Excel is crucial:
- Clean Data Appearance: Blank rows can clutter your data, making it look unprofessional and hard to analyze.
- Improve Data Processing: Most data analysis tools and functions struggle with empty rows, which can lead to errors or miscalculations.
- Enhance Readability: A spreadsheet with no gaps is easier to navigate and comprehend, improving overall readability for you and your team.
- Speed Up Operations: Removing unnecessary rows can significantly speed up Excel’s performance, especially with large datasets.
🔍 Note: When deleting blank rows, always ensure you have a backup of your data to avoid any unintended deletions.
Tip 1: Filter and Delete

Filtering is one of the simplest ways to remove blank rows:
- Select Your Data Range: Highlight the range of cells you want to clean up.
- Apply Filter: Go to the ‘Data’ tab and click on ‘Filter.’ Little arrow buttons will appear in the header of each column.
- Filter Blank Rows: Click on the arrow in any column header, uncheck ‘Select All,’ and then check only the box for ‘(Blanks).’ This will show only the rows that are blank in that column.
- Delete: Right-click on the row numbers on the left to select all filtered blank rows, then choose ‘Delete Row’ from the context menu.

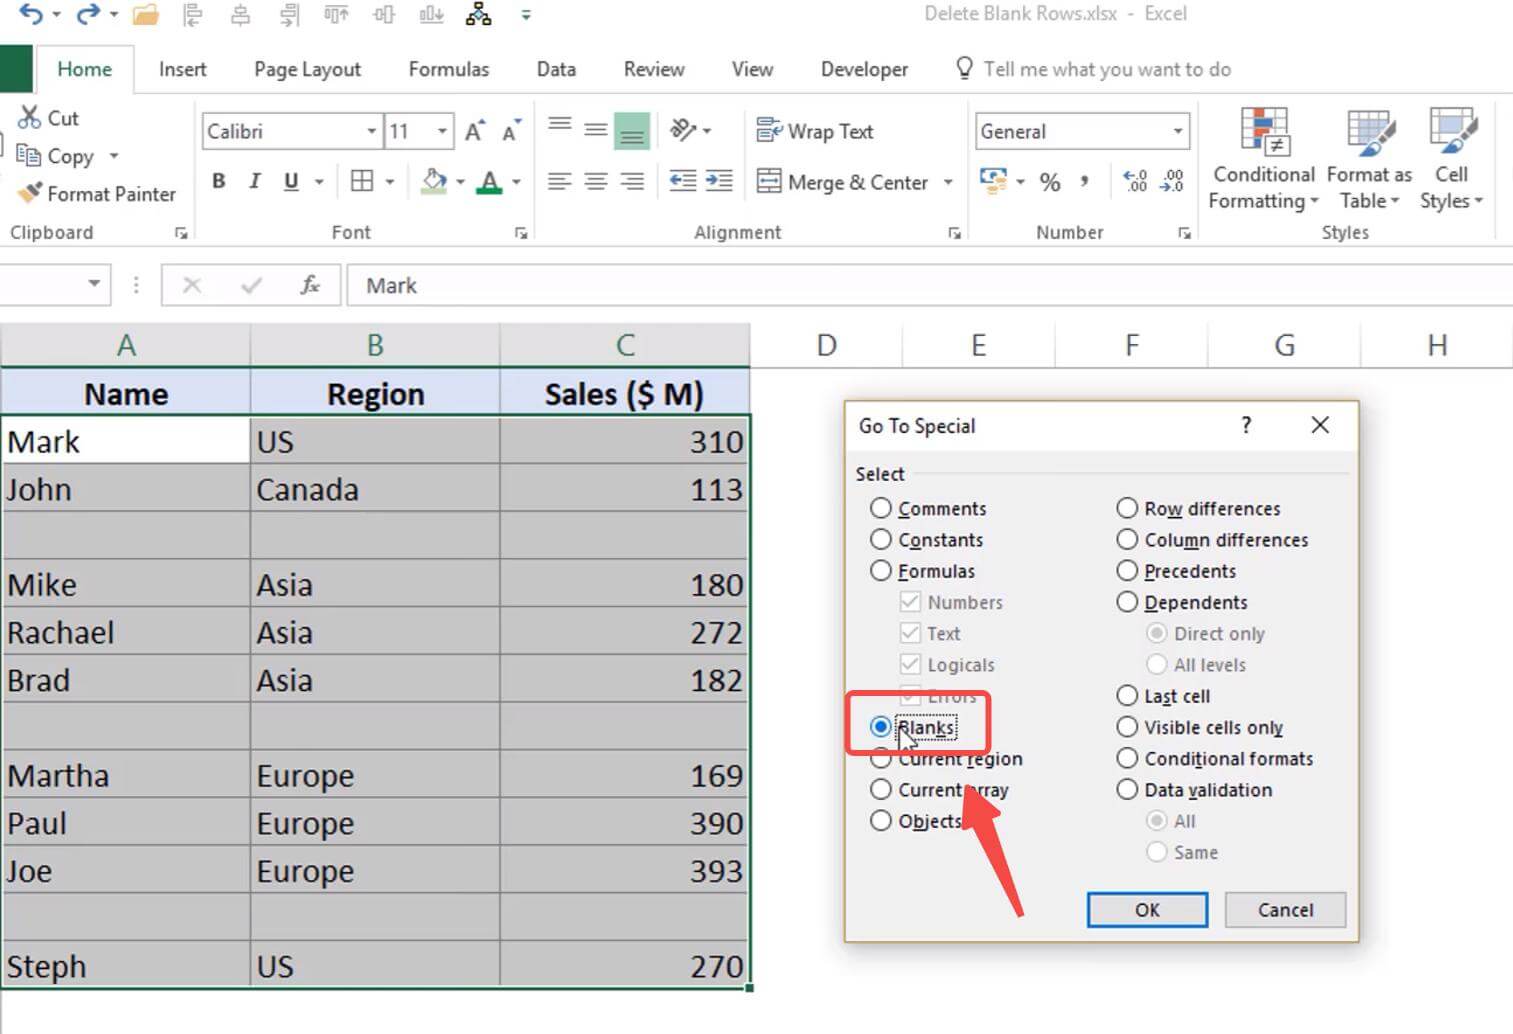
Tip 2: Using Go To Special

Excel’s Go To Special feature allows for a different approach to remove blank rows:
- Select the Range: Choose the range where blank rows need to be deleted.
- Use Go To Special: Press ‘Ctrl+G’ on your keyboard (or go to ‘Home’ tab > ‘Find & Select’ > ‘Go To Special’), then select ‘Blanks’ and click ‘OK.’
- Delete the Rows: Once the blank cells are highlighted, right-click on any of the selected cells and choose ‘Delete…’ from the context menu. Then select ‘Shift cells up’ or ‘Entire row’ as per your needs.

Tip 3: Macro for Bulk Cleanup

For users comfortable with macros, here’s how you can automate the process:
- Open Visual Basic Editor: Press ‘Alt+F11’ to open the VBA editor.
- Insert a New Module: In the editor, go to ‘Insert’ > ‘Module’ to create a new module.
- Input the Macro Code: Below is the VBA code to delete blank rows:
Sub DeleteBlankRows()
    Dim ws As Worksheet
    Set ws = ActiveSheet
    On Error Resume Next
    ws.UsedRange.SpecialCells(xlCellTypeBlanks).EntireRow.Delete
    On Error GoTo 0
End Sub
Copy and paste this code into the module, then close the editor. To run the macro, press 'Alt+F8', select 'DeleteBlankRows', and click 'Run.' This will delete all blank rows within the used range of the active sheet.

⚠️ Note: Macros can alter data irreversibly. Always save a backup or create a test environment before running.
Tip 4: Keyboard Shortcuts

If you prefer to work with keyboard shortcuts, here’s a quick method:
- Select the Range: Highlight the range you’re interested in cleaning up.
- Use ‘Ctrl+Shift+L’: This toggles the Filter on.
- Filter for Blanks: Use ‘Alt+Down Arrow’ to open the filter dropdown, then navigate with arrow keys to ‘(Blanks)’ and hit ‘Enter.’
- Select Rows: Press ‘Ctrl+Shift+Space’ to select the visible rows.
- Delete Rows: Hit ‘Ctrl+-’ (Ctrl and Minus) to delete the selected rows.
✅ Note: The above steps are based on the default keyboard shortcuts. Some might need to be adjusted if Excel's settings have been modified.
Tip 5: Power Query for Data Transformation

Power Query is a powerful tool for data transformation, including removing blank rows:
- Select Your Data: Choose the range or table you want to process.
- Open Power Query Editor: Go to ‘Data’ > ‘Get Data’ > ‘From Table/Range,’ or ‘From Other Sources’ if your data isn’t in a table.
- Remove Blanks: In the Power Query Editor, click ‘Home’ > ‘Remove Rows’ > ‘Remove Blank Rows.’
- Apply Changes: Click ‘Close & Load’ or ‘Close & Load To’ to return the cleaned data to your worksheet.

This method provides a visual and easy-to-use interface for filtering and transforming your data, and it can handle large datasets with ease.
To wrap up these insights, deleting blank rows in Excel is an essential part of data cleaning and can significantly improve the functionality and appearance of your spreadsheets. The methods outlined range from simple filtering techniques to advanced data transformation with Power Query, offering options for everyone from beginners to power users.
Is it safe to delete blank rows in Excel?

+
Yes, it is generally safe to delete blank rows, but always ensure you have a backup of your data to avoid unintended deletions. It’s also beneficial to double-check that the rows you are deleting are indeed blank and not just missing values in visible columns.
What if I need to delete rows where only specific columns are blank?

+
Excel’s Go To Special feature allows you to select blank cells in specific columns. Once selected, you can manually delete the rows or use a macro to automate the process. Alternatively, use Power Query’s filtering options for more granular control.
Can I undo the deletion of blank rows?

+
Yes, you can undo most actions in Excel by pressing ‘Ctrl+Z’ immediately after the action. However, if you close the file or save over it, this might not be possible. Always keep a backup when performing bulk changes.
Are there any downsides to using macros for deleting rows?

+
Macros can be powerful tools, but they come with risks. If not written carefully, they can delete data unintentionally or cause other unexpected outcomes. Therefore, it’s critical to have a backup and understand the macro code before running it.