Mastering Excel Formulas: Referencing Another Sheet Easily

Mastering Excel Formulas: A Guide to Referencing Across Sheets

Have you ever found yourself buried in sheets of data, wanting to consolidate and calculate figures effortlessly across different parts of your Excel workbook? Here's a comprehensive guide to teach you how to reference another sheet in Excel with ease, making your data handling more efficient.
Understanding Cell References

Before we dive into sheet-to-sheet referencing, it’s critical to understand the basics of Excel cell references. In Excel, references help you to link data between cells, which can be within the same sheet or across different sheets.
- Absolute References: These are fixed references. For example, cell A1 on Sheet1 can be referenced as
Sheet1!$A$1. If you copy this formula, the reference remains unchanged. - Relative References: These references change when a formula is copied or filled to another cell. For instance, if you reference
=A1in a formula, the cell will adjust based on the position you copy it to. - Mixed References: A hybrid of absolute and relative, where either the column or row is fixed, but not both. For example,
$A1orA$1.
🔎 Note: In Excel, references are case-insensitive. 'Sheet1' and 'sheet1' are treated the same.
Referencing Data From Another Sheet

Basic Sheet Reference

To reference data from another sheet, you'll use this format: =SheetName!CellReference
Here’s how to do it:
- Select the cell: Choose the cell where you want to display the result of your formula.
- Start typing the formula: Enter the equals sign to start the formula.
- Type the Sheet Name: Add the name of the sheet you're referencing, followed by an exclamation mark. If your sheet name includes spaces, you'll need to use single quotes around it, like 'Sales Data'!A1.
- Add the Cell Reference: Type the specific cell you want to reference, like A1.
📌 Note: If you need to reference a range, simply extend the cell reference, e.g., SheetName!A1:A10 for cells A1 to A10.
Using Named Ranges for Clarity

Named ranges can simplify formula creation, especially when referencing across sheets:
- Go to the sheet containing the data you want to reference.
- Select the range you want to name.
- Press
Ctrl+Shift+F3to open the 'Create Names from Selection' dialog, or simply name it manually usingFormulas>Define Nameon the ribbon. - Now, you can reference this named range in your formula:
=SalesData.
Referencing Another Workbook

If you're referencing a cell from a different workbook:
- Open both the source and destination Excel workbooks.
- Switch to the destination workbook where you want to insert the formula.
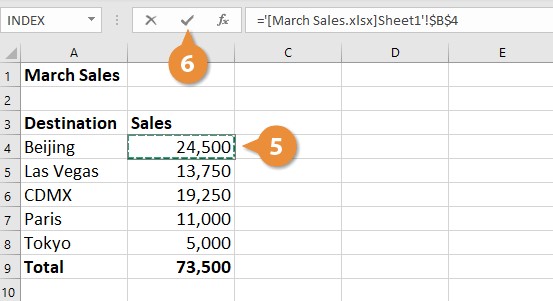
- Select the cell and enter the formula starting with
[WorkbookName]SheetName!CellReference. Make sure the workbooks are in the same folder or you'll need to specify the full path. - When you close the source workbook, Excel will ask if you want to save the links. Choose
Yesto retain the reference.
Advanced Referencing Techniques

3D References

When you want to reference the same cell or range across multiple sheets, 3D referencing can be very useful:
- Select the sheets you want to include in your 3D reference by holding down
Ctrland clicking on the sheet tabs. - Then, simply reference the cell or range in the usual way, like
=SUM(Sheet1:Sheet3!A1).
VLOOKUP Across Sheets

VLOOKUP is an essential function for pulling data from a table. Here’s how to use it for referencing across sheets:
- Identify the lookup value on one sheet.
- Set up the reference range on another sheet where the data table resides.
- Use the formula
=VLOOKUP(lookup_value, [OtherSheet]!$A$1:$D$100, column_index, [range_lookup]). Remember to lock the range using absolute references to avoid errors when copying the formula.
💡 Note: The VLOOKUP function assumes the table is sorted in ascending order when the range_lookup is TRUE or omitted.
Summarizing Key Points

We've covered several techniques for referencing across Excel sheets. From basic cell references to named ranges and 3D references, these methods enhance your ability to manage and analyze data efficiently. Knowing how to navigate and link your data can save you time and reduce errors, allowing for more dynamic and flexible data models.
Remember that understanding the type of reference you're using (absolute, relative, or mixed) is crucial for correctly linking data. Practice with named ranges for better clarity in your formulas, and consider using VLOOKUP or 3D references for complex data analysis.
What’s the difference between absolute and relative references?

+
Absolute references remain constant when the formula is copied or filled, e.g., A1. Relative references, like A1, adjust based on their new location in the workbook when copied.
Can I reference cells across different workbooks?

+
Yes, you can reference cells from different workbooks using the format [WorkbookName]SheetName!CellReference. Both workbooks must be open when creating the reference.
How do I use a named range for referencing?

+
Define a named range through the ‘Name Manager’ or by selecting the range and using ‘Create Names from Selection’. You can then reference this named range directly, e.g., =SalesData.