Protecting Your Excel Sheet with Password: Simple Steps

When dealing with sensitive data in Excel, protecting your files with a password can be a crucial step to ensure your information remains secure. Whether you're a business professional safeguarding financial reports or a student keeping your research data private, knowing how to password protect Excel sheets is a valuable skill. In this guide, we'll explore the straightforward process of securing your Excel files with password encryption to protect your sensitive data from unauthorized access.
Why Should You Password Protect Excel Files?

- Privacy: To keep personal or confidential data secure from prying eyes.
- Data Integrity: To prevent accidental modifications by others.
- Compliance: For adhering to industry standards or organizational policies that require data protection.
- Limiting Access: To control who can access or modify the content within your spreadsheets.
Before proceeding, ensure that your version of Excel supports password protection. Microsoft Excel from Office 2007 onwards includes this feature.
How to Password Protect an Excel Sheet

Follow these steps to apply password protection to your Excel sheet:
- Open Your Workbook: Start Excel and open the workbook you wish to protect.
- Select the Worksheet: Right-click on the sheet tab at the bottom of the Excel window that you want to protect.
- Access Protection Settings: From the context menu, select 'Protect Sheet.'
- Set the Password:
- In the 'Protect Sheet' dialog box, enter a password into the 'Password to unprotect sheet' field.
- Choose what actions are allowed for the users in the list below the password field, like selecting locked cells or formatting cells.
- Click 'OK' to confirm your settings.
- Re-enter the Password: Excel will prompt you to re-enter the password to prevent typos, which would lock you out of your own data.
- Save the Workbook: Remember to save your workbook after setting the protection; this applies the password protection to the file.
Protecting Multiple Sheets at Once

If you have several worksheets within a workbook that need protection:
- Select Multiple Sheets: Click the first sheet tab, then hold down Ctrl (or Command on a Mac) and click additional sheet tabs.
- Repeat Protection Steps: Follow the same steps as above for multiple sheets, but apply the protection to the selected group.
💡 Note: Password protection works on a per-sheet basis. If you want to protect the entire workbook, you need to protect each worksheet or set a different kind of workbook protection.
How to Encrypt the Entire Workbook

If you want to add another layer of security by encrypting the entire Excel file, here’s how:
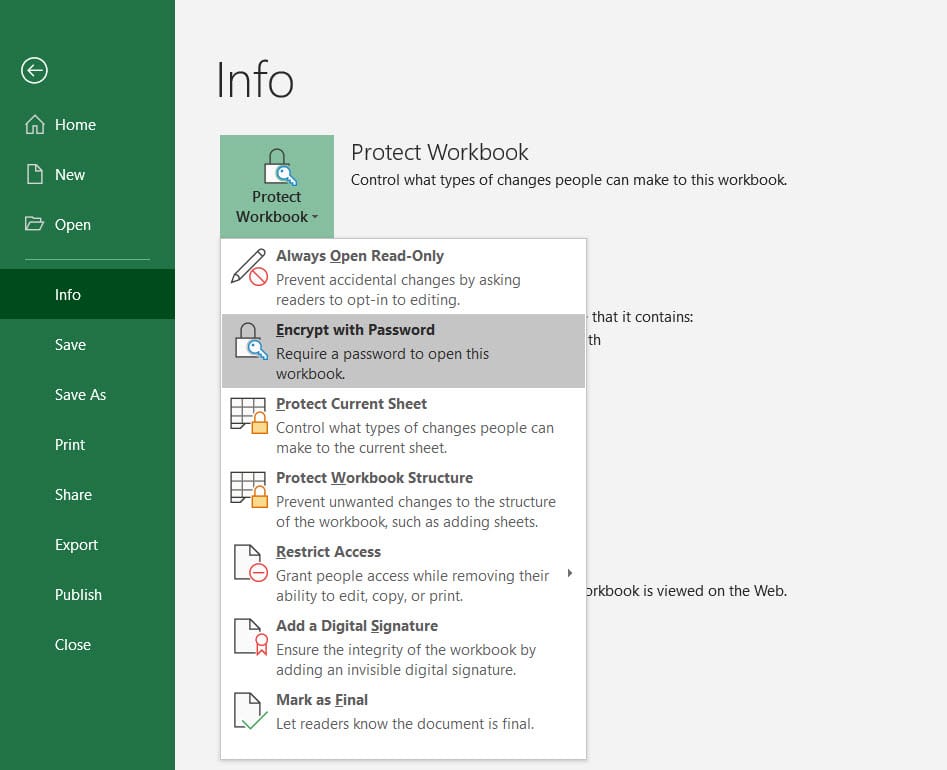
- Open File Options: Go to 'File' and then 'Info'.
- Encrypt with Password:
- Under 'Protect Workbook', click 'Encrypt with Password'.
- Enter a password in the 'Password' field.
- Re-enter the password when prompted to confirm.
- Save Your Workbook: Don't forget to save your changes.
🔍 Note: Workbook encryption provides a higher level of security as it restricts access to the file itself before even opening it.
Removing Password Protection

If you ever need to remove the password protection:
- Open the Protected Sheet: Enter the password to open or modify the sheet if it's encrypted.
- Unprotect Sheet: Go to the 'Review' tab on the ribbon and click 'Unprotect Sheet'.
- Enter Password: Provide the password you set initially to unprotect the sheet.
- Save Changes: Remember to save your workbook after removing the protection.
Now, you've learned how to apply password protection to your Excel sheets, securing your data with ease. From protecting individual worksheets to encrypting entire workbooks, these steps ensure that your sensitive information is shielded from unauthorized access.
In practice, password protection is not just about locking down data; it's also about fostering good data management habits. Keeping your spreadsheets organized with clear, straightforward permissions can prevent data mishandling and maintain integrity. Remember that although these methods enhance security, they are not infallible. Advanced hacking or malware can sometimes bypass these protections. Therefore, alongside password protection, consider additional security measures like:
- Regularly updating your software to fix known security vulnerabilities.
- Using strong, unique passwords for different workbooks.
- Backing up important data to a secure, encrypted external source or cloud storage with access controls.
To summarize, password protecting Excel sheets or workbooks is a straightforward process that offers essential security for your data. By setting permissions, encrypting files, and understanding the limitations of this protection, you can effectively guard your information from unauthorized access while ensuring that you can still collaborate or share data when necessary.
Can I recover a forgotten password for my Excel sheet?

+
Unfortunately, Microsoft Excel does not provide a built-in method to recover a forgotten password. If you lose the password, you might need to use specialized software or consider the data lost if you have no backups.
How secure is the password protection in Excel?

+
The security of password protection in Excel depends on the complexity of the password and the method used. While it provides a layer of defense against casual access, it may not be robust enough against targeted hacking attempts. Using strong passwords and encrypting the entire workbook adds more security.
What are the limitations of Excel’s password protection?

+
Password protection in Excel is intended to deter casual users from modifying or viewing data but does not prevent determined hackers from accessing the data. Additionally, once a file is protected, you need the password to modify permissions or content, which can be inconvenient if passwords are forgotten or lost.