5 Ways to Password-Protect Excel Columns

5 Ways to Password-Protect Excel Columns

Securing sensitive data within Excel spreadsheets is paramount for both personal and professional use. While Microsoft Excel provides robust security options for the entire workbook or specific sheets, there isn't a direct feature to lock down individual columns. However, with some clever workarounds and utilizing the features of Excel, you can effectively password-protect your columns. Here are five methods to achieve this:
1. Sheet Protection with Hidden Columns

One of the most straightforward ways to protect columns from unauthorized access or changes is by using Excel’s sheet protection feature:
- Select the columns you wish to protect.
- Right-click and choose “Hide.”
- Go to the “Review” tab, click on “Protect Sheet.”
- Set a password to unlock the sheet protection.
⚠️ Note: This method prevents users from editing hidden cells, but others can still unhide the columns by knowing the password.
2. VBA Macro to Lock Columns

If you’re comfortable with VBA (Visual Basic for Applications), you can create a macro to lock specific columns:
- Press Alt + F11 to open the VBA Editor.
- Insert a new module and paste the following code:
Sub LockColumns() With Worksheets("Sheet1") .Protect Password:="yourpassword", UserInterfaceOnly:=True .Columns("B:B").Locked = True End With End Sub - Adjust the column reference and password as needed.
💡 Note: Users can still view the data if they can unprotect the sheet with the correct password.
3. Password-Protected Workbooks

To enhance security, you can protect the entire workbook:
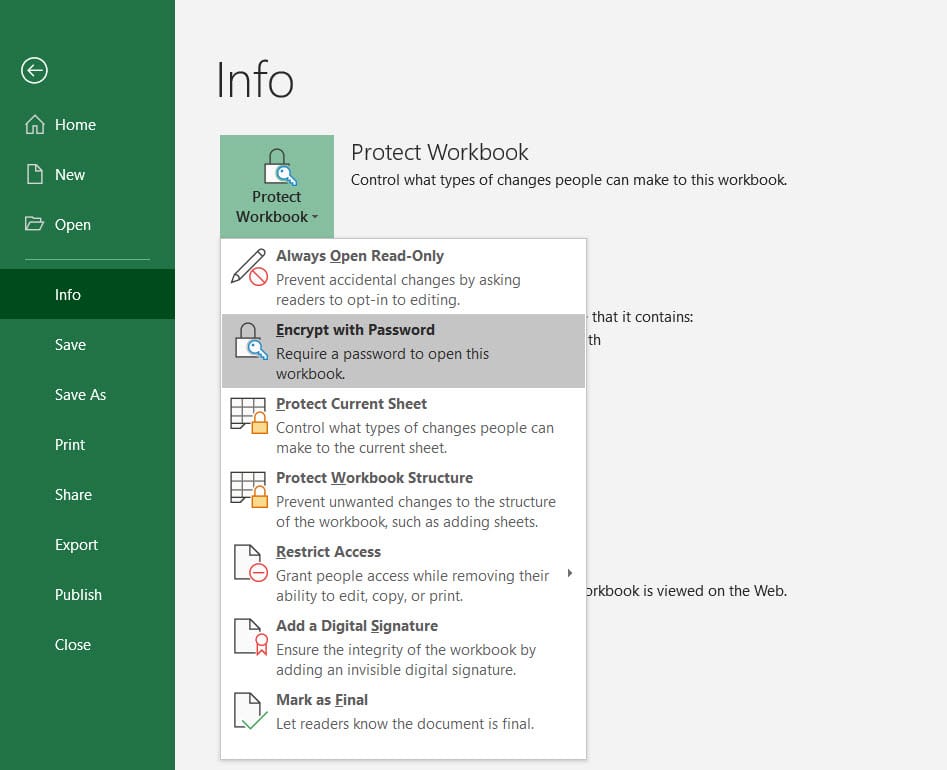
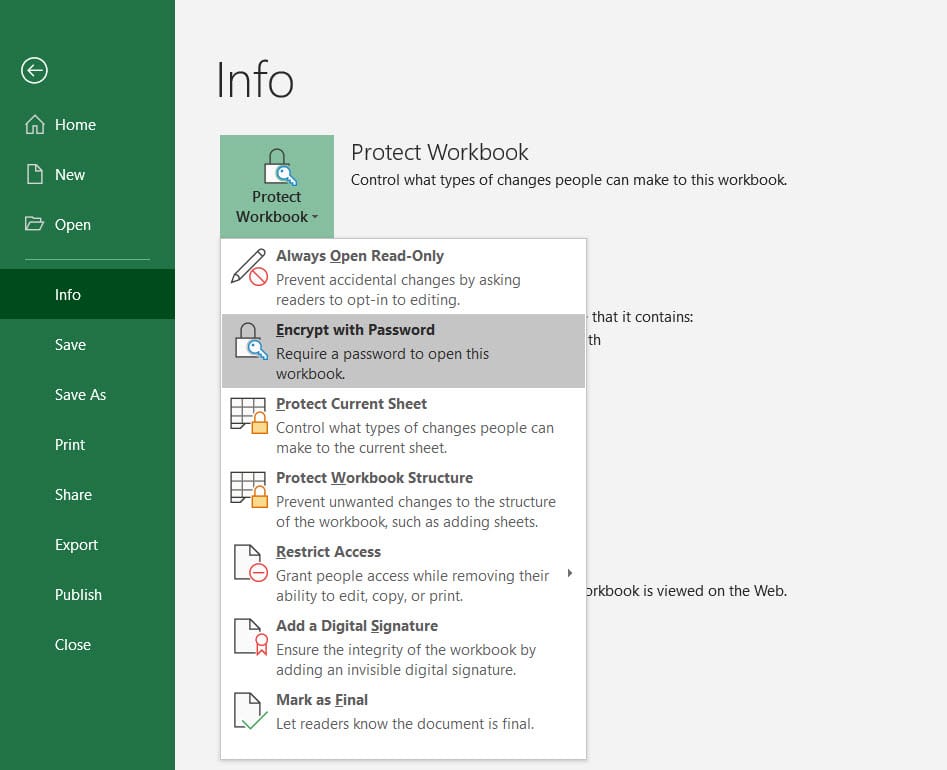
- Go to the “File” menu, then “Info.”
- Choose “Protect Workbook” and select “Encrypt with Password.”
- Set a strong password to prevent access to the workbook.
4. Advanced Technique Using Formulas

Here’s an advanced technique for those who need to protect column data but allow interaction:
- Copy the data from the sensitive column to a new column with a password-protected formula:
=IF(A1="Password",E1,"") - Users must enter the correct password in cell A1 to reveal the content in the second column.
- Hide the original column with the sensitive data.
5. Excel File Protection through Workbook Sharing

Using shared workbooks with restricted editing can also mimic column protection:
- Go to “Review” > “Share Workbook” and allow changes by more than one user.
- Set permissions to restrict editing to specific ranges or columns.
- Password protect the shared workbook.
📌 Note: This method doesn’t provide complete security but can deter unauthorized edits.
In conclusion, while Excel doesn’t offer a direct way to password-protect individual columns, these techniques can significantly bolster your document security. By understanding and implementing these methods, you can tailor security levels to meet your specific needs, balancing accessibility with protection. Protecting columns through sheet protection, VBA macros, or advanced formula techniques ensures that your sensitive information remains confidential and safe from unintended edits.
Can I protect individual cells in Excel?

+
Yes, you can lock specific cells by selecting them, going to ‘Format Cells,’ and checking the ‘Locked’ option under the ‘Protection’ tab. Then, protect the sheet to enforce this setting.
Is it possible to protect Excel spreadsheets from being edited without a password?

+
While you can restrict editing in a way that doesn’t require a password, this isn’t foolproof. Users can still gain full control if they can unprotect the sheet or workbook.
Can Excel VBA scripts be used for column protection?

+
Yes, VBA can be used to lock columns, hide data, or create custom security features. However, the script itself must be protected to prevent tampering.
Does sheet protection in Excel prevent data theft?

+
Sheet protection in Excel primarily prevents editing, not viewing. To prevent data theft, consider encrypting the workbook or using more advanced security measures outside of Excel.