How to Print Excel Header on Each Sheet

Understanding Excel Headers

Before diving into the steps of printing Excel headers on each page, it’s essential to understand what headers are and why they are important. In Microsoft Excel, headers are the text or graphics that appear at the top of each printed page. They help:
- Identify the document or worksheet.
- Include page numbers for easier document navigation.
- Add titles or sections names for better organization.
- Include the date, time, or file path, which can be useful for tracking document versions.
💡 Note: Headers are different from column headers, which are labels at the top of data columns within the worksheet.
Setting Up Headers in Excel

Here’s how you can set up headers to print on every sheet:
Accessing the Header & Footer Tools

Open your Excel Workbook: Ensure you have the file open that you wish to modify.
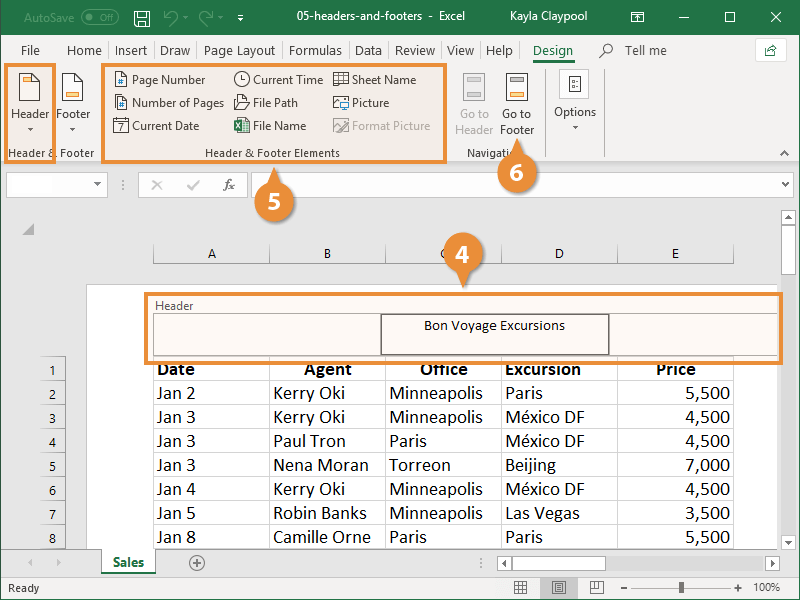
Switch to Page Layout View: Navigate to the View tab on the Ribbon, then select Page Layout from the Workbook Views group.

Click on Header: Double-click the header area at the top of the page to open the Header & Footer Tools.
Customizing the Header

Within the Header & Footer Tools:
- Design Tab: This is where all the options for customizing headers reside.
- Insert Options: Use the Header & Footer Elements group to add date, time, page number, file path, and other dynamic elements.
- &[Date] - Insert the current date
- &[Time] - Insert the current time
- &[Page] - Insert the current page number
- &[File] - Insert the workbook's file name
- &[Path] - Insert the file's path on your local system
- &[Tab] - Insert the sheet name
- Text Area: Click into the header boxes to type static text like titles, your company name, etc.
- Format Text: Use the Format Text options to adjust font, size, style, and color of your header text.
Setting the Header for All Sheets

To ensure the header is printed on all sheets:
Select Multiple Sheets: Click the first sheet tab, hold down Shift, then click on the last sheet tab.
Set Header: After selecting multiple sheets, any header changes will apply to all selected sheets.
🔍 Note: When you have multiple sheets selected, the Header & Footer options might not be immediately visible. You might need to reselect the sheets or ensure you are in Page Layout View for these options to appear.
Adjusting Print Settings

To optimize how your headers are printed:
Changing Header Margins

Go to the Layout Tab: In the Page Layout view, click on the Layout tab.
Adjust Margins: Under the Margins group, click on the Custom Margins. Here, you can adjust the top margin to give your header more or less space.
Printing Options

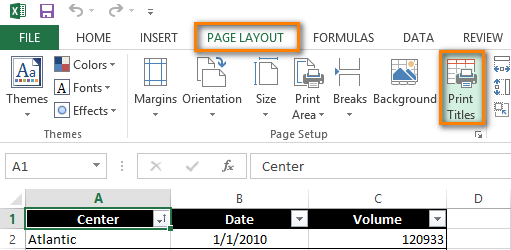
- Print Titles: Go to the Page Layout tab, and in the Page Setup group, click Print Titles. This allows you to specify rows or columns to repeat on each printed page.
- Page Breaks: Preview your document or use the Page Break Preview to manage where pages start and end to ensure headers appear where expected.
- Scale to Fit**: If your headers push data off the page, adjust the scale under Page Setup to fit data onto fewer pages.
Common Issues and Solutions

Here are some typical problems users face and their solutions:
Headers Not Appearing on Every Page

- Check Header Settings: Ensure your header is set to repeat on each page by reviewing the Header settings in Page Layout.
- Review Print Area: Make sure your print area includes all necessary rows or columns.
- Use Print Preview: Use Print Preview to visually check where headers appear before actual printing.
Incorrect Header Content

- Verify Header Elements: Double-check the codes used to insert dynamic content like &[Date] or &[Page]. If these are incorrect, the content will not display properly.
- Refresh Headers: Sometimes Excel doesn’t update headers automatically; you might need to refresh the header content by re-entering the Page Layout view.
Headers Overlapping Content

- Adjust Margins: Increase the top margin to give your header space.
- Rescale Content: If headers are overlapping because of too much data, consider scaling the sheet to fit on fewer pages.
📘 Note: Excel's print preview is a good tool to catch most issues before they occur. Utilize it before committing to printing large spreadsheets.
Understanding how to print Excel headers on each page involves not just setting up the header content but also optimizing the sheet’s layout to accommodate headers without losing data. By following these steps, you can ensure your headers appear correctly on every printed sheet, enhancing document readability and professionalism.
Why don’t my headers appear on all sheets?

+
Make sure to select multiple sheets before setting the header. This ensures the header settings apply to all selected sheets. If headers still don’t appear, check your print area and page breaks.
How do I change the font size in my headers?

+
In Page Layout view, click on the header box, select your text, and then adjust the font size using the Format Text options in the Header & Footer Tools Design tab.
Can I add images to the header?
+Yes, you can insert images or company logos into headers using the Insert Picture command in the Header & Footer Elements group on the Design tab.