5 Simple Ways to Print Excel Sheets Fit-to-Page

Excel spreadsheets can often contain a wealth of information organized into columns and rows, sometimes spanning across many pages. However, when it comes time to print, ensuring that all your data fits neatly on one page can be a challenge. In this comprehensive guide, we'll explore five straightforward ways to print your Excel sheets so they fit-to-page, streamlining your printing process and enhancing the readability of your printouts.
1. Adjusting Page Layout

Before delving into complex solutions, start with the basics by tweaking the Page Layout settings. Here’s how:
- Open the Excel workbook you want to print.
- Go to the Page Layout tab.
- Click on Size and choose an appropriate paper size or create a custom size.
- From the Orientation options, select either Portrait or Landscape depending on your data’s dimensions.
- Adjust Margins to minimize the waste space on the page.
2. Scaling Options

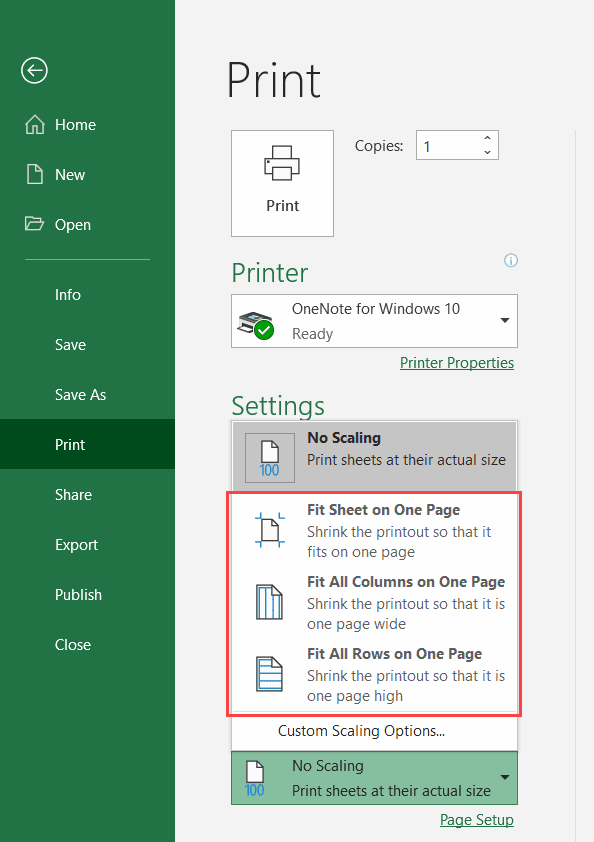
Scaling your worksheet is often the most effective way to ensure everything fits onto a single page.
- Navigate to the Page Layout tab.
- Look for the Scale to Fit group.
- Set the Width or Height to fit one page.
💡 Note: Using the “Width” option is usually better for spreadsheets with more columns, while “Height” works well for sheets with numerous rows.
3. Print Area Configuration

Sometimes, reducing the print area helps in managing the size of the printed output.
- Select the range of cells you want to print.
- Go to Page Layout > Print Area > Set Print Area.
- Print this area instead of the whole sheet to save space.
4. Page Break Preview

Page Break Preview helps you see where Excel will break pages and adjust accordingly:
- On the View tab, click Page Break Preview.
- Drag the blue page break lines to adjust where the data should be split.
- Examine how your changes affect the layout to ensure everything fits.
5. Using Excel’s Fit-to-Page Feature

When all else fails, Excel’s built-in Fit-to-Page feature can come to the rescue:
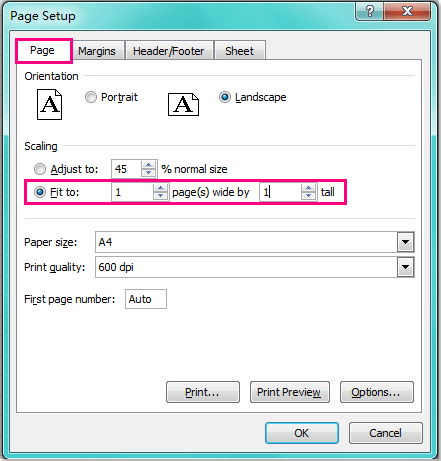
- Access Page Layout > Sheet Options.
- Check Print under Fit to.
- Set 1 page wide by 1 tall to force Excel to fit your sheet on a single page.
🔍 Note: This feature might affect text size and readability, so it’s not always the most suitable for all documents.
To wrap things up, adjusting your Excel sheets for fit-to-page printing involves a combination of layout tweaks, scaling, and smart use of Excel’s printing options. Whether you're scaling down your data, setting a print area, or using the Fit-to-Page feature, these methods will help you print your Excel sheets in a way that's concise and easy to digest. Remember, the goal is not just to fit everything onto a single page, but to ensure that the printed output is readable and professionally presented.
How do I know if my Excel sheet will fit on one page?

+
Use the Page Break Preview view to see where Excel will split your data. You can then adjust the print area or scale your sheet to ensure everything fits on one page.
Can I save a specific print configuration?

+
Unfortunately, Excel does not provide an option to save print configurations directly. However, you can use Macros to record and apply specific print settings as needed.
What happens to headers and footers when using Fit-to-Page?

+
Fit-to-Page will shrink all content, including headers and footers. Ensure your headers and footers are concise, or they might become too small to read when printed.
Is there a way to manually fit rows and columns to fit onto a page?

+
You can manually adjust row and column sizes to fit onto a page, but this might require some trial and error. The Page Break Preview can help you see the results of these changes in real-time.