Print Excel Sheets with Lines in Excel 2013 Easily

Excel 2013 users often find themselves in situations where they need to print their spreadsheets, but the default settings can leave out important gridlines that make the printed document hard to read. If you're looking to enhance the readability of your printed Excel sheets by including gridlines, this tutorial is for you.
Understanding Gridlines in Excel


Before diving into the process, it’s helpful to understand what gridlines are:
- On-screen gridlines: These are the faint lines you see on your computer screen that help organize data.
- Printed gridlines: These are not automatically printed, and you need to enable them if you want them to show up on your printed sheet.
How to Print Gridlines in Excel 2013

Here’s a step-by-step guide to printing Excel 2013 sheets with lines:
Step 1: Open Your Workbook

Start by opening the workbook you wish to print in Microsoft Excel 2013.
Step 2: Go to the “Page Layout” Tab

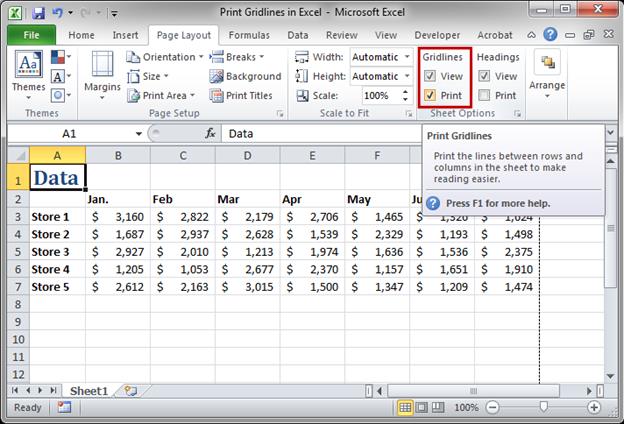
Click on the “Page Layout” tab in the Excel ribbon at the top of your window.
Step 3: Enable Gridlines for Printing

In the “Sheet Options” group, under “Gridlines”, make sure:
- To check the box next to “Print” under “Gridlines”.
Step 4: Adjust Print Settings

Now, before you hit print:
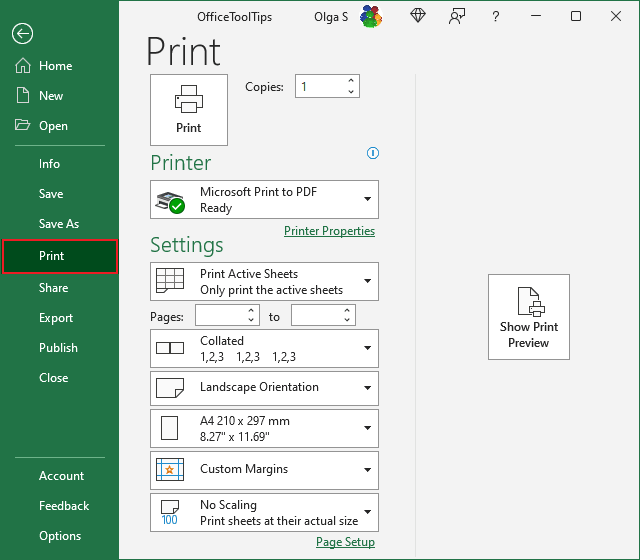
- Click on the “File” tab.
- Select “Print” to access the print preview.
- Check if the gridlines are showing up as expected.
Step 5: Print Your Document

If everything looks correct, proceed to:
- Choose your printer settings.
- Hit “Print” to start the printing process.
🔔 Note: If gridlines don't appear, ensure the "Draft quality" is not selected, as this setting can disable gridlines for printing.
Alternative Methods to Show Gridlines

Sometimes, the gridlines are either not visible on-screen or not printing as expected:
Changing Workbook View

- Go to the “View” tab.
- In the “Workbook Views” group, click on “Normal”.
Modifying Sheet Color

If gridlines are not visible:
- Go to “Page Layout”.
- Under “Themes”, change the “Gridline color” to a darker hue.
Adjusting Cell Borders

- Select your range of cells.
- From the “Home” tab, choose “Borders” and set the type you prefer.
✏️ Note: Adding borders manually can give a similar effect to printing gridlines but might require more setup time.
When to Use Each Method

Here’s a decision guide:
| Method | Best for | Advantages |
|---|---|---|
| Printing Gridlines | Quick output | Fast, built-in feature |
| Changing View | On-screen clarity | Simple toggle |
| Modifying Colors | Contrast issues | Visibility improvement |
| Adjusting Borders | Specific design | Custom aesthetics |

In wrapping up, by following these steps, you can easily print your Excel 2013 sheets with gridlines. This ensures that your printed documents maintain the same level of clarity and organization as your on-screen spreadsheets. Whether you need gridlines for professional presentations, to aid in data entry or analysis, or simply for personal use, Excel 2013 provides straightforward options to meet your needs.
Why don’t my gridlines show when I print?

+
If your gridlines aren’t printing, make sure the “Print” option under “Gridlines” in the “Page Layout” tab is checked. Also, ensure you aren’t in “Draft quality” print mode, which omits gridlines.
Can I print gridlines only for certain cells?

+
No, Excel does not allow printing gridlines for specific cells; they are either on or off for the entire sheet. However, you can manually add borders to mimic this effect.
Do gridlines impact the appearance of the cells on screen?
+No, gridlines do not affect the cell contents or appearance; they are just visual aids on screen and in print.


