5 Ways to Print Excel Sheets to Fit One Page

Managing large Excel spreadsheets can be a daunting task, especially when it comes to printing. There’s nothing more frustrating than running out of paper because your data insists on sprawling across multiple sheets. However, with some strategic preparation, you can effectively fit your Excel data onto a single page, making your printouts compact, organized, and easy to share. Here are five smart strategies to help you print your Excel sheets to fit one page seamlessly.
1. Scale to Fit

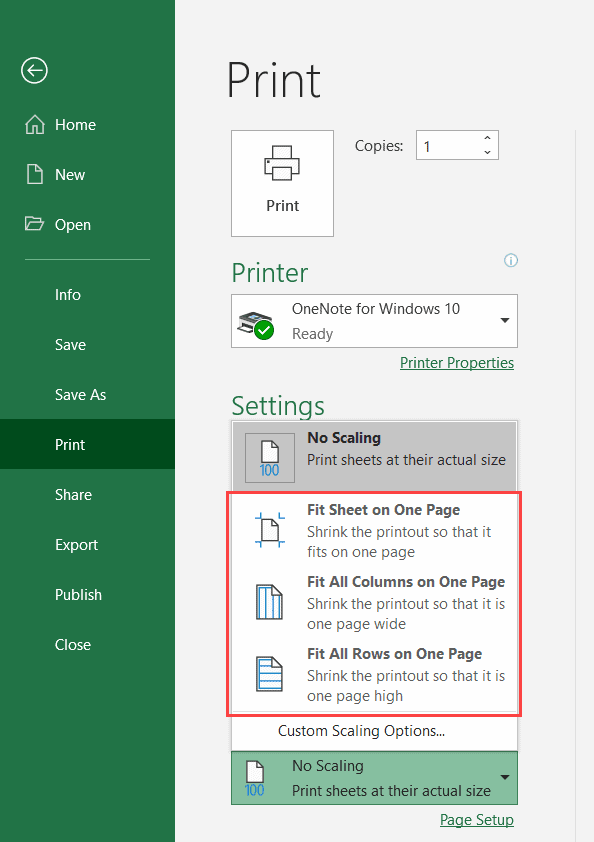
Excel provides an intuitive feature known as “Scale to Fit,” which allows you to adjust the scale of your printout without altering the original document.
- Open your Excel worksheet.
- Navigate to File > Print or press Ctrl + P.
- Find the Page Setup section and locate the “Scaling” options.
- Select “Fit to:” and ensure that the width and height are set to one page each.
This feature will automatically adjust the size of all content on the sheet, compressing or stretching it to fit within the bounds of a single printed page. Be mindful that this can sometimes make text or graphics very small or hard to read, but for charts or when legibility isn’t critical, it’s a fast and effective solution.
📌 Note: If your document contains a lot of information, scaling might make everything very small. Consider other methods if readability is crucial.
2. Adjust Margins and Orientation

The way your document is formatted can greatly impact how much data fits on a single page. Here’s how to tweak these settings:
- In the Page Layout tab, click on Margins and choose a preset or customize the margins to minimize white space.
- From the same tab, switch between Portrait and Landscape orientation. Often, landscape orientation will allow for wider tables to fit within a single page.
- You can also adjust the print area by clicking Print Area > Set Print Area in the Page Layout tab, selecting only the data you need to print.
These adjustments can significantly reduce the number of pages required for printing. Remember to keep these changes aligned with the readability of your document.
3. Use Page Break Preview

Excel’s Page Break Preview mode helps you see exactly where your page breaks will occur, allowing you to manually adjust your data to fit on one page:
- Go to the View tab and select Page Break Preview.
- You’ll see blue lines indicating automatic page breaks and dashed lines for manual adjustments.
- Adjust the width and height of the page by dragging these lines to fit your data. This visual tool helps you organize your content more efficiently.
This method is particularly useful for larger spreadsheets where you can make strategic decisions about what data needs to be on the same page.
4. Optimize Column Widths and Row Heights

One of the most straightforward ways to ensure your sheet fits on one page is by optimizing how much space each column and row occupies:
- Right-click on the row or column headers, and choose Column Width or Row Height.
- Reduce unnecessary width or height, ensuring that the text still fits within each cell.
- Use the AutoFit feature by double-clicking the column header lines to automatically adjust the width to the longest entry.
This adjustment helps in utilizing the space more efficiently, potentially allowing your data to fit within the printable area.
5. Hide Unnecessary Data

Sometimes, you might have data in your spreadsheet that doesn’t need to be printed. Hiding this information can help:
- Select the rows or columns you wish to hide, right-click, and select Hide.
- Alternatively, for a temporary solution, you can use Print Area under Page Layout to only print a selected range.
This not only helps in fitting the spreadsheet onto one page but also focuses the reader’s attention on the most relevant information.
📌 Note: Remember to restore any hidden columns or rows once you're done printing to maintain the integrity of your data.
To round off our exploration of how to fit Excel sheets to one page, we've covered scaling options, adjusting print settings, utilizing page break previews, optimizing data presentation, and selectively hiding data. Each method provides unique benefits, allowing you to choose the best approach for your specific needs. Whether you're preparing a report for a meeting or creating a concise summary for distribution, mastering these techniques ensures your Excel documents are both presentable and functional. Keep in mind that while making your data fit on one page is convenient, maintaining readability and accuracy should always be your primary concerns.
Will scaling affect the readability of my document?

+
Yes, scaling can make text and charts very small, potentially reducing readability. It’s best used for documents where detailed analysis isn’t required or when you have no other option to fit everything on one page.
Can I print different sections of my worksheet on different pages?

+
Absolutely. Using the ‘Print Area’ feature in Excel, you can set different print areas to print various parts of your worksheet on separate pages, even when your goal isn’t to fit everything onto one page.
How do I ensure that hidden data isn’t accidentally printed?

+
Hidden data won’t print unless it’s part of the set print area. Always check the print preview before finalizing your print to avoid surprises.