5 Simple Tricks to Print Excel Sheets Easily

Printing an Excel spreadsheet doesn't have to be a daunting task. Whether you're preparing financial reports, creating project schedules, or just need a hard copy of your data, the process can be streamlined with a few simple tricks. Here, we will explore five effective techniques to make printing in Excel effortless and tailored to your specific needs.
1. Set Print Area Efficiently

One of the most common issues when printing an Excel sheet is printing more than what is necessary. Here’s how you can manage this:
- Select the range of cells you want to print.
- Go to the ‘Page Layout’ tab, and click on ‘Print Area’, then select ‘Set Print Area’.
This method ensures you only print the data that is relevant to your report or presentation.
🚨 Note: Remember to reset the print area if you need to print a different section later.
2. Use Page Break Preview

Excel’s Page Break Preview feature helps visualize how your sheet will be divided when printed:
- Under the ‘View’ tab, select ‘Page Break Preview’.
- Adjust the blue lines to manually set where the page breaks will occur.
This can prevent awkward page breaks in the middle of charts or tables, ensuring your printed document looks as you intended.
3. Optimize Printing Settings

To make your Excel document print-friendly, adjust the following settings:
- Margins: Use narrow margins if you need to fit more data on a page.
- Orientation: Switch between landscape and portrait to fit your data better.
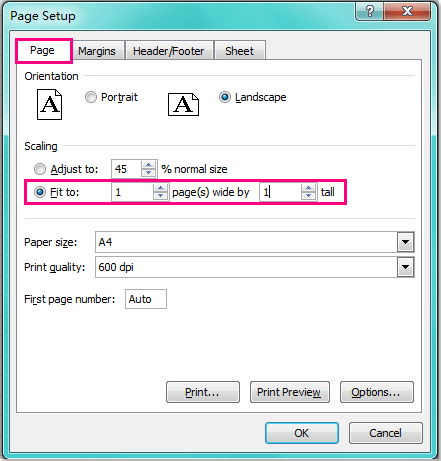
- Scaling: Use the ‘Fit Sheet on One Page’ option if your data is too large for one page.
- Headers and Footers: Add headers or footers for better document identification.
| Setting | Description |
|---|---|
| Margins | Defines the white space around the edges of your document. |
| Orientation | Rotates the print direction to fit more columns or rows. |
| Scaling | Reduces or enlarges the print size to fit the content on fewer or more pages. |

4. Print to PDF for Clarity

Sometimes, printing to a PDF offers clearer results and is more efficient for sharing:
- Select ‘File’ > ‘Save As’ > ‘PDF’.
- Choose your options in the Print dialog box to format the PDF as needed.
📝 Note: PDF printing maintains your document’s formatting and is great for keeping records or sending documents.
5. Use Excel’s Custom Views

Custom views can save your favorite print settings, making it easy to switch between various configurations:
- Set up your sheet with desired print settings.
- Go to the ‘View’ tab, click ‘Custom Views’, and then ‘Add’.
- Name the view and save. Now you can easily switch between views with different print settings.
Printing in Excel doesn't need to be a hassle. By mastering these five simple tricks, you'll save time, reduce waste, and produce professional-looking documents. Remember to set your print area accurately, use Page Break Preview to control pagination, tweak your print settings for better output, consider printing to PDF for clarity, and utilize custom views for tailored printing needs. With these techniques, you'll transform how you manage and present your Excel data on paper, making your printing experience much more efficient and effective.
How do I set multiple print areas in Excel?

+
To set multiple print areas, hold down the Ctrl key while selecting multiple ranges. Then go to the ‘Page Layout’ tab, click ‘Print Area’, and choose ‘Set Print Area’.
Why won’t my Excel sheet fit on one page?

+
This might happen if your content is too large for the page or if the print settings are not optimized. Adjust the scaling in ‘Page Setup’ or use the ‘Fit Sheet on One Page’ option to resolve this.
Can I print charts and tables from Excel?

+
Yes, you can print charts and tables by including them in your print area or by using the Page Break Preview to ensure they are not split across pages.