Print Selective Data from Excel Sheets Easily

Extracting data from Excel sheets can be a hassle, especially when you're dealing with large datasets or need to frequently pull specific information. Whether you're an accountant summarizing financial reports, a marketer analyzing consumer behavior, or a student compiling research data, knowing how to efficiently select and print data from Excel sheets can save time and reduce frustration. In this comprehensive guide, we'll explore various methods to print selective data from Excel with precision and ease.
Understanding Excel’s Data Structure

Before diving into the methods, it’s vital to understand how Excel organizes data:
- Cells: Individual rectangles where you can input data.
- Rows and Columns: Cells are organized in a grid format, with rows named with numbers (1, 2, 3, etc.) and columns labeled with letters (A, B, C, etc.).
- Range: A collection of cells you can refer to by the upper-left cell’s address followed by the lower-right cell’s address, like A1:C10.
🛠️ Note: Selecting a large range of cells for printing can slow down your Excel application.
Manual Selection and Printing

Let’s start with the most straightforward way to print selective data:
Selecting Data Manually

- Click and drag to highlight the cells, rows, or columns you want to print.
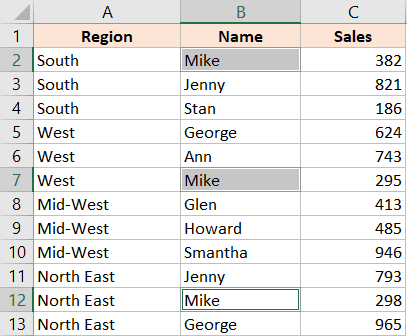
- Alternatively, you can use Ctrl+Click to select non-adjacent cells or ranges.
Printing the Selection

- Go to File in the top left corner.
- Select Print.
- On the right side, under Settings, you’ll see an option labeled Print Active Sheets. Click on it to expand the options.
- Choose Print Selection.
- Adjust your printer settings and hit Print.
Using Filters and Print Areas

For recurring reports or when you need to frequently print selective data, setting up filters and print areas can be very efficient:
Setting Up Filters

- Select your dataset’s header row.
- Go to Home > Sort & Filter > Filter. Arrow icons will appear next to each header.
- Click these arrows to filter your data based on criteria. Only the filtered data will be displayed.
Defining a Print Area

- Select the range you want to print regularly.
- Go to Page Layout > Print Area > Set Print Area.
- This range will remain selected for future prints unless you change or clear it.
Advanced Techniques

For those who need more control over what gets printed, here are some advanced methods:
Using Conditional Formatting for Printing

- Apply conditional formatting to highlight cells based on specific criteria.
- Use Print Selection to print only highlighted cells.
🔍 Note: Conditional formatting can help in visualizing data, but ensure the printout is legible.
Printing Data as a PDF

- Instead of directly printing, you can create a PDF file of your data, which can be shared or printed later.
- From the File tab, select Save As, choose PDF, and then select the cells you want to include in the PDF.
| Method | Pros | Cons |
|---|---|---|
| Manual Selection | Quick for one-off prints; no setup required | Time-consuming for repetitive tasks; prone to error |
| Filters & Print Area | Efficient for recurring prints; reduces selection errors | Requires initial setup; might be limiting for varying print needs |
| Conditional Formatting | Visualizes data effectively; prints only what matters | Can be complex to set up; must ensure legibility |
| PDF Export | Provides a sharable, print-ready document; preserves formatting | Extra step in the process; may require additional software |

Each of these methods has its place depending on the complexity of your data and your printing needs. By understanding your requirements and the capabilities of Excel, you can choose the most suitable approach.
Recapitulation

Throughout this guide, we’ve covered various methods for printing selective data from Excel sheets. From simple manual selection to setting up filters and print areas, using conditional formatting, and exporting to PDF, there are numerous ways to tailor your printing process. Each method has its own advantages:
- Manual selection is quick for one-off tasks.
- Setting up filters and print areas provides a more automated approach for frequent tasks.
- Conditional formatting adds an extra layer of customization, allowing you to print visually distinct data.
- Exporting to PDF creates a portable and shareable document, ensuring data consistency across different platforms.
By mastering these techniques, you can streamline your workflow, reduce errors, and ensure that the information you need is presented clearly and accurately. Excel is a powerful tool when used correctly, and with these methods at your disposal, you can extract the most from your data with minimal effort.
How can I quickly select a large range of cells?

+
Click the first cell, then hold the Shift key while clicking the last cell of the desired range.
Can I print only the visible cells after filtering?

+
Yes, with Print Selection selected, only the visible cells will be printed.
What if I want to print multiple non-adjacent selections?

+
You can hold Ctrl while clicking to select non-adjacent cells or ranges, then use Print Selection.
Is there a way to reset my Print Area?

+
Yes, go to Page Layout > Print Area > Clear Print Area to remove the current setting.
Can I use Excel’s Page Break Preview to help with printing?
+Absolutely! Switch to Page Break Preview (View > Page Break Preview) to see where pages will break and adjust your selection accordingly.