5 Essential Steps to Create Excel Sheets Easily

In today's data-driven world, proficiency in Microsoft Excel can significantly enhance your productivity at work or help manage personal finances. This guide walks you through the five essential steps to create Excel sheets with ease, ensuring you can organize, analyze, and visualize data efficiently.
Step 1: Open Microsoft Excel

Begin by opening the Microsoft Excel application from your computer or device. If you have a Microsoft 365 subscription, you can also access it through the web version. Here’s how to start:
- Click on the Microsoft Excel icon on your desktop or in the Start menu (for Windows).
- On a Mac, you might find it in the Applications folder or use Spotlight to search for “Excel.”
- If using Microsoft 365 online, log in to your Microsoft account and navigate to Excel from the Office app launcher.

Step 2: Understanding the Excel Interface

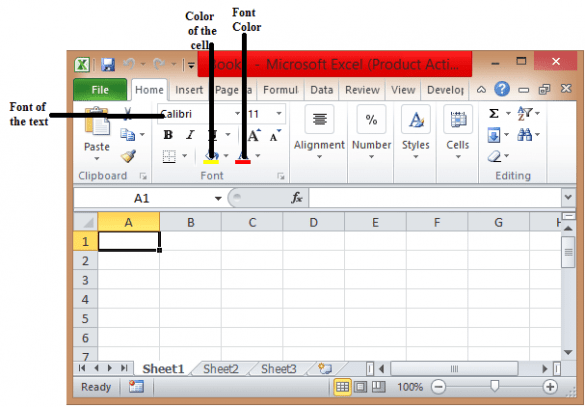
Familiarize yourself with Excel’s interface to work effectively:
- Ribbon: Contains most of the tools and commands in a tabbed toolbar.
- Worksheet: The grid where you enter your data, each cell representing a unique address.
- Formula Bar: Shows the content or formula in the selected cell.
- Name Box: Displays the name or address of the currently selected cell or range.
To further understand the layout:
| Component | Function |
|---|---|
| Ribbon | Access commands like formatting, inserting, and reviewing |
| Worksheet | Data input, manipulation, and analysis area |

💡 Note: Use the keyboard shortcut Ctrl+Tab (Windows) or Control+Tab (Mac) to switch between Excel windows or documents.
Step 3: Creating Your Spreadsheet

Now, you’re ready to start creating your spreadsheet:
- Click on any cell to begin entering data. You can type numbers, text, or formulas.
- To add a new row or column, right-click on the row number or column letter, and select “Insert.”
- Use the Merge and Center command to format headers or consolidate cells for better visibility.
- Format cells using the “Format Cells” dialog (Ctrl+1) to change number formats, alignment, and more.
🔄 Note: Remember to save your work regularly to avoid losing data. Use Ctrl+S for Windows or Command+S for Mac.
Step 4: Enter Data and Apply Formulas

Entering data and applying formulas is where Excel’s true power shines:
- Type data into cells. Use Enter or Tab to move between cells.
- For calculations, begin typing the formula in a cell with ‘=’ sign, e.g.,
=A1+B1to add values in A1 and B1. - Excel supports many functions like SUM, AVERAGE, VLOOKUP, and more. Use the AutoSum feature for quick calculations.
- Remember to use cell references for dynamic data analysis.
| Function | Description |
|---|---|
=SUM(A1:A10) |
Adds all numbers in the range A1 to A10 |
=AVERAGE(B2:B5) |
Calculates the average of values in B2 to B5 |
Step 5: Formatting and Data Analysis

With your data in place, format and analyze it for better insights:
- Use conditional formatting to highlight cells based on criteria, making trends and anomalies stand out.
- Charts can be created to visualize data. Go to Insert > Recommended Charts for suggestions based on your data.
- Filter and sort data by selecting a range and using the Sort & Filter options on the Data tab.
- Data validation ensures data integrity by setting rules for what can be entered into cells.
Here are some formatting tips:
- Bold or italicize headers to differentiate from data.
- Use borders, cell shading, and text colors to make the spreadsheet visually appealing and easier to read.
- Adjust column widths to fit content; double-click the right edge of the column header to auto-fit.
This journey through Microsoft Excel's basic functionalities equips you with the skills necessary to create, format, and analyze data effectively. Whether for personal budgeting, business analytics, or project tracking, these steps will help you leverage the power of Excel to streamline your work, enhance data visualization, and make informed decisions based on your data.
What is the difference between a formula and a function in Excel?

+
A formula is any calculation you perform in Excel, typically starting with an equal sign (=). A function is a predefined formula that performs calculations using specific values in a particular order (arguments). For example, =A1+B1 is a simple formula, whereas =SUM(A1:A10) uses the SUM function.
How can I quickly add data from multiple cells?

+
Use the AutoSum feature. Simply select the cell where you want the result, click the AutoSum button (Σ) on the Home tab, and Excel will automatically guess the range to sum. Alternatively, you can type the function manually, like =SUM(A1:A10).
Can I lock cells to prevent editing?

+
Yes, you can protect specific cells or the entire sheet. First, format the cells you want to protect by selecting them, going to Format Cells > Protection, and ensuring the Locked option is checked. Then, go to the Review tab and select Protect Sheet to set the protection level.