Shrink Your Excel Sheets for Easy Printing

Ever found yourself struggling to print a massive Excel worksheet only to find it prints across multiple pages, making it hard to read? You're not alone. Reducing the size of your Excel sheets for easy printing can transform your documents into neat, professional-looking reports or handouts. In this comprehensive guide, we'll explore various methods to shrink your Excel sheets, ensuring they fit perfectly on a single page or just a few pages without losing essential data.
Why Shrink Your Excel Sheets?

Before diving into the technical aspects, it’s worth understanding why you might want to reduce your Excel sheets:
- Conservation of Paper: Reducing the size of your sheet conserves paper, making your documents more environmentally friendly.
- Professional Appearance: A well-fitted Excel sheet appears more polished and is easier to navigate for your audience.
- Readability: Large, sprawling Excel sheets can be overwhelming. Shrinking helps improve the readability by focusing on the necessary data.
- Portability: Smaller printouts are easier to carry around, especially for meetings or presentations.
Using Page Layout Options

Excel provides several built-in features to manage the scale and layout of your printed output. Here’s how you can use them:
1. Page Setup Options

To access page setup options:
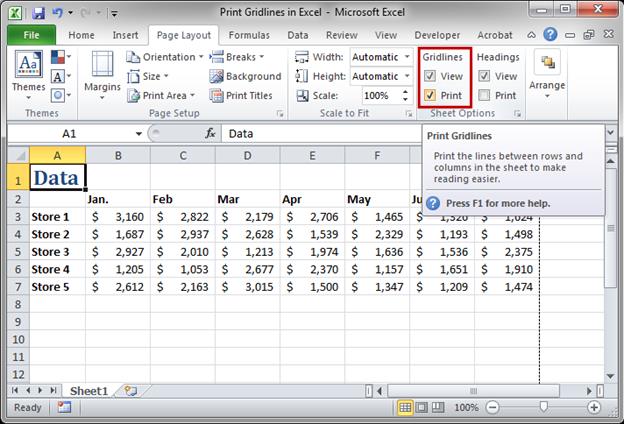
- Click on the ‘Page Layout’ tab.
- In the ‘Scale to Fit’ group, you can:
- Adjust the width and height percentages to scale your sheet.
- Use the ‘Fit to’ option to fit your data to a specific number of pages.
2. Print Area Setting

If you only need to print specific parts of your worksheet:
- Select the cells you want to print.
- Navigate to ‘Page Layout’ > ‘Print Area’ > ‘Set Print Area’.
Only the selected area will print, which can significantly reduce the size of your printed sheet.
3. Adjusting Margins and Orientation

Adjusting margins and changing the page orientation can help fit more content onto each page:
- In ‘Page Layout’, under ‘Margins’, choose ‘Custom Margins’ to reduce margins.
- Choose ‘Orientation’ to either ‘Landscape’ or ‘Portrait’ based on your data layout.
Reducing Font Size and Cell Contents

Sometimes, the best way to shrink your sheet is to adjust the content itself:
1. Font Size and Style

Decreasing font size or changing to a thinner font:
- Select your data range or the whole sheet.
- Go to ‘Home’ > ‘Font’ group, where you can adjust the font size or change the font style.
2. Using Abbreviations

Shortening content by using abbreviations or acronyms can also help:
- Replace full names or phrases with abbreviations where possible, e.g., ‘Jan’ instead of ‘January’.
Excel’s Advanced Techniques

For those who need to go beyond basic scaling:
1. Excel’s VBA for Custom Scaling

If Excel’s built-in scaling isn’t cutting it, VBA might be your answer:
Sub AutoFitToPage()
    ‘Fit entire worksheet to print on one page
    With ActiveSheet.PageSetup
        .Zoom = False
        .FitToPagesWide = 1
        .FitToPagesTall = 1
    End With
End Sub
💡 Note: This VBA code will adjust your worksheet to fit onto one page when printed. Remember to save your workbook as a macro-enabled file (.xlsm).
2. Data Consolidation

If you have repetitive or redundant data, consolidating it:
- Use Excel’s ‘Consolidate’ feature under the ‘Data’ tab to combine data from multiple sheets or ranges.
Optimizing Table Layout

A well-organized layout can also help in shrinking:
| Action | Benefit |
|---|---|
| Merge cells | Reduces the space needed for headers or titles |
| Remove blank rows or columns | Streamlines data, reducing unnecessary space |
| Adjust column width & row height | Can fit more data into less vertical space |

The Importance of Previewing

Before printing, always use ‘Print Preview’:
- Go to ‘File’ > ‘Print’ > ‘Print Preview’.
- Check for any unintended scaling or layout issues.
Through the use of these techniques, you can effectively manage the size of your Excel sheets, making them print-ready in a more compact and readable format. Whether for meetings, reports, or sharing with clients, optimizing your Excel printouts ensures that your data is presented clearly and professionally, enhancing the impact of your work.
Why does my Excel sheet print over multiple pages even after scaling?

+
Ensure you’ve checked the ‘Fit to’ option in the Page Setup and that the total content, including headers and footers, fits within the page margins you’ve set.
Can I use VBA to automatically adjust print settings for any sheet?

+
Yes, VBA can be programmed to automatically adjust print settings. The code provided earlier is an example, but you can customize it to fit various sheets dynamically.
Is there a way to print certain parts of my sheet?

+
Yes, setting a ‘Print Area’ allows you to print only the selected range of your worksheet, which can help reduce the overall size of the printout.