Excel Printing Guide: One Page Tips and Tricks

If you've ever found yourself struggling with getting your Excel spreadsheets to print just right, you're not alone. Whether you're printing financial reports, project plans, or any data-centric document, mastering Excel's printing features can save you a lot of time and frustration. This guide will walk you through essential Excel printing tips and tricks to make your documents look professional and fit on a single page effortlessly.
Understanding Print Options in Excel

Before we dive into the nitty-gritty of printing, it’s crucial to understand the print options available in Excel. Here’s what you need to know:
- Page Layout: This tab allows you to adjust margins, orientation, and the size of your worksheet.
- Print Preview: Always check this to see how your document will look when printed.
- Page Break Preview: This feature helps you see where pages naturally break, allowing you to adjust manually if needed.
Adjusting Page Setup for One Page

To fit your data onto one page, follow these steps:
- Change the Orientation: Go to Page Layout > Orientation and select Landscape if your data is wider than it is long, or Portrait if it’s longer.
- Modify Margins: Click on Page Layout > Margins, then customize them to reduce unnecessary whitespace.
- Scale to Fit: Navigate to Page Layout > Scale to Fit. Here, you can scale the worksheet to print on one page by adjusting the Width and Height options to “1 page.”
Using Page Breaks Effectively

To control where your Excel document breaks for printing:
- Manual Page Breaks: Go into Page Break Preview, and you can drag blue dashed lines to create manual breaks where you want.
- Remove Breaks: If there are automatic breaks that don’t make sense, right-click on the break line and choose Remove Page Break.
Formatting for Better Printing

When preparing your worksheet for printing, consider these formatting tips:
- AutoFit Columns and Rows: Double-click the edge of the column or row header to auto-adjust sizes for content.
- Wrap Text: If cells contain long strings of data, wrap text to prevent overflow and make your data fit neatly on the page.
- Font Size and Style: Choose readable fonts and sizes. Keep headers bigger but decrease text in cells if space is an issue.
Print Area Settings

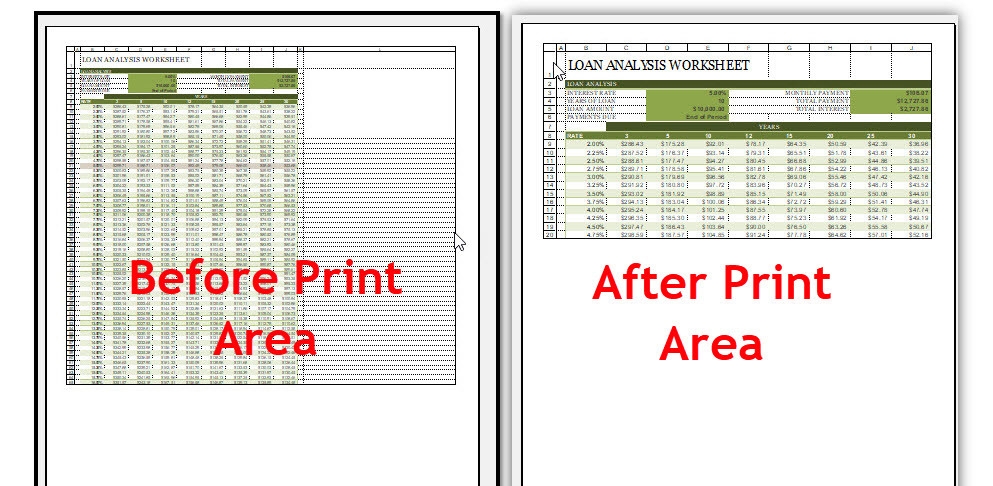
Sometimes, you might not want to print the entire worksheet but only specific cells:
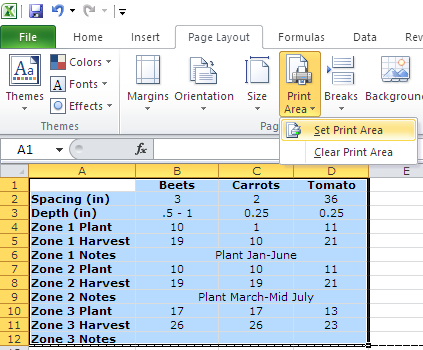
- Set Print Area: Select the cells you want to print, go to Page Layout > Print Area > Set Print Area.
- Clear Print Area: If you’ve made changes, you can clear it with Page Layout > Print Area > Clear Print Area.
Headers, Footers, and Repeating Elements

To add headers, footers, or ensure important elements are repeated on every printed page:
- Add Headers and Footers: From Page Layout > Print Titles, insert headers and footers like page numbers, document titles, or date.
- Repeat Rows or Columns: Use Print Titles > Rows to repeat at top or Columns to repeat at left to keep headers in view.
Optimizing Data for One Page

Here are some optimization techniques:
- Hide Unnecessary Columns/Rows: Right-click on row or column headers and select Hide to exclude them from printing.
- Merge and Center: Merging cells for headers or important data can save space and make your printout clearer.
- Remove Gridlines: Gridlines often aren’t necessary in prints. Toggle them off under Page Layout > Sheet Options.
Troubleshooting Print Issues

Encountering problems when printing? Here’s what you can do:
- Check Page Setup: Make sure that the page setup options like orientation, margins, and scale are set as intended.
- Print Area Confirmation: Verify that the print area is selected correctly and includes all necessary data.
- Software Updates: Ensure your version of Excel is up to date; updates often resolve printing issues.
🔍 Note: Always perform a print preview before sending to the printer to ensure everything looks right.
By applying these Excel printing tips and tricks, you'll be able to streamline your printing process, making sure your documents are professional, easy to read, and fit neatly on a single page. Remember, practice makes perfect, so don't be afraid to experiment with different settings until you find the perfect balance for your data presentation needs.
Why does my Excel sheet not print correctly?

+
Common issues include incorrect print area settings, printer drivers not being up-to-date, or settings in Excel not being configured properly for your print needs.
Can I print only a selection of data?

+
Yes, you can set a specific print area in Excel by selecting the cells you want to print and then choosing Page Layout > Print Area > Set Print Area.
How can I make headers appear on every printed page?

+
Go to Page Layout > Print Titles and in the dialog box, choose the rows or columns you want to repeat at the top or left of each page.