Master Excel Data Validation: Simple Techniques

Excel data validation ensures that the data entered into spreadsheets meets specific criteria, thereby maintaining accuracy and consistency. Whether you're managing a small dataset or a complex inventory system, understanding how to implement data validation techniques can significantly enhance your data management skills.
Basic Data Validation


Before diving into complex validations, let’s start with the basic types:
- Whole Number - Limits input to integers within a specified range.
- Decimal - Allows decimal numbers within a given range.
- List - Restricts entry to predefined items in a list.
- Date - Ensures entered values are within a specific date range.
- Time - Similar to date but for time.
- Text Length - Controls the length of text entries.
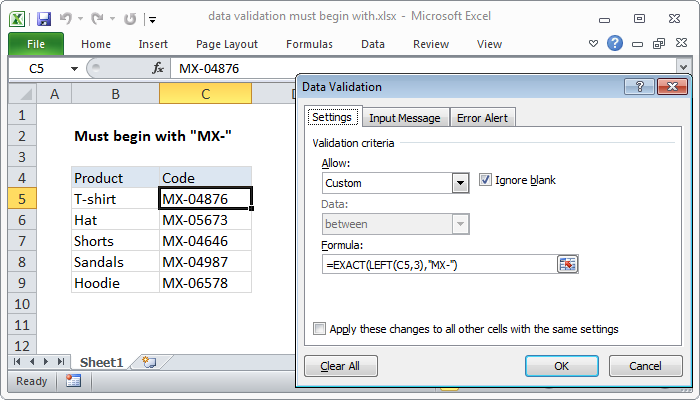
- Custom Formula - Validates data based on custom formulas.
Setting Up Data Validation

Here’s how you can set up data validation in Excel:
- Select the Cells: Choose the cells where you want to apply validation.
- Open Data Validation: Go to Data > Data Validation.
- Choose Settings: Select the type of validation, like Whole Number, List, etc.
- Configure Criteria: Set the validation criteria, e.g., between 10 and 100 for a whole number range.
- Error Alert: Optionally customize the error message that appears when invalid data is entered.
💡 Note: Remember to verify the cells by entering both valid and invalid data to ensure the validation rules are working as expected.
Advanced Techniques

Dynamic Data Validation

Dynamic validations adjust based on external factors, like changing list contents or formula-driven criteria:
- Dynamic List: Use
=OFFSET(A1,0,0,COUNTA(A:A),1)to make a list that updates as items are added or removed. - Conditional Validation: Combine
IFstatements within formulas to change validation rules dynamically.
Cascading Drop-Down Lists

| Cell | Content |
|---|---|
| A1 | Category |
| A2 | Subcategory |
| B1 | =Data Validation Source |
| B2 | =Data Validation Source based on A1 |

📝 Note: Cascading lists can create a seamless, intuitive data entry experience, reducing errors significantly.
Using Formulas for Complex Validations

Here are some examples:
- Unique Entries: Ensure entries are unique using
=COUNTIF(A1:A100,A1)=1for cell A1. - Date Based Validation: Restrict entry to dates in the future using
=A1>TODAY(). - Preventing Duplicate Values: Check for duplicates with
=COUNTIF(A2:A100,A2)=1.
In Summary

As you’ve seen, data validation in Excel is not just about restricting input but about guiding users to enter accurate and relevant data. From simple lists to complex formula-based validations, Excel offers a variety of tools to enhance data integrity. Applying these techniques thoughtfully can streamline data management and minimize errors, making your spreadsheets more reliable and efficient.
What is the purpose of data validation in Excel?

+
The purpose of data validation is to ensure that the data entered into Excel meets specific criteria, enhancing data accuracy and consistency.
Can data validation be applied to cells that already contain data?

+
Yes, data validation can be applied to cells with existing data. However, existing data might not comply with the new rules, so it’s advisable to review or clear the data before applying new validations.
How do I ensure data entry remains consistent across different spreadsheets?

+
Use named ranges or reference lists to maintain consistency. Also, consider linking spreadsheets or using external data sources where validation rules can be applied centrally.
What are some common pitfalls in setting up Excel data validation?

+
Some common mistakes include not testing validations with all possible data, overuse of complex formulas that slow down the spreadsheet, or not providing clear error messages.


