Mastering Excel Dropdowns: Create Options Easily

Microsoft Excel offers a plethora of features to streamline data entry and management, one of which is the ability to create dropdown lists. Dropdown lists, or data validation lists, allow users to quickly select values from a predefined set of options, reducing errors and improving consistency. Whether you're managing a small personal project or handling large corporate databases, mastering dropdowns can significantly enhance your Excel skills. Here's how to create these options easily:
Creating a Basic Dropdown List

Before diving into more complex setups, let's start with creating a simple dropdown list:
- Select the cell where you want the dropdown to appear.
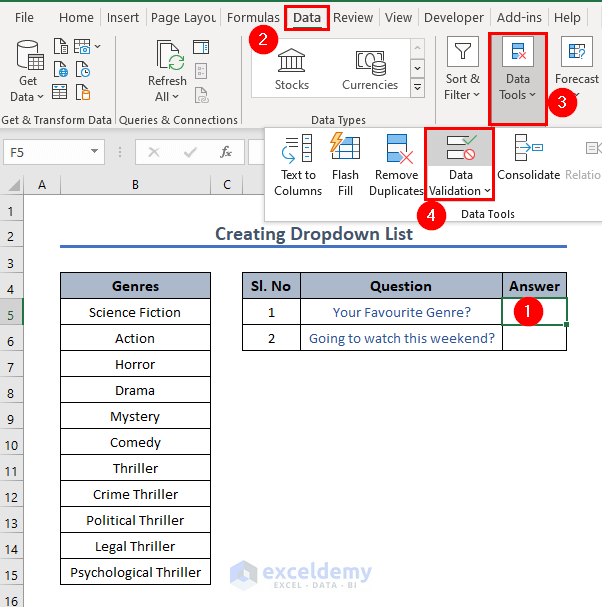
- Go to the Data tab on the Excel ribbon and click on Data Validation.
- In the Data Validation dialog box:
- Choose List from the 'Allow' dropdown menu.
- In the 'Source' box, enter your list items separated by commas or select a range of cells that contains the items.
- Click OK.
Now, when you click on the cell with the dropdown, you will see a list of options to choose from.
💡 Note: Ensure your source list does not contain any blank cells or the validation might not work correctly.
Using a Separate List for Dropdown Options

For a more dynamic approach, you can use a separate list on your worksheet to control what options appear in your dropdown:
| Step | Description |
|---|---|
| 1 | Create a list of options in a column or row. |
| 2 | Select the cell(s) where you want to apply the dropdown. |
| 3 | Go to Data > Data Validation > Settings > Allow: List. |
| 4 | In the Source box, type or select the range of cells containing your options (e.g., =A1:A5 if your list is in cells A1 to A5). |
| 5 | Click OK. |

📘 Note: If you ever change the list, the dropdown list will automatically update to reflect these changes.
Creating a Dynamic Dropdown List with Named Ranges

Named ranges provide a more manageable way to reference lists, especially when you want to reuse them or when your list changes frequently:
- Define your list range as a named range:
- Select your list.
- Go to Formulas > Define Name.
- Name your range (e.g., "my_list") and click OK.
- Go to Data Validation and set up your dropdown:
- In the 'Source' field, type the name you just created (e.g., =my_list).
- Click OK.
Your dropdown will now use this named range as its source, making it easier to manage and update.
Advanced: Dropdown List Based on Another Cell's Value (Dependent Dropdowns)

For more complex data entry scenarios where your second dropdown should change based on the selection in the first dropdown, here's how to set it up:
- Create your main list (e.g., in column A) and dependent lists (e.g., in columns B, C, etc.).
- Define named ranges for the dependent lists with formulas:
- E.g., for column B named "DependentB":
=OFFSET(Sheet1!$B$2,0,0,MATCH(Sheet1!$A$1,Sheet1!$A$2:$A$100,0)-1,1)
- E.g., for column B named "DependentB":
- Set up your dropdown for the main list as described above.
- Then, for the second dropdown:
- Go to Data Validation.
- In 'Source', enter the INDIRECT function:
=INDIRECT($A$1), assuming A1 is where the main dropdown is located.
- Click OK.
This setup allows the second dropdown to display values from a list that changes dynamically based on what's selected in the first dropdown.
📢 Note: The INDIRECT function relies on the named ranges you created for each dependent list. Ensure that the references in your named range formulas are correct for accuracy.
Wrap Up

Dropping dropdown lists in Excel not only simplifies data entry but also ensures data integrity across your spreadsheets. Whether you're creating simple static lists or more complex, dynamic dropdowns dependent on another selection, Excel's versatility allows for a wide range of applications. Here are some key points we've covered:
- Basic dropdowns for single-cell data entry.
- Using separate lists to maintain dropdown options.
- Dynamic lists with named ranges to easily manage updates.
- Advanced dependent dropdowns for interactive data selection.
Can I use a range from another worksheet for my dropdown list?

+
Yes, you can use a named range from another worksheet as your dropdown list source. Just ensure the named range is globally defined or create it to include the sheet name (e.g., “Sheet2!MyList”) when setting the source for your dropdown list.
How can I make the dropdown list items appear sorted?

+
Sort the range of cells that contains your dropdown items alphabetically before setting up the Data Validation. Once sorted, the dropdown list will appear in the same order when you create it.
What happens if I change the source list of a dropdown?

+
If your dropdown list is based on a range or named range that changes, Excel will automatically update the options in the dropdown list to reflect those changes, assuming the range or named range is still correctly referenced.
Can I limit input to only the dropdown list options?

+
Yes, when you set up your data validation, under the ‘Error Alert’ tab, you can choose to display an error message when someone attempts to enter a value not included in the list, effectively limiting input to only the options you’ve provided.
Is it possible to allow multiple selections in a dropdown?

+
Standard Excel data validation doesn’t support multiple selections in a dropdown. However, you can simulate this with VBA or use Excel 365’s new functionality for allowing multiple selections from a list. Alternatively, you could use checkboxes or helper columns to achieve a similar result.