5 Simple Tips to Make Your Excel Sheets Print-Ready

If you've ever tried to print an Excel spreadsheet, you've likely encountered the challenges of fitting all your data onto a single, legible page. Excel, while incredibly powerful for data management, can be tricky when it comes to printing. Whether it's for meetings, presentations, or personal records, making your spreadsheets print-ready can save you time and reduce frustration. Here, we'll walk through five simple tips to ensure your Excel sheets look clean and professional when printed.
Adjust Page Layout Settings

Before delving into the nitty-gritty of formatting your cells, the first step is to adjust your Page Layout settings. Here’s how you can do it:
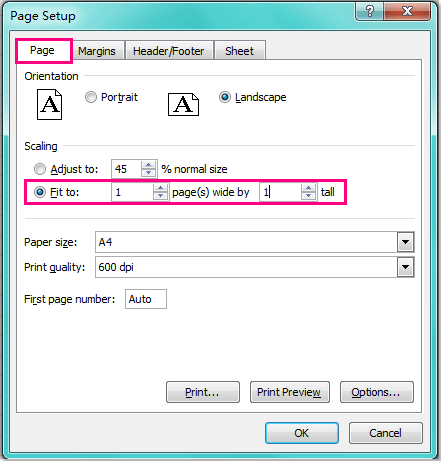
- Page Orientation: Navigate to Page Layout > Orientation. Decide if your data fits better in portrait or landscape mode. Often, landscape allows for wider data sets.
- Margins: From the same Page Layout tab, adjust the margins to fit your content. Default settings might be too large; reducing them can help fit more data.
- Scale to Fit: Use Width and Height under the Scale to Fit group to scale your sheet to fit on one or multiple pages as needed. Be cautious not to make your text too small to read.
Set Print Areas

Not all data in your sheet needs to be printed. Here’s how you can specify what gets printed:
- Select the cells you wish to print.
- Go to Page Layout > Print Area > Set Print Area. This tells Excel exactly what portion of your spreadsheet you want to print.
⚠️ Note: Clearing the print area can be done by going to Page Layout > Print Area > Clear Print Area if you need to adjust your selection later.
Use Headers and Footers

Headers and footers can provide valuable information like document titles, dates, and page numbers. Here’s how to add them:
- Go to Insert > Header & Footer. This will switch you to Page Layout view where you can easily add headers and footers.
- Click in the header or footer area to insert text or choose from predefined options like page numbers or date.
- Tip: Use &[Page] to insert the current page number and &[Pages] to display the total number of pages.
| Use | Code |
|---|---|
| Page Number | &[Page] |
| Total Pages | &[Pages] |
| Date | &[Date] |
| Time | &[Time] |

Print Gridlines and Headings

Making your data readable when printed is crucial. Here’s how to enhance visibility:
- Gridlines: Navigate to Page Layout > Sheet Options > Print under the Gridlines section. This ensures your gridlines will print, making your data easier to follow.
- Row and Column Headings: In the same Sheet Options section, check Print under the Headings to print row numbers and column letters.
📌 Note: This can use additional ink, but it significantly improves the readability of printed documents.
Preview Before Printing

Before you commit to printing, always use Excel’s Print Preview feature:
- Click on File > Print. Here, you’ll see a preview of how your data will look on paper.
- Check for any issues like cut-off text, incorrect page breaks, or scaling that makes the document hard to read.
- Use the Page Setup link on the right to make last-minute adjustments if necessary.
By following these tips, your Excel sheets will look professional and be more user-friendly when printed. From setting up the correct page layout to making last-minute checks in print preview, each step is designed to streamline your printing process. Remember, the key is not just to get your data onto paper but to do so in a way that it communicates effectively and looks polished. Each time you prepare to print, take these steps into account to ensure your Excel documents are print-ready and easy to read.
Why don’t my Excel sheets print correctly?

+
Issues with Excel sheets not printing correctly often stem from incorrect page layout settings, print area not set properly, or lack of print previewing. Ensure all settings are adjusted according to the content and use print preview to make last-minute adjustments.
Can I print part of my Excel sheet?

+
Yes, you can print a specific range of your Excel sheet by setting a print area. Select the cells you want to print, then go to Page Layout > Print Area > Set Print Area.
How do I ensure that my data fits on one page?

+
To fit your data on one page, use the “Scale to Fit” feature in Page Layout. Adjust the width and height to “1 page” and reduce margins if necessary to accommodate your content without making the text too small.
What should I do if my Excel document prints with missing data?

+
If your Excel document prints with missing data, check your print area settings to ensure all necessary cells are included. Also, look for hidden rows or columns that might have been printed but not visible on your screen.
Can Excel automatically adjust text to fit page?

+
Excel does not automatically adjust text size, but you can use the ‘Scale to Fit’ option to reduce or enlarge your printout to fit the page. However, text wrapping can be enabled within cells to fit content without altering font size.