7 Steps to Create an Expense Excel Sheet Easily

The journey to financial clarity often begins with organizing your expenses, and there's no better tool for this than Microsoft Excel. By creating an expense Excel sheet, you can track where your money goes, categorize your spending, and gain insights into your financial habits. Here are seven easy steps to set up your own expense tracking system in Excel, ensuring you keep your finances in check.
Step 1: Plan Your Expense Sheet Layout

Before diving into Excel, take a moment to outline what your expense tracking spreadsheet should look like:
- Categories: Consider common expense categories like Rent/Mortgage, Utilities, Groceries, Entertainment, Travel, etc.
- Columns: Date, Category, Description, Amount, Payment Method, Notes.
- Formulas: Include basic calculations for totals, subtotals, and perhaps an average spending per category.

Step 2: Set Up the Excel Workbook

Open Microsoft Excel and create a new workbook:
- Click on File > New > Blank Workbook.
- Name your workbook something descriptive, like "Monthly Expenses 2023".
Step 3: Create Headers and Format

With your workbook open, follow these steps to set up your headers:
- Merge and Center: Merge the first row cells and center-align the title, "Monthly Expenses".
- Column Headers: In the second row, type in the headers: Date, Category, Description, Amount, Payment Method, and Notes.
- Formatting:
- Use the Format Painter to copy formatting from one cell to others.
- Bold the headers for visibility.
| Date | Category | Description | Amount | Payment Method | Notes |
|---|---|---|---|---|---|
| 5/1/2023 | Rent | May Rent | $1200 | Bank Transfer |

🔍 Note: Ensure you save your work frequently to avoid data loss.
Step 4: Input Your Data

Now, start entering your expense data:
- Be consistent with date formats (e.g., MM/DD/YYYY).
- Ensure the category is correctly inputted for filtering and analysis.
- Description should be brief but informative.
- Enter amounts without currency symbols, as Excel can handle this automatically.
- Select a payment method from a predefined list if possible.
- Notes can be left empty or used for additional details.
Step 5: Automate Calculations

To make your expense sheet dynamic:
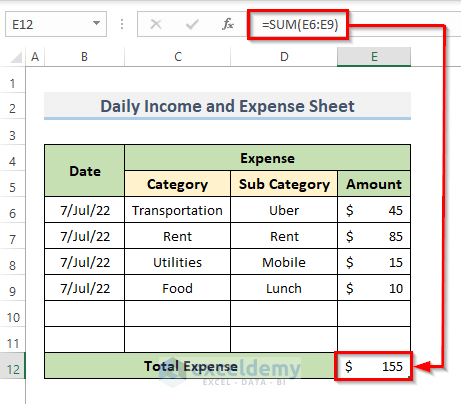
- Sum: Use the SUM formula to calculate totals in your Amount column.
- Average: Use AVERAGE to get an idea of average monthly spending per category.
- Conditional Formatting: Apply rules to highlight expenses above a certain threshold, helping you quickly identify overspending.
📌 Note: Excel's conditional formatting can also visualize trends over time with color scales.
Step 6: Visualize Your Expenses

Visualizing data can make it easier to understand your financial trends:
- Create Charts: Use pie charts or bar graphs to show spending by category.
- Insert Pivot Tables: Pivot tables are powerful for filtering and summarizing data quickly.

Step 7: Regular Updates and Review

To maintain the usefulness of your expense tracking sheet:
- Regularly Update: Make it a habit to enter expenses daily or weekly.
- Review Periodically: Set monthly or quarterly review sessions to assess your spending patterns.
- Adjust Categories: Modify categories if needed to better reflect your current lifestyle or financial goals.
Setting up an expense Excel sheet is more than just organizing data; it's about gaining a deeper understanding of your financial life. This process empowers you to make informed decisions, save money, and work towards your financial goals with clarity. By following these steps, you'll not only have a tool to track expenses but also a foundation for financial planning and analysis.
Can I use an Excel sheet for income as well as expenses?

+
Yes, you can adapt your expense Excel sheet to include an income section or create separate sheets for income and expenses within the same workbook.
What if I am not good at Excel?

+
Excel offers numerous tutorials online, or you can start with simpler spreadsheet applications like Google Sheets before moving to Excel. Start with basic functions and build up to more complex analysis as you become more comfortable.
How often should I update my expense tracker?

+
Updating your expense tracker daily or weekly can provide the most accurate and current financial overview. Monthly updates can also work if you have less frequent expenses.