5 Easy Steps to Convert Excel Format to Sheets

In today's digital age, the ability to convert data seamlessly from one platform to another is critical. With many businesses and individuals using both Microsoft Excel and Google Sheets, knowing how to transition between these two popular spreadsheet tools is essential for data management, collaboration, and productivity. In this comprehensive guide, we will delve into the easy steps to convert an Excel file format to Google Sheets, ensuring a smooth transition without losing data integrity. Here's how you can accomplish this in just five steps:
Step 1: Open Google Drive

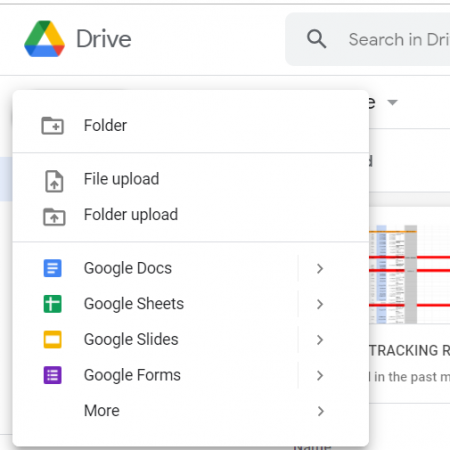
Begin by navigating to Google Drive, where your Google Sheets will be stored. If you do not have a Google account, sign up for one. Once logged in, follow these actions:
- Click on the ‘+’ icon in the top left corner to start a new file or upload.
- Select “File upload” from the options.
- Locate and select your Excel file (.xlsx, .xlsm, .xlsb, .xls) from your local storage.

Step 2: Upload Excel File

After selecting your Excel file, Google Drive will begin the upload process. Depending on the file size, this might take a few seconds:
- Monitor the progress bar in the bottom right corner of Google Drive.
- Once uploaded, the file will appear in your Google Drive.
Step 3: Convert to Google Sheets

Now that your Excel file is in Google Drive, it needs to be converted into a Google Sheets document:
- Right-click on the uploaded Excel file.
- Choose “Open with” and then select “Google Sheets.”
- The conversion process starts automatically. If you encounter any errors, double-check your file’s compatibility with Google Sheets.
Step 4: Edit in Google Sheets

With the file now converted, you can begin editing it:
- Examine the data to ensure all information has been preserved and correctly formatted.
- Make necessary adjustments to formulas, charts, or formatting as Google Sheets might interpret some Excel functions differently.
- Save your changes by clicking on “File” > “Save as Google Sheets.”
💡 Note: Formulas, charts, and certain formatting might not convert perfectly. Always check and adjust these elements manually to ensure data accuracy.
Step 5: Optional - Export or Share

Finally, you can share the converted document or export it back to an Excel format:
- Share the Sheets document by clicking on the “Share” button in the top right corner.
- Opt to “Download as” if you need an Excel file again. Choose from various formats like .xlsx, .ods, .pdf, etc.
By following these five simple steps, you've now transitioned from an Excel document to Google Sheets, giving you the advantages of cloud storage, real-time collaboration, and seamless data analysis capabilities. Excel users seeking to leverage Google's cloud-based tools can now do so efficiently, ensuring data consistency across different platforms.
FAQs on Converting Excel to Google Sheets

Do I lose any functionality when converting Excel to Google Sheets?

+
While most Excel functions are supported, some advanced features or complex macros might not convert or might need to be adjusted manually.
Can I convert multiple Excel files at once?

+
Yes, you can select multiple files to upload and convert simultaneously in Google Drive.
How do I ensure data accuracy during conversion?

+
Always review your data post-conversion. Check formulas, charts, and formatting to make any necessary adjustments for accuracy.


