Lock an Excel Tab: Secure Your Data Easily

Working with spreadsheets often involves handling sensitive or important data that needs to be kept secure. Microsoft Excel offers several features to help protect your workbook, including the ability to lock tabs or sheets to prevent unauthorized changes or access. Here’s a comprehensive guide on how to lock an Excel tab and ensure your data is safe and secure.
Why Lock an Excel Tab?

Before we delve into the how, understanding why you might want to lock an Excel tab is crucial:
- Prevent Accidental Changes: Especially useful when sharing a workbook with multiple users.
- Maintain Data Integrity: Locking a tab ensures the data on it remains unmodified, preserving the accuracy of reports or analyses.
- Protect Formulas and Settings: Locking prevents tampering with complex formulas or settings critical to your spreadsheet’s functionality.
Steps to Lock an Excel Tab

Here’s a step-by-step process to lock an Excel tab:
1. Open the Excel Workbook

Start by opening the Excel file you wish to lock. Navigate to the sheet you want to protect.
2. Protect the Sheet


To begin the locking process:
- Right-click on the tab at the bottom of your Excel window.
- Select Protect Sheet from the context menu.
3. Set Protection Options

A dialog box will appear with several options:
- Password to unprotect sheet: Enter a password if you want to restrict editing to those who know the password.
- Allow all users of this worksheet to: Check or uncheck various user permissions such as selecting locked cells, formatting cells, sorting data, etc.
4. Finalize the Lock

After setting your preferences:
- Click OK.
- If you set a password, you'll need to confirm it by re-entering it.
5. Test the Lock

Try to edit or modify something in the locked sheet to ensure it works. If changes aren't allowed, the tab is successfully locked.
⚠️ Note: Users who open the file can still see the data unless you also protect the entire workbook.
Protecting the Workbook

Locking a sheet might not be enough if you want to restrict access to the workbook structure itself. Here’s how you can protect the entire workbook:
1. Navigate to Workbook Protection

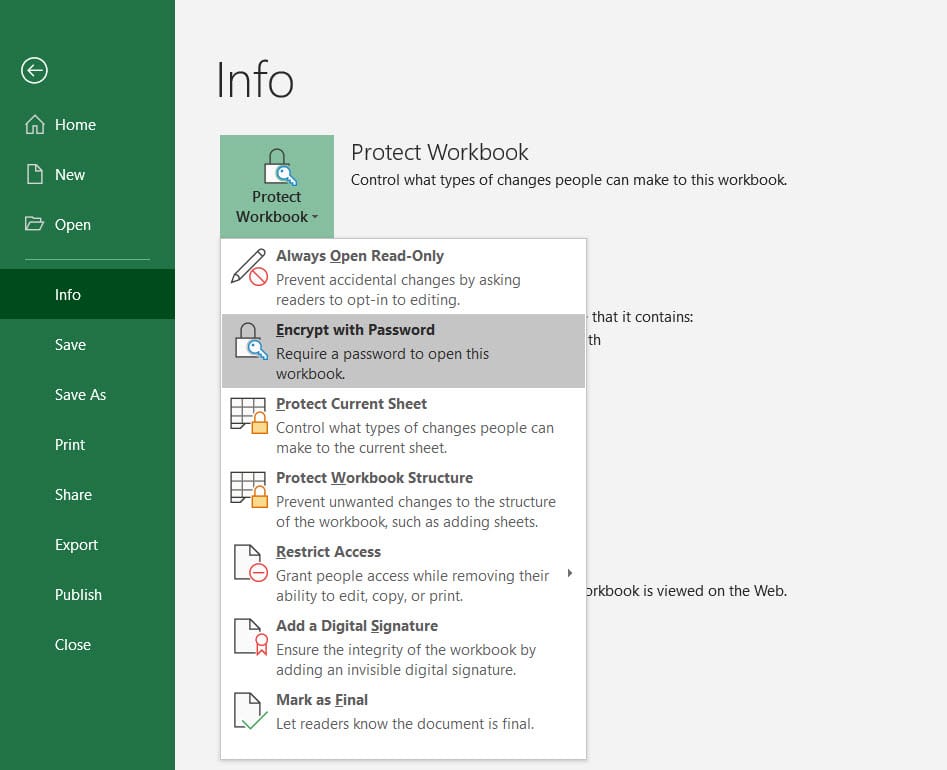
Go to File > Info > Protect Workbook > Encrypt with Password or Protect Workbook Structure.
2. Set Workbook Protection

Choose between:
- Encrypt with Password: This requires a password to open the workbook.
- Protect Workbook Structure: This prevents users from adding, moving, deleting, hiding or unhiding sheets within the workbook.
3. Apply Protection

Enter and confirm the password if chosen, then hit OK.
🔐 Note: Passwords used for workbook protection are case-sensitive and can't be recovered if forgotten.
Unprotecting an Excel Tab

To make changes to a locked sheet:
- Right-click the protected sheet.
- Choose Unprotect Sheet.
- If a password was set, you’ll need to enter it to proceed.
Final Thoughts

Locking tabs in Excel is an effective method for securing your data against unauthorized changes or viewing. While it’s an excellent practice for safeguarding sensitive information, remember that it’s not a substitute for robust cybersecurity measures like file encryption or secure cloud storage. Always use a combination of these techniques to ensure comprehensive data protection. The steps provided here are straightforward but effective, making it possible for anyone, from beginners to experts, to secure their Excel data with ease.
Can I lock multiple tabs at once in Excel?

+
While you can’t select multiple tabs to lock them all at once, you can protect each tab individually by repeating the protection process.
What happens if I forget the password to a protected Excel sheet?

+
If you forget the password, you’ll be unable to unprotect the sheet unless you use third-party tools or methods, which are not officially supported by Microsoft.
Is it possible to lock a tab to prevent viewing or only editing?
+You can protect a worksheet to prevent editing by locking cells, but to prevent viewing, you would need to encrypt the entire workbook.