Easily Insert Rows in Excel: Quick Guide

When working with data, Excel remains a powerhouse for many users around the world. Whether you're a seasoned analyst or someone who uses spreadsheets for simple tasks like keeping track of groceries, knowing how to manipulate your data efficiently is key. In this guide, we'll delve into how you can easily insert rows in Excel, enhancing your spreadsheet manipulation skills.
The Basics of Inserting Rows

Let’s start with the fundamental method of inserting a single row into your Excel worksheet:
- Click on any cell within the row below where you want the new row to appear.
- Right-click on the row number to bring up the context menu.
- Select “Insert” from the options. Excel will shift the existing rows down and insert a new blank row in the selected location.
Keyboard Shortcuts for Efficiency

If you’re looking to speed up your workflow:
- Select the row below where you want your new row to appear.
- Use the shortcut Ctrl + + (plus sign) on your keyboard. This will invoke the “Insert” dialog where you can choose the direction of insertion.
Multiple Row Insertion

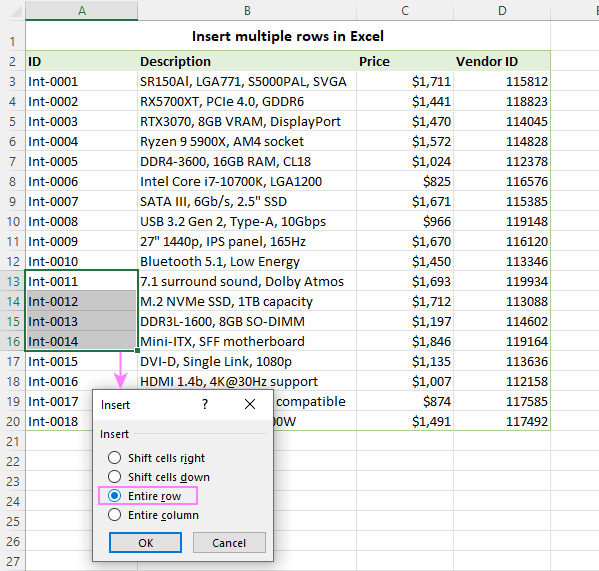
To insert more than one row at a time:
- Select as many rows as you wish to insert. For example, select two rows to insert two new rows.
- Right-click and choose “Insert”, or use the same keyboard shortcut.
| Shortcut | Action |
|---|---|
| Ctrl + + (plus sign) | Inserts rows or columns |
| Shift + Spacebar | Selects the entire row |

✏️ Note: When you insert rows, Excel automatically shifts the formulas and functions in the worksheet to accommodate the new rows, ensuring your calculations remain accurate.
Advanced Row Insertion Techniques

Here are some lesser-known methods for inserting rows in Excel:
Using the “Insert Copied Cells” Feature

- Copy the cells or rows you want to insert into your worksheet.
- Select the range where you want to insert the copied rows.
- Right-click, hover over “Insert”, and then choose “Insert Copied Cells”. This will shift the existing rows down and insert the copied cells.
Insert Rows via VBA Script

For those comfortable with programming:
- Open the VBA Editor by pressing Alt + F11.
- Go to “Insert > Module” to create a new module.
- Paste the following script:
Sub InsertRows()
    Dim ws As Worksheet
    Set ws = ThisWorkbook.Sheets("Sheet1")
    ws.Rows(5).Insert Shift:=xlDown, CopyOrigin:=xlFormatFromLeftOrAbove
End code
This script will insert a new row at row number 5. You can adjust the row number as needed.
Inserting Rows With Data Validation

If your worksheet includes data validation:
- When you insert a row, Excel will carry over the data validation rules from the cell above.
- To ensure consistency, check the newly inserted row to see if the validation rules have applied correctly.
Final Thoughts on Row Insertion

Mastering the ability to insert rows in Excel is not just about increasing productivity but also about managing data effectively. The various methods provided, from simple keyboard shortcuts to more advanced VBA scripts, give users the flexibility to choose what suits their needs best. Remember, the key is to adapt these techniques to make your Excel experience smoother and more efficient.
What happens to formulas when rows are inserted?

+
When you insert a row, Excel adjusts the references in formulas automatically to reflect the change in data layout.
How do I insert rows at the bottom of the data range?

+
Select the last row of your current data range, then use the “Insert” method or shortcut to add rows below it.
Can I insert multiple rows using VBA?

+
Yes, by modifying the VBA script, you can adjust the range to insert multiple rows at once. For example, ws.Rows("5:10").Insert inserts 6 rows.