Editing Text Box in a Protected Excel Sheet: A How-To Guide

Editing a text box in a protected Excel sheet can seem daunting at first, but with the right steps and understanding, it becomes a straightforward task. This guide will walk you through the process, ensuring you can seamlessly modify your Excel sheets while maintaining the integrity and protection of your data.
Understanding Excel Sheet Protection

Excel's sheet protection feature is designed to safeguard your data from unintentional modifications or unauthorized access. However, this protection can sometimes interfere with editing elements like text boxes. Here's what you need to know about sheet protection:
- Protection does not lock all cells by default, but can prevent formatting, data entry, and other changes.
- Text boxes are not cells, so they are not protected in the same way. However, their content and properties might be affected indirectly by sheet protection settings.
Preparation for Editing

Before you can edit a text box on a protected Excel sheet, ensure the following:
- You have permission to unprotect the sheet.
- Text boxes should be placed as objects in the sheet, not within protected cells.
- You know the password if the sheet is password protected.
How to Check if You Can Edit Text Boxes

To verify if you can edit a text box:
- Right-click the text box and select 'Edit Text'. If you can't, proceed to unprotect the sheet.
Steps to Edit Text Box in a Protected Excel Sheet

1. Unprotect the Sheet

Unprotecting the sheet allows you to edit any element:
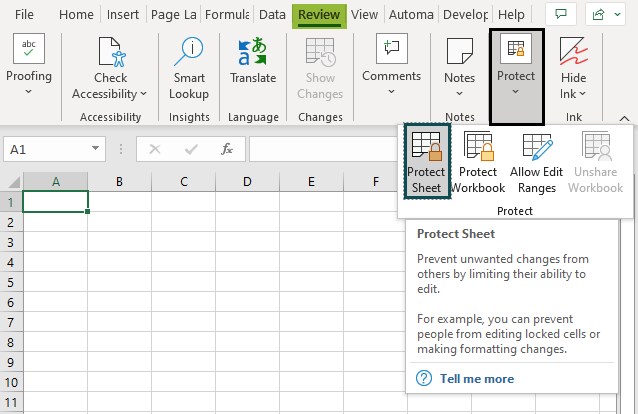
- Go to the ‘Review’ tab in Excel.
- Click ‘Unprotect Sheet.’
- If password protected, enter the password and click ‘OK.’
🔒 Note: Only authorized users should have access to the unprotection password to prevent unauthorized changes.
2. Modify the Text Box

Once the sheet is unprotected:
- Click on the text box you want to edit.
- Type or delete text as needed.
- Adjust text properties like font, size, or color from the ‘Home’ tab if necessary.
3. Reprotect the Sheet

After editing:
- Go back to the ‘Review’ tab.
- Click ‘Protect Sheet.’
- If you want to password protect again, enter the password and confirm.
- Select options like allowing selection of unlocked cells, etc., and click ‘OK.’
🔓 Note: Do not reprotect the sheet without checking your edits, as you might lock in unintended changes.
Advanced Tips for Managing Text Boxes in Protected Sheets

Using Macros for Streamlined Editing

If you frequently need to edit text boxes:
- Create a macro to automatically unprotect and then reprotect the sheet after editing.
- Assign this macro to a button for quick access.
Positioning Text Boxes

Strategically place text boxes:
- Do not overlap text boxes with locked cells to avoid editing issues.
- Consider using shapes or grouped objects if you need complex layouts.
Final Thoughts

Editing text boxes in protected Excel sheets involves understanding the protection settings, safely unprotecting the sheet, making necessary changes, and reapplying protection. With these steps, you can maintain the integrity of your data while allowing for necessary modifications to enhance your Excel spreadsheets.
What happens if I forget the password to unprotect the sheet?

+
If you forget the password, you will not be able to edit any protected elements on the sheet. You might need to recover the password or use Excel’s built-in tools to reset or remove protection, though this might involve losing other settings or data integrity.
Can I selectively protect certain elements on an Excel sheet?

+
Yes, Excel allows for selective protection. You can protect specific cells, shapes, or charts while leaving other elements editable. Use the ‘Protect Sheet’ options to control what users can do.
Is it possible to protect a text box’s position but allow editing of its content?

+
Yes, you can anchor the text box to a specific cell or range and lock the cells around it. This way, the content of the text box can be edited, but its position remains fixed.