5 Simple Steps to Alphabetize Your Excel Sheets

Organizing data in Microsoft Excel can be a daunting task, especially when dealing with large datasets. Alphabetizing data, or sorting it in alphabetical order, is a fundamental skill for anyone looking to manage spreadsheets more effectively. This guide will walk you through the process, making it simple even for those who are not seasoned Excel users.
Step 1: Preparing Your Data for Sorting

Before you start sorting, ensure your data is clean and consistent. Here are some things to check:
- Remove or correct blank rows, as they can disrupt sorting.
- Consistent formatting in terms of spacing, capitalization, and special characters.
- Merge any split cells that might be present in your data.

💡 Note: Sorting will affect all rows in your selection, so make sure your data range includes all necessary columns.
Step 2: Selecting Your Data Range

To begin sorting:
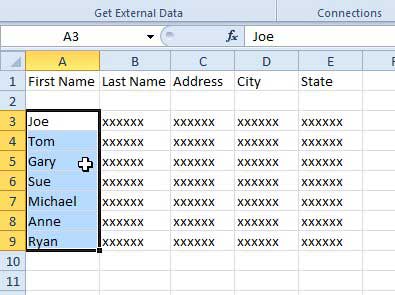
- Click and drag to highlight the data range you want to sort. Ensure to include the header row.
- If you are sorting the entire sheet, click the triangle at the top-left corner of the sheet to select all cells.

Step 3: Using Excel’s Sort Feature

To sort your data alphabetically:
- Navigate to the “Data” tab in the Ribbon.
- Click on the “Sort A to Z” or “Sort Z to A” button for a simple one-level sort.
- For more options, click “Sort”, which opens the Sort dialog box.
In the Sort dialog box:
- Select the column you want to sort by.
- Choose “A to Z” or “Z to A”.
- Add levels for multi-column sorting if needed.

✅ Note: Use the “Options” button to customize sorting rules, like sensitivity to case or accents.
Step 4: Customizing the Sort Order

Excel allows for custom sorting:
- Sort by Cell Color: You can sort cells by their fill color.
- Sort by Font Color: Font color can be another criterion for sorting.
- Sort by Cell Icon: Conditional formatting icons can also influence the order of data.
- Use Custom Lists: Define your own custom sort order, like sorting by days of the week or any specific sequence.
These options are accessible through the Sort dialog box, under the “Options” button, or when you right-click on a column header.
| Sort by | Options | Description |
|---|---|---|
| Cell Color | Color | Sort by the background color of cells. |
| Font Color | Color | Sort by the font color. |
| Cell Icon | Icon | Sort by conditional formatting icons. |

Step 5: Saving Your Sorted Data

Once your data is sorted, consider:
- Saving your Excel workbook with the new sorting in place.
- Creating a backup or copy of the original data before sorting, especially if you might need the original order later.
- Using “Save As” to save different versions of your workbook with various sorting arrangements.
💾 Note: It’s always wise to maintain a backup or original version of your data before applying significant changes like sorting.
Through these five steps, you've now learned how to alphabetize your Excel sheets effectively. Sorting data can significantly enhance readability, help you quickly locate information, and maintain a neat and organized workbook. Remember to save your work frequently, ensure that your data remains consistent, and consider the impact of sorting on the structure of your data. By mastering these simple sorting techniques, you empower yourself to handle Excel data with ease, thereby improving your productivity and data management skills.
Can I sort multiple columns at the same time?

+
Yes, Excel allows you to sort by multiple columns. Use the Sort dialog box, click “Add Level” to sort by more than one column at a time.
What happens if I sort data with merged cells?

+
Excel does not support sorting merged cells directly. You need to unmerge them before sorting or consider manually adjusting the data range.
How can I undo a sort if I made a mistake?

+
Use the “Undo” feature (Ctrl + Z) immediately after sorting to revert to your data’s original order. If you’ve saved your changes, you may need to recover from a backup or manually reorder the data.
Is it possible to sort data in reverse alphabetical order?

+
Yes, simply choose “Sort Z to A” in the Sort dialog box to sort data in reverse alphabetical order.