5 Easy Steps to Create an Excel Sheet

Creating an Excel sheet can be an incredibly useful skill, whether you're organizing personal data or managing complex business information. Excel, part of the Microsoft Office suite, offers a powerful platform for data analysis, visualization, and more. In this guide, we'll walk through the 5 easy steps to create an Excel sheet, from basic setup to inputting your data, enhancing it with formatting, and analyzing your information for insights.
1. Open Microsoft Excel

The first step to creating an Excel sheet is, naturally, opening the software. Here’s how:
- On a Windows PC, you can click on the Start Menu, search for Excel, and then click on the Excel application.
- For Mac users, click on Finder, go to Applications, and then open Microsoft Excel from there.
- If you have a Microsoft 365 subscription, you can also access Excel online by visiting the Office website, logging in, and selecting Excel.
2. Start a New Workbook

Upon opening Excel, you’ll be presented with a new, blank workbook or prompted to open a recent document:
- If a new workbook doesn’t open automatically, go to File > New and select Blank Workbook.
- This will create a new file titled “Book1” by default, which you can rename later.
3. Input Your Data

Now that your workbook is ready, you can begin entering data:
- Click on any cell to start typing. Each cell can hold text, numbers, or formulas.
- To navigate between cells, use the arrow keys or click directly on the cell you want to edit.
- Press Enter to move to the cell below or Tab to move to the cell to the right.
📝 Note: When entering numbers as dates, use a format like MM/DD/YYYY to ensure Excel recognizes the input as a date.
4. Formatting Your Data

Excel provides numerous formatting options to make your data more readable and visually appealing:
- Font and Cell Formatting: Use the Font group in the Home tab to adjust font size, color, or style. Right-click on a cell or range for quick formatting options.
- Cell Borders and Colors: Add borders or change background colors via the Borders and Fill Color options in the Home tab.
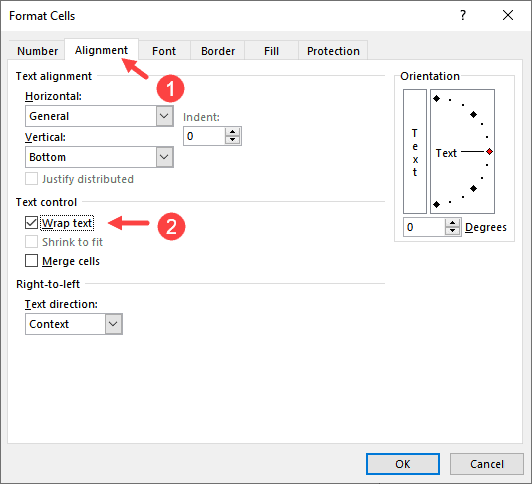
- Text Alignment: Align your text within cells using the alignment tools.
- Number Formatting: Select cells and format numbers as Currency, Percentage, or Date from the Home tab.
📝 Note: Keep formatting consistent across your sheet to maintain readability. Use it to highlight important data points or to separate sections visually.
| Action | Shortcut |
|---|---|
| Copy | Ctrl+C |
| Paste | Ctrl+V |
| Undo | Ctrl+Z |

5. Analyze Your Data

After your data is entered and formatted, you can start analyzing it:
- Formulas: Type a formula into any cell prefixed with “=” to calculate values. For instance, “=SUM(A1:A10)” will sum the values from A1 to A10.
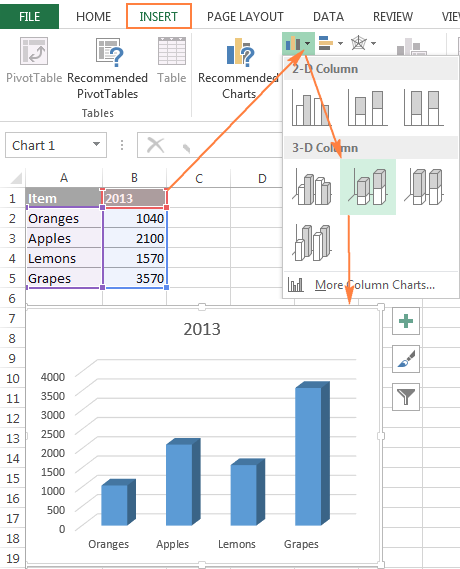
- Charts: Use the Insert tab to create charts visualizing your data. Choose from pie, bar, line, and many other chart types.
- Data Analysis Tools: Excel includes tools like PivotTables for summarizing, analyzing, and exploring data interactively.
In wrapping up, creating an Excel sheet isn’t just about entering data into a grid; it’s about organizing, analyzing, and presenting that data effectively. From opening Excel to analyzing your data, each step is designed to build a functional and insightful spreadsheet. Whether you’re tracking daily expenses or analyzing business trends, mastering these steps will empower you to harness the full potential of Excel.
How do I save my Excel sheet?

+
To save your Excel sheet, press Ctrl+S or go to File > Save. If it’s a new document, you’ll be prompted to choose a location and name your file. Use formats like .xlsx for Excel Workbook.
Can I share an Excel sheet with others?

+
Yes, you can share your Excel sheet by saving it to OneDrive or SharePoint and inviting others to edit or view your document via File > Share.
What’s the difference between an Excel Workbook and Worksheet?

+
An Excel Workbook (.xlsx) is the entire file containing one or more Worksheets. A Worksheet is a single tab within a Workbook where you work with your data.