Connect Excel to SQL Database in Minutes

Connecting your Excel spreadsheets to a SQL database can significantly enhance your data management capabilities, allowing for real-time updates, dynamic data analysis, and improved data integrity. Whether you're looking to manage a large dataset or automate your reporting processes, here's a step-by-step guide to help you get started in minutes.
Prerequisites for Connection

- An instance of a SQL database like Microsoft SQL Server, MySQL, PostgreSQL, etc.
- Excel 2016 or newer (Office 365 subscription with Excel Online also works).
- Proper permissions to connect to the SQL database.
Step-by-Step Guide to Connect Excel to SQL Database

1. Open Microsoft Excel

Launch Excel on your computer or open Excel Online through your Microsoft 365 account.
2. Navigate to the Data Tab

Select the ‘Data’ tab on the ribbon. This is where you’ll find all data management options.
3. Choose “Get External Data”

- For Excel 2016 or later: Click ‘New Query’ > ‘From Other Sources’ > ‘From SQL Server Database’
- For Excel Online: Click ‘Get Data’ > ‘From Database’ > ‘From SQL Server Database’
4. Configure Connection

A new window will open prompting you to enter the following details:
- Server Name: The name or IP address of the SQL server.
- Log on Credentials: Choose between using your Windows credentials or providing a specific login for the database.
- Database Name: If your SQL server hosts multiple databases, select the one you wish to connect to.
- Advanced Options: Optionally, you can choose how Excel should connect to the database, including setting the command timeout.
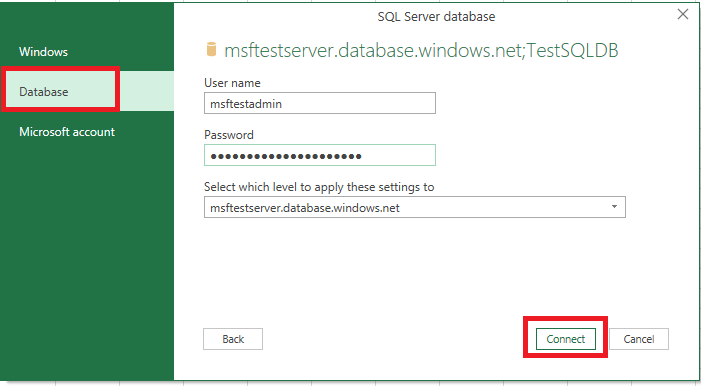
5. Authentication and Connection

Once you’ve entered the server details, click ‘Next’ or ‘Connect’ and:
- If using Windows Authentication, you might not need to do anything else.
- If using SQL Server Authentication, enter the username and password and click ‘OK’.
6. Select Data

After authentication, you’ll need to choose which data to import:
- You can select tables, views, or write custom SQL queries.
- For security reasons, limit the amount of data fetched by setting filters or conditions in your query.
7. Load Data into Excel

Choose one of these options:
- Load: Brings the data directly into the worksheet.
- Load To: Opens the Import Data dialog, where you can specify where to place the data or use Power Query to transform it.
- Transform: Opens the Query Editor for data manipulation before loading.
⚠️ Note: Keep in mind that loading large datasets directly into Excel can impact performance. Consider using Power Query to filter or aggregate data before importing.
8. Refreshing and Automating Data

- Refresh: Click ‘Refresh All’ in the Data tab to update the data from the SQL server.
- Automation: Use VBA scripting or the Power Automate service (formerly Microsoft Flow) for scheduled or event-driven updates.
To wrap up this guide, connecting Excel to a SQL database is an easy yet powerful way to manage, analyze, and report on your data. By following these steps, you can streamline your data processes, ensure data consistency, and leverage the capabilities of both Excel and SQL databases for comprehensive data analysis.
Common Challenges and Solutions

- Connection Issues: Ensure proper permissions and check server availability.
- Data Refresh: Set up scheduled refresh in Excel or use automation tools.
- Performance: Optimize queries or limit data import for better performance.
What version of Excel do I need to connect to SQL?

+
You need Excel 2016 or later, or Excel Online through a Microsoft 365 subscription.
Can I automate the connection to refresh data?

+
Yes, through VBA scripts or Microsoft Power Automate for scheduled or event-driven data refresh.
How do I secure the connection?
+Use Windows Authentication where possible, and avoid saving passwords in the workbook by using secure authentication methods like SQL Server authentication with proper credential management.