3 Quick Tips for Applying Excel Formulas Across Sheets

Mastering Excel involves not only understanding individual formulas but also knowing how to apply these formulas across multiple sheets for seamless data management. Here are three effective tips to help you navigate Excel's extensive capabilities with ease, enhancing productivity and accuracy.
Tip 1: Using Named Ranges

When working with multiple sheets, using named ranges can significantly streamline your workflow. Here’s how you can benefit:
- Improved Clarity: Named ranges make formulas easier to understand. Instead of referencing cells like A1, you can use meaningful names like “SalesData”.
- Ease of Formula Expansion: When named ranges are used, formulas automatically adjust as data expands or contracts, reducing errors.
To create a named range:
- Select the range of cells you want to name.
- Go to the Formulas tab, click Name Manager, then New.
- Enter a name in the dialog box and hit OK.
- Now, you can use this named range across sheets to reference data.
Tip 2: Utilizing 3D Formulas

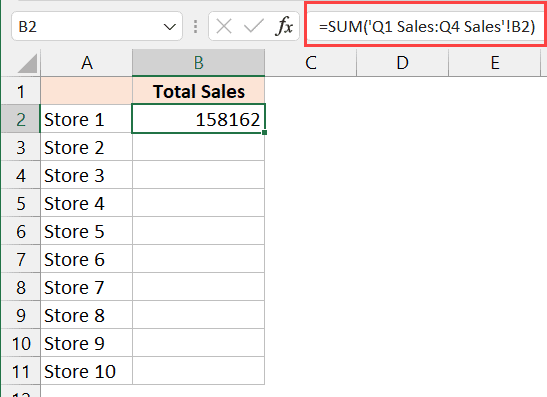
3D formulas are a powerful feature in Excel that allows you to sum or perform calculations across the same range in multiple sheets. Here's how to apply them:
- Sum Across Sheets: Use a 3D formula like =SUM(Sheet1:Sheet3!A1) to add up the same cell (A1 in this case) across all sheets from Sheet1 to Sheet3.
- Data Consistency: Helps maintain data integrity by ensuring the same formula applies across different sheets.
To create a 3D sum:
- Enter =SUM( in the cell where you want the total.
- Select the range across sheets by clicking the first sheet, holding Shift, then clicking the last sheet in the sequence.
- Select the range (e.g., A1) and close the parentheses.
- Excel will automatically generate the correct 3D formula.
📌 Note: 3D formulas require sheets to be named in a sequential order for effective functionality.
Tip 3: Implementing Data Validation Across Sheets

Data validation ensures data accuracy and uniformity across multiple sheets. Here are the steps to implement it:
- Dropdown List Creation: Create a list of valid entries in one sheet, then reference this list on other sheets.
- Uniform Entry: Ensures that entries across sheets are consistent, reducing errors in data compilation.
To set up data validation:
- Go to the Data tab, and choose Data Validation.
- In the dialog, select List from the “Allow:” dropdown.
- Use =List1! followed by the range name for the source data (e.g., =List1!A1:A10).
- Repeat the process on all relevant sheets to maintain consistency.
In the world of data management, Excel’s ability to use formulas across multiple sheets is indispensable. By employing named ranges, 3D formulas, and data validation, you not only enhance the accuracy of your data but also improve efficiency. Remember:
- Named ranges provide clarity and ease of use.
- 3D formulas simplify the calculation process across sheets.
- Data validation ensures data integrity across your workbook.
Can I use named ranges in formulas across different workbooks?

+
Yes, you can reference named ranges across different workbooks. Simply use the workbook’s name in the formula like this: =‘WorkbookName.xlsx’!NamedRange.
What if my sheets aren’t in sequential order for 3D formulas?

+
If your sheets aren’t sequentially named, you’ll need to manually adjust the formula or use another method like linking cells across sheets.
How do I ensure data consistency across sheets?

+
Use data validation and named ranges to ensure consistency. Also, cross-check data using formulas to catch any discrepancies.
What should I do if I want to apply these techniques in Google Sheets?

+
Google Sheets has similar functionality. You can use named ranges, although 3D formulas aren’t supported. Instead, use IMPORTRANGE or QUERY functions.
Can these tips be applied to other spreadsheet software?

+
While these tips are specific to Excel, many spreadsheet applications support similar features like named ranges and data validation, though the exact methods might differ.