5 Easy Ways to Add Validation in Excel Sheets

Ever worked on an Excel sheet where incorrect data entry caused issues in your workflow or analysis? Ensuring data integrity in spreadsheets can significantly enhance the reliability of your data-driven decisions. Let's explore five easy ways to add validation in Excel, making sure your data entries are accurate, consistent, and useful.
1. Use Data Validation for Predefined Lists

Excel’s Data Validation feature is your first line of defense against incorrect data entry. Here’s how you can leverage it for lists:
- Select the cells or range where you want to apply the validation.
- Navigate to the Data tab, and click on Data Validation.
- Under the Settings tab, set Allow: to List, then enter your list of acceptable entries in the Source: field or reference a range that contains the list.
2. Custom Data Validation with Formulas

What if your validation rules are more complex or need to be based on calculations? Here’s how you can create custom validation:
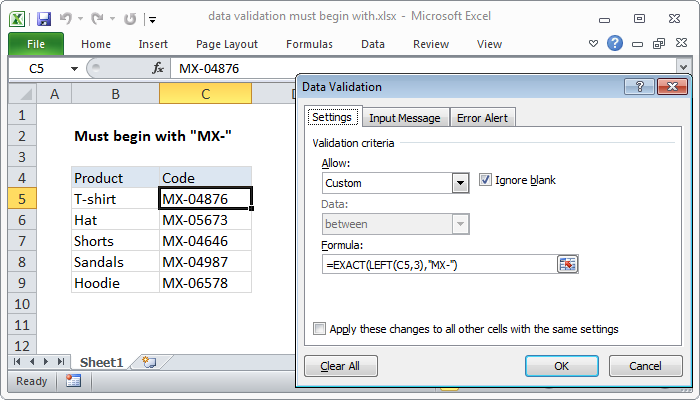
- In the Data Validation dialog, set Allow: to Custom.
- Enter a formula in the Formula: field. For example, to ensure a value entered in cell A2 is greater than 10:
=A2>10
⚠️ Note: Ensure your formula accounts for relative cell references if necessary.
3. Date and Time Validation

Time-sensitive data? Here’s how you can keep your dates and times in check:
- Under Data Validation, choose Date or Time in the Allow: field.
- Specify the criteria using the Data: dropdown. For example, to ensure a date is after today:
Between
- Set the Start date to =TODAY() and End date to a future date or leave it blank for any future date.
| Validation Type | Example |
|---|---|
| Date | Ensure a date is within the current financial year |
| Time | Limit working hours input to between 9am to 5pm |

4. Error Alert Messages

Don’t leave your users guessing when they input invalid data. Set up error alerts:
- After setting up validation, in the Data Validation dialog, click the Error Alert tab.
- Choose an Error Alert Style: (Stop, Warning, or Information).
- Provide a clear Title and Error Message for the user.
5. Using Conditional Formatting for Visual Validation

Sometimes, visual cues can be as effective as hard rules. Here’s how to visually highlight issues:
- Select the range to validate visually.
- Under Home, click on Conditional Formatting, then New Rule….
- Choose Use a formula to determine which cells to format.
- Enter a formula to check for invalid data (e.g., =A2=“Invalid Entry”).
- Set a Format that will alert the user, like bold red text or a background color.
As you've seen, Excel provides numerous tools to ensure your data meets the standards you require. From lists to custom formulas, from dates to visual alerts, these validation methods empower you to manage your data with precision and ease. By implementing these techniques, you'll reduce errors, streamline data entry, and increase the accuracy of your reports, analyses, and workflows.
Remember, validation not only helps in maintaining data integrity but also guides users in correctly inputting data, thereby reducing support queries and improving overall user experience.
How do I add multiple validation rules to one cell?

+
You can add multiple validation rules to one cell using the “Custom” option in Data Validation. Ensure your formula includes all conditions combined with logical operators like AND or OR.
Can validation be applied to multiple cells at once?

+
Yes, you can select multiple cells or a range before setting up validation. The rules will apply to all selected cells.
What if I need to remove or change validation rules?

+
Select the cells with the validation rules, go to Data Validation, and either clear all settings or modify them as needed.