Easily Add Checkboxes to Excel Sheets: A Simple Guide

If you've ever found yourself needing to manage tasks, track items, or simply organize your work in a visually intuitive way, you might have considered the utility of checkboxes in your Excel spreadsheets. Excel, widely recognized as the quintessential tool for data organization, now empowers users to enhance their data interaction through simple checkboxes. Here's a straightforward guide on how to add these elements to your spreadsheets, making them more interactive and functional.
Why Use Checkboxes in Excel?

- Clarity: Checkboxes provide a clear visual indicator of completion or selection, reducing confusion in data interpretation.
- Interactivity: Users can mark tasks or selections in real-time, which is particularly useful for collaborative environments or project management.
- Automation: They can be linked to formulas and conditional formatting, automating tasks like totaling selected items or highlighting completed entries.
Step-by-Step Guide to Adding Checkboxes in Excel

1. Prepare Your Excel Sheet

Before inserting checkboxes, ensure your Excel sheet is set up correctly:
- Have a clear column or row where you want the checkboxes to appear.
- Organize your data into clear, structured sections or lists.
2. Accessing the Developer Tab

To insert checkboxes, you'll first need to enable the Developer tab. Here's how:
- Go to Excel's File menu.
- Select Options.
- Navigate to Customize Ribbon.
- Under Main Tabs, check the box next to Developer.
- Click OK to apply the changes.
3. Inserting the Checkbox

With the Developer tab visible:
- Click on Developer.
- Within the Controls group, click on Insert.
- Choose Form Controls, and then select Checkbox.
- Draw the checkbox on your sheet by clicking and dragging your cursor.
4. Editing and Positioning Checkboxes

- Labeling: You can click on the text next to the checkbox to rename it or delete it for a cleaner look.
- Size and Placement: Adjust the size of the checkbox by clicking and dragging its corners. Move it by clicking and dragging from the center.
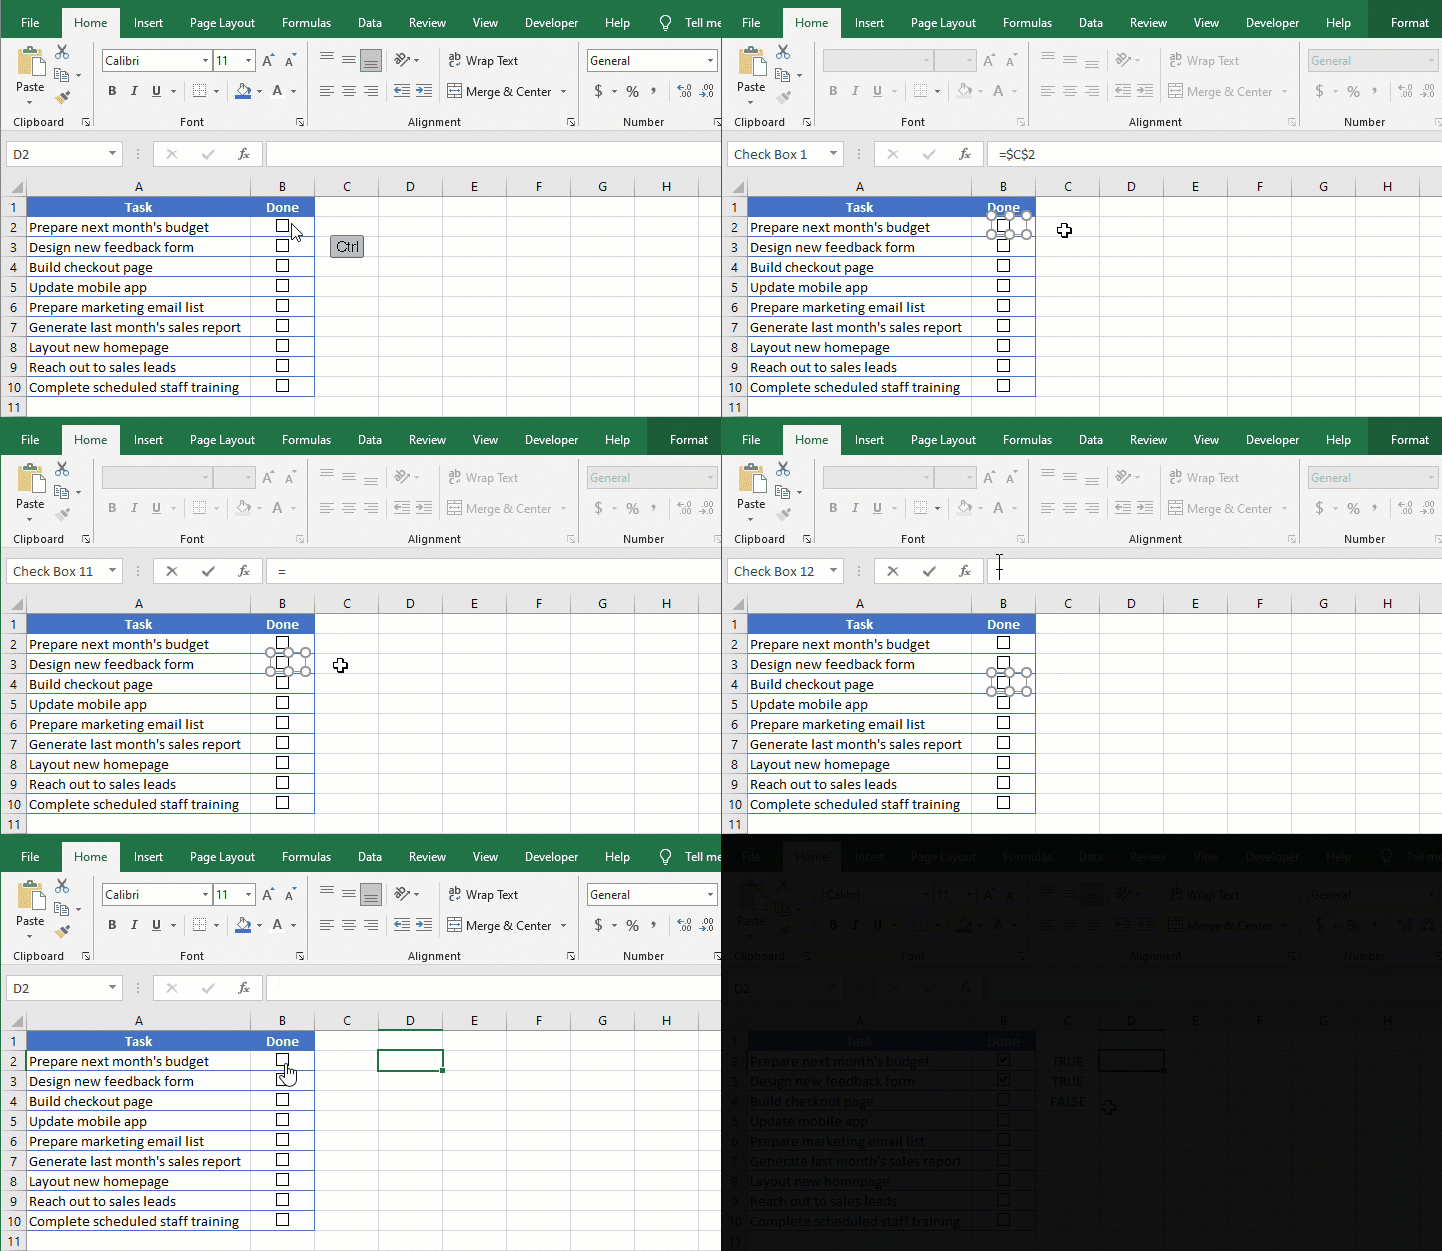
- Copying Checkboxes: Hold down Ctrl (Windows) or Cmd (Mac) and drag to replicate the checkbox.
5. Linking Checkboxes to Cells

Checkboxes gain real power when linked to cell values, allowing for dynamic interaction:
- Right-click on the checkbox.
- Select Format Control.
- Go to the Control tab.
- Click in the Cell link box and select the cell you want the checkbox to affect.
- Click OK.
Now, toggling the checkbox will change the linked cell's value to TRUE (checked) or FALSE (unchecked).
Advanced Uses of Checkboxes

Conditional Formatting

You can automate visual cues:
- Go to Home > Conditional Formatting.
- Set up rules where a cell linked to a checkbox changes color when checked.
Calculating Totals or Counts

Using formulas like SUMIF or COUNTIF can help calculate sums or counts based on checkbox states.
⚠️ Note: Remember, Excel's limits on form controls per workbook may affect sheets with many checkboxes.
Frequently Asked Questions

Can I use checkboxes for conditional formatting in Excel?

+
Yes, checkboxes can be linked to cells which can then be used in conditional formatting rules to change cell appearance based on the checkbox state.
How do I copy multiple checkboxes at once?

+
You can group select by holding down Ctrl or Cmd and clicking on multiple checkboxes, then dragging to copy them.
Can I hide the label of a checkbox in Excel?
+Yes, simply click on the text next to the checkbox and delete it. The checkbox will remain.
Is there a limit to the number of checkboxes I can add to an Excel sheet?
+Yes, Excel has a limit of around 32,000 form controls per workbook, which includes checkboxes. Keep this in mind for large datasets.
To wrap up, adding checkboxes to Excel sheets is more than just a visual enhancement; it’s about making your spreadsheets work for you. Whether you’re managing a project, tracking items, or automating tasks, checkboxes provide a simple yet powerful way to interact with your data. By following this guide, you’ve now equipped yourself with the tools to transform your data management experience, making it more interactive, efficient, and user-friendly. Remember to explore Excel’s conditional formatting and calculation capabilities to fully leverage the power of these interactive elements in your spreadsheets.