Add Borders to Excel Sheets Easily: Step-by-Step Guide

Ever struggled with customizing the appearance of your Excel spreadsheets to make your data more readable or to highlight important sections? Adding borders is one of the simplest yet most effective ways to enhance your Excel documents visually. Whether you're compiling financial reports, organizing sales data, or simply managing a to-do list, borders can significantly improve the aesthetics and functionality of your spreadsheets. Here's a comprehensive guide on how to add borders to Excel sheets in just a few steps.
Understanding the Importance of Borders in Excel

Before diving into the how-to, it’s beneficial to understand why borders are important:
- Visual Appeal: Borders make your data look organized and polished.
- Clarity: They help in delineating different sections or data sets, making it easier to read at a glance.
- Data Grouping: Borders can group related cells, simplifying data interpretation.
Step 1: Opening Microsoft Excel


Step 2: Selecting Cells for Borders

Decide on which cells need borders. Here’s how to select cells:
- Click and drag to select a range of cells.
- For non-adjacent cells, hold down the Ctrl key and click each cell individually.
- For entire columns or rows, click the column/row header.
Step 3: Accessing the Borders Menu

With cells selected, you can access the border options through various methods:
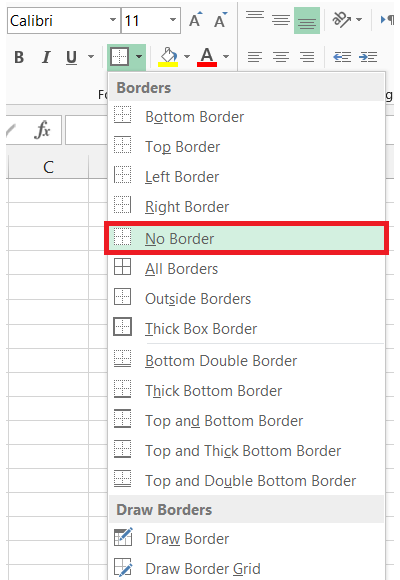
- Go to the Home tab on the ribbon. In the Font group, click the down arrow next to the border icon to reveal the border options.
- Right-click the selected cells, choose Format Cells, then navigate to the Border tab.
- Press Alt+H, B to open the borders menu via keyboard shortcut.
Step 4: Choosing Border Style and Color

Once you’ve accessed the borders menu, you’ll see various styles and colors:
- Line Style: Choose from a variety of lines including solid, dashed, or dotted.
- Color: Select from a palette of colors to match your spreadsheet’s design or company branding.
- Preset: Excel offers presets for different borders such as All Borders, Outer Borders, and Bottom Border.
⚠️ Note: Some border styles might not print as expected due to printer limitations. Always preview before printing.
Step 5: Applying Borders to Selected Cells

After selecting your border style and color, apply them by:
- Selecting a border type like All Borders or Thick Box Border to instantly apply to the selected cells.
- Using the Draw Border or Erase Border tools for custom border creation or removal.
Step 6: Reviewing and Adjusting Borders

Before finalizing your borders:
- Check the spreadsheet to ensure borders align with your data grouping intentions.
- If necessary, adjust border thickness or add/remove borders by repeating Steps 3-5.
Now that your Excel sheet has the perfect borders, it's easier to navigate and interpret the data. Remember, the simplicity of adding borders can greatly enhance the functionality of your spreadsheets, making your data presentation more professional and user-friendly.
FAQ Section

Can I customize the color of each border individually?

+
Yes, Excel allows you to apply different colors to different borders. You can change the color of each border using the Border Color selector in the Format Cells dialog box or through the Borders menu.
What if I want to remove all borders from my sheet?

+
To remove all borders at once, select the cells or entire sheet, go to the Home tab, click on the arrow next to Borders, and select “No Border.”
Are there shortcuts to quickly apply border styles?

+
Yes, Excel provides keyboard shortcuts for borders. For example, Alt+H, B, A will apply all borders. You can explore more in the Excel shortcut list.
How can I ensure my borders are printer-friendly?

+
Always preview your document before printing. If borders appear to be missing or faint, adjust the line style or weight to make them more visible on print. Also, check your printer settings for border and line options.