5 Ways to Securely Protect Your Excel Sheets

In a business environment where data security is paramount, protecting Excel sheets has become a critical skill. Excel, widely used for data analysis and storage, contains sensitive information that could be damaging if accessed by the wrong individuals. This blog post will guide you through 5 Ways to Securely Protect Your Excel Sheets, ensuring your data remains confidential and secure from unauthorized access.
1. Password Protect Your Excel File


One of the most straightforward methods to secure your Excel workbook is by setting a password to open it. Here’s how:
- Open the Excel workbook you wish to secure.
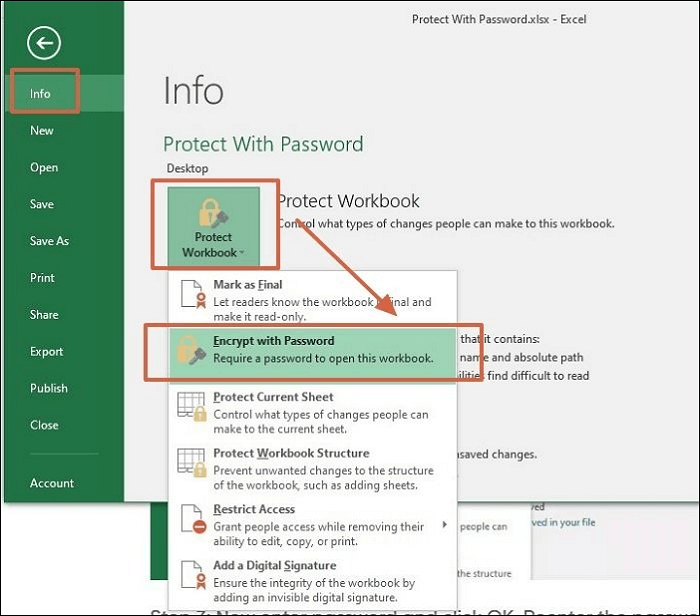
- Click on File > Info > Protect Workbook > Encrypt with Password.
- Type in a strong password and confirm it. Remember, a strong password should be at least 12 characters long, including numbers, letters, and special characters.
- Save your file. Now, anyone opening this file will need to enter the password you’ve set.
🔑 Note: Make sure to store your password in a secure location. If you forget your password, Microsoft does not provide a way to recover it, which means your data might be irretrievably lost.
2. Restrict Editing by Setting Permissions

While a password ensures only authorized individuals can open your file, you might also want to control who can edit the document:
- Go to File > Info > Protect Workbook > Restrict Editing.
- You can choose to allow or restrict certain actions like adding comments, or filling in forms.
- You can also set user-specific permissions if your organization uses Microsoft Rights Management services.
Remember, this feature is particularly useful in collaborative settings where not all users should have full editing capabilities.
3. Protect Specific Sheets or Cells


Instead of protecting the entire workbook, you might only need to protect specific sheets or even cells:
- Select the sheet or cells you want to protect.
- Go to the Review tab, then click on Protect Sheet or Protect Workbook for the entire workbook.
- Choose the protection options like allowing sorting, filtering, or selecting unlocked cells.
- Set a password if desired.
This approach is beneficial when you need to lock certain parts of the data while allowing others to interact with the rest.
4. Hide Formulas

To prevent others from seeing or accidentally altering your formulas:
- Select the cells containing the formulas.
- Right-click and choose Format Cells > Protection tab.
- Check the box for Hidden.
- Now protect the sheet as explained in the previous step.
Once you protect the sheet, the formulas will be hidden from view, and the only way to see them is by unprotecting the sheet with the password.
5. Use the ‘File Protection’ Option

For additional security layers, consider:
- Going to File > Info > Protect Workbook > Mark as Final.
- This option restricts editing by turning off typing, editing commands, and proofing marks, making the file read-only.
- Additionally, you can add a digital signature to verify the integrity of the workbook.
In today’s data-driven world, protecting your Excel sheets is not just about safeguarding information; it's about maintaining the integrity of your data analysis and business decisions. By implementing the methods discussed here, you create multiple layers of security that deter unauthorized access and editing. Remember, while these steps provide significant protection, combining them with regular backups, using secure systems, and maintaining up-to-date software can offer an even more robust defense against data breaches or losses.
What should I do if I forget the password for my Excel file?

+
Unfortunately, Microsoft does not provide a way to recover lost passwords. You’ll need to either remember the password or re-enter all the data into a new Excel file if no backup exists.
Can I change permissions for multiple users in Excel?

+
Yes, if your organization uses Microsoft Information Protection (formerly known as Azure Information Protection), you can set permissions for different users or groups to control who can view, edit, or print the workbook.
Is there a way to protect Excel sheets without using a password?

+
Yes, you can use the ‘Mark as Final’ feature to make the document read-only, which prevents changes but does not require a password. However, this isn’t as secure as using a password since it’s easy to override.