Print Multiple Excel Pages on One Sheet: Easy Guide

Mastering the Art of Printing Multiple Excel Pages on One Sheet

Working with Microsoft Excel often involves dealing with extensive datasets and managing numerous sheets within a single workbook. One of the practical skills that can significantly enhance productivity is learning how to print multiple Excel pages on one sheet. This guide will walk you through the steps to accomplish this task efficiently, ensuring that you can save paper, reduce clutter, and make your printed documents easier to manage.
Understanding Print Settings in Excel

Before diving into the method of printing multiple pages on one sheet, let's first understand the print settings in Excel:
- Page Layout: Controls the margins, orientation, and scaling of your document.
- Print Area: Defines which part of your spreadsheet you want to print.
- Scaling Options: These allow you to adjust how much content is displayed on a page.
Setting Up Your Excel Sheet for Printing

To prepare your Excel sheets for printing:
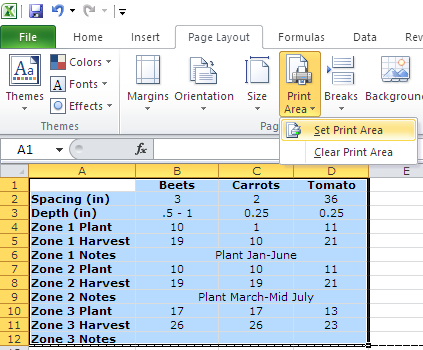
- Ensure all data is within the print area. Go to Page Layout > Print Area > Set Print Area.
- Check the page orientation. Go to Page Layout > Orientation and choose between portrait or landscape for the best fit.
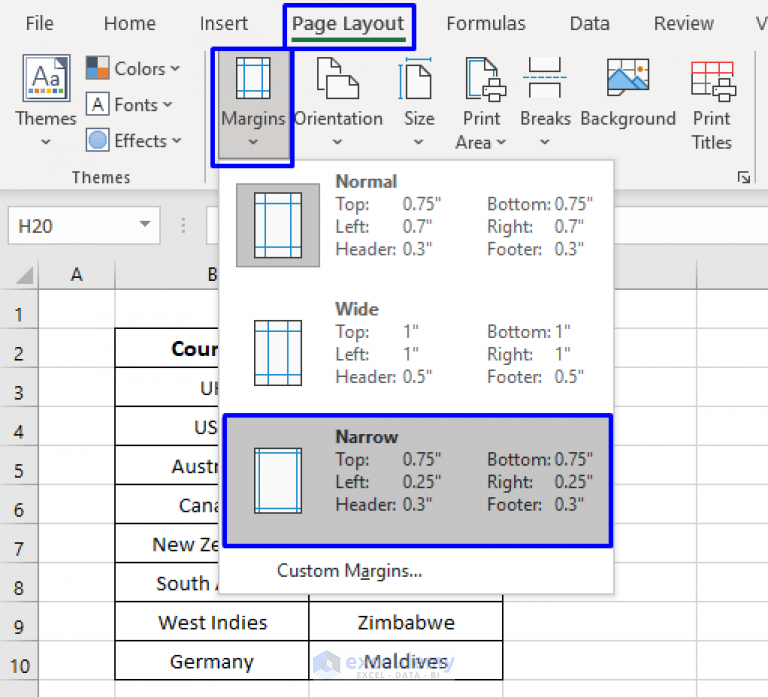
- Adjust page margins to minimize wasted space. Navigate to Page Layout > Margins.
Steps to Print Multiple Excel Pages on One Sheet

Here are the steps to print multiple Excel pages on one sheet:
Step 1: Adjust Scaling Options

In Excel, go to the 'Page Layout' tab:
- Select Page Setup from the Page Layout ribbon.
- Within the Page Setup dialog box, navigate to the 'Page' tab.
- Under 'Scaling', select 'Adjust to [percentage]% normal size' and reduce this percentage to fit multiple pages onto one.
Step 2: Preview Your Document

Use the 'Print Preview' feature to ensure your sheets fit appropriately:
- Click File > Print or press Ctrl + P to view the preview.
- Adjust the scaling further if necessary.
Step 3: Printing Your Document

Once satisfied with the layout:
- In the Print Preview window, select Print.
- Choose your printer settings and click Print to produce your document.
🔍 Note: Adjusting scaling might make text or charts smaller, potentially making them less readable. Ensure that the final output meets your readability requirements.
Advanced Tips for Printing

To optimize your printing experience:
- Use Fit to Page: This option forces content to fit on one page, potentially at the cost of readability. Found under Page Layout > Page Setup > Fit to.
- Set Print Titles: Use this feature to print the same row or column on every page if your document spans multiple pages.
- Consider the Gridlines: Print gridlines or not? They can help in reading data but might add unnecessary clutter.
FAQ Section

Why don't my pages fit on one sheet after scaling?

+
Sometimes, the content might be too large or complex for the scaling options to fit everything neatly. Consider reducing the size of charts or images, adjusting margins, or spreading the content over two sheets if necessary.
Can I print certain ranges from different sheets?

+
Yes, you can select specific print areas from different sheets within Excel. Use the 'Print Area' feature on each sheet and then print the whole workbook to have multiple pages on one sheet.
How can I avoid readability issues when scaling?

+
Try not to reduce the scale too much. If possible, focus on the most important data for printing or use a larger paper size like A3 if available. Also, check the 'Fit to Page' option for minimal readability loss.
In summary, learning how to print multiple Excel pages on one sheet can streamline your work process, reduce paper usage, and keep your documents organized. By mastering the print settings and scaling options within Excel, you can tailor your printouts to fit your needs, ensuring efficient use of resources while maintaining the necessary readability and clarity of your work. Remember to adjust for readability, consider the layout of your printout, and utilize advanced settings when necessary for the best results.